
Winterising your RV is essential to prevent costly damage from freezing temperatures. This guide walks you through every step—from draining water systems to storing batteries—so your camper stays safe and ready for spring adventures.
This is a comprehensive guide about How To Winterise An Rv.
In This Article
Key Takeaways
- Drain all water systems completely: This includes fresh water tanks, water heater, and plumbing lines to prevent ice expansion and pipe bursts.
- Use RV antifreeze in plumbing: Non-toxic antifreeze protects your water lines and fixtures from freezing during cold months.
- Remove or protect your battery: Cold drains battery life; store it indoors or use a maintainer to keep it charged.
- Seal and insulate vulnerable areas: Windows, vents, and underbelly need protection from drafts, moisture, and pests.
- Clean and store appliances properly: Refrigerators, stoves, and HVAC systems require special care to avoid mold and mechanical issues.
- Elevate tires and cover your RV: Prevent flat spots and UV damage with proper tire care and a breathable cover.
- Check local climate risks: Adjust your winterising steps based on how cold and snowy your storage area gets.
[FEATURED_IMAGE_PLACEHOLDER]
How to Winterise an RV
If you’re an RV owner, you already know that your home on wheels needs more than just a quick wash before it hibernates for the winter. Winterising an RV isn’t just a good idea—it’s a necessity. Without proper preparation, freezing temperatures can wreak havoc on your plumbing, appliances, and even the structural integrity of your rig. From cracked water lines to dead batteries, the damage can be expensive and time-consuming to fix.
But don’t worry. Winterising your RV doesn’t have to be overwhelming. With the right steps, tools, and a little patience, you can protect your investment and ensure your camper is ready to roll when spring arrives. Whether you’re storing your RV in your driveway, a storage lot, or a heated garage, this guide will walk you through the entire process—step by step. We’ll cover everything from draining your water system to sealing up vents, so you can rest easy knowing your RV is safe all winter long.
Why Winterising Your RV Is So Important
You might be thinking, “It’s just a few cold months—how bad can it really be?” The truth is, even a single night below freezing can cause serious damage. Water expands when it freezes, and that expansion can crack pipes, split water heaters, and ruin seals in your plumbing system. One burst pipe could flood your RV’s interior, leading to mold, rot, and thousands of dollars in repairs.
Beyond the plumbing, cold weather affects nearly every part of your RV. Batteries lose charge faster in the cold, tires can develop flat spots from sitting, and moisture buildup can lead to mildew and pests. Even your refrigerator and air conditioner aren’t immune—improper storage can shorten their lifespan.
Winterising isn’t just about avoiding damage; it’s about preserving the value and functionality of your RV. A well-maintained rig will last longer, perform better, and cost less in repairs over time. Plus, when you de-winterise in the spring, you’ll save hours of troubleshooting and get back on the road faster.
The Risks of Skipping Winterisation
Let’s talk about what happens when you skip winterising. Imagine waking up one morning to find your water pump won’t turn on. You check the pipes and discover a frozen, cracked line behind the sink. Or worse—your water heater has split open because residual water froze inside. These aren’t rare horror stories; they’re common outcomes for RVs that weren’t properly prepared.
Another risk is battery failure. Most RV batteries aren’t designed to sit idle in freezing temperatures. Cold slows down the chemical reactions inside, reducing their ability to hold a charge. By spring, your battery might be completely dead, requiring a costly replacement.
And don’t forget about pests. Mice and other critters love the warmth and shelter of an unused RV. Without proper sealing, they can chew through wires, nest in insulation, and leave behind droppings that create health hazards.
When to Winterise
Timing matters. You should winterise your RV before the first hard freeze—typically when nighttime temperatures consistently drop below 32°F (0°C). In most regions, this means late fall, but it varies by climate. If you live in a mild area like Southern California or Florida, you might get away with minimal winterising, but it’s still wise to take precautions.
If you plan to use your RV during the winter—say, for a ski trip or holiday camping—you may only need to “partial winterise” or use heating pads and insulated covers. But for long-term storage, full winterising is the way to go.
Step-by-Step Guide to Winterising Your RV
Now that you understand why winterising is crucial, let’s dive into the how. This step-by-step process covers all the essentials, from draining your water system to storing your battery. Follow these steps in order to ensure nothing is missed.
Gather Your Supplies
Before you start, make sure you have the right tools and materials. Here’s a checklist:
– Non-toxic RV antifreeze (typically pink, rated for potable water systems)
– Water pump converter kit or air compressor (optional but helpful)
– Funnel
– Bucket or container for draining
– Screwdrivers and wrenches
– Battery maintainer or trickle charger
– RV cover (breathable, waterproof)
– Duct tape or foam sealant
– Cleaning supplies (for fridge, stove, etc.)
– Gloves and safety glasses
Having everything ready will save you time and frustration. Most of these items can be found at RV supply stores, hardware stores, or online.
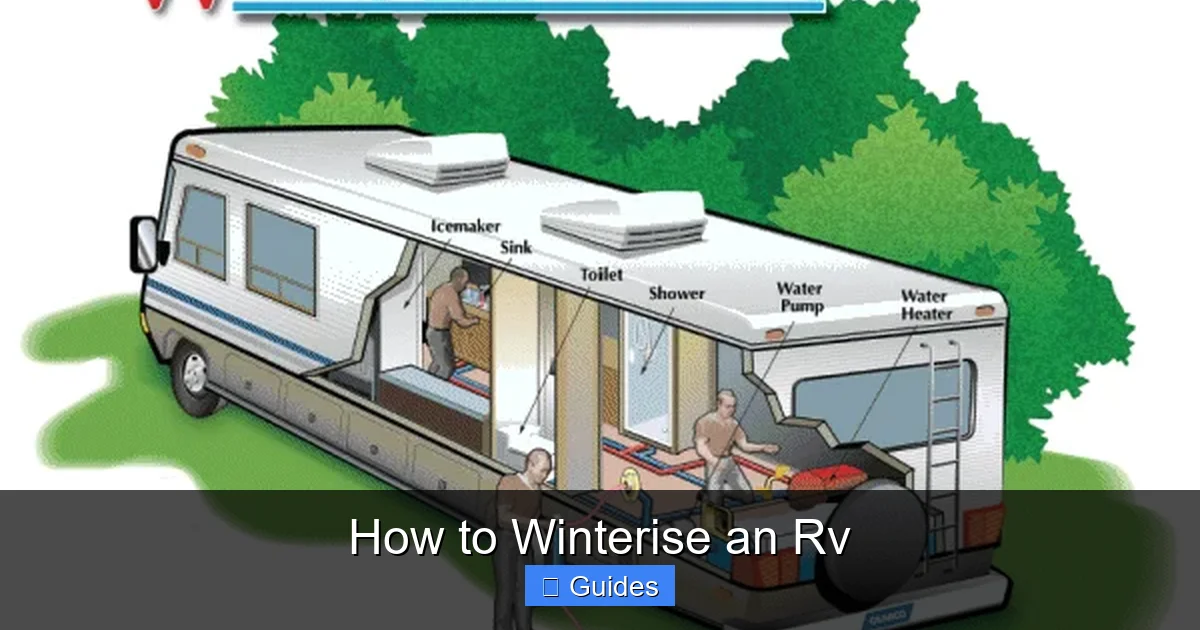
Drain All Water Systems
The first and most critical step is removing all water from your RV’s plumbing. Any water left in the system can freeze, expand, and cause cracks.
Start by turning off the water heater and allowing it to cool completely. Then, locate the drain plug (usually on the bottom) and open it to let the water out. Some models also have an anode rod that can be removed to speed up drainage.
Next, open all faucets—both indoor and outdoor—including the shower, sink, and toilet. Don’t forget the low-point drain valves, which are designed to release water from the lowest points in your plumbing. These are often located under the RV and labeled “hot” and “cold.”
Flush the toilet several times to empty the water from the flush valve. If your RV has a water filter, remove and drain it as well.
Blow Out the Lines (Optional but Recommended)
For extra protection, many RVers use an air compressor to blow out remaining water from the pipes. This step isn’t mandatory, but it helps ensure no droplets are left behind.
Attach the compressor to the city water inlet using a blow-out plug or adapter. Set the pressure to around 30–40 PSI—too high can damage seals. Turn on the compressor and open each faucet one at a time, starting with the one farthest from the inlet. Listen for air to come out steadily, then close the faucet. Repeat for all fixtures, including the toilet and outdoor shower.
This method is faster and uses less antifreeze, but it requires some skill and the right equipment. If you’re not comfortable doing this, skip to the antifreeze step.
Add RV Antifreeze to the Plumbing
Once the lines are drained (and optionally blown out), it’s time to add antifreeze. This is the most reliable way to protect your plumbing from freezing.
Start by bypassing the water heater. Most RVs have a bypass valve that prevents antifreeze from entering the tank. If yours doesn’t, you’ll need to install one or manually close the valves leading to the heater.
Next, use your water pump to draw antifreeze into the system. Pour the antifreeze into the fresh water tank, then turn on the pump. Open each faucet one at a time, starting with the one closest to the pump. Let the pink antifreeze run until it comes out of the faucet, then close it. Don’t forget the shower, toilet, and outdoor shower.
Pour a small amount of antifreeze directly into each drain trap (sink, shower, etc.) to protect the P-traps. For the toilet, flush it until antifreeze appears in the bowl.
Drain and Protect the Water Heater
Your water heater is especially vulnerable to freezing. After draining it, leave the drain plug off and the pressure relief valve open to allow air circulation. This prevents moisture buildup and reduces the risk of cracking.
If your water heater has an electric element, make sure it’s turned off and unplugged. Some models also have a winterising cap that replaces the anode rod—use this if available.
Empty and Clean the Fresh and Waste Tanks
Don’t forget about your holding tanks. Empty the black (toilet) and gray (sink/shower) tanks at a dump station. Rinse them thoroughly with a tank rinser or flush system.
Add a little antifreeze to the black tank to prevent freezing in the valve area. You can also use a tank treatment to break down residue and reduce odors.
Battery Care and Electrical Systems
Your RV’s battery is one of the most sensitive components during winter storage. Cold temperatures reduce its capacity and can lead to permanent damage if it discharges too low.
Remove or Maintain the Battery
If possible, remove the battery and store it indoors in a cool, dry place—never in a freezing garage or shed. Use a battery maintainer or trickle charger to keep it at full charge. These devices provide a low, steady charge that prevents sulfation without overcharging.
If you can’t remove the battery, disconnect it and use a maintainer designed for outdoor use. Check the charge level monthly and recharge if it drops below 50%.
Turn Off All Electrical Systems
Unplug your RV from shore power and turn off all breakers. This prevents phantom drains and reduces the risk of electrical fires.
If your RV has a propane system, turn off the gas supply at the tank. Some RVers also install a propane leak detector for added safety.
Appliances and Interior Protection
Your RV’s interior needs attention too. Appliances, cabinets, and upholstery can all be affected by cold, moisture, and pests.
Refrigerator and Freezer
Clean the fridge and freezer thoroughly. Remove all food, wipe down shelves, and leave the doors slightly open to prevent mold and odors. If your fridge has a drain plug, open it to let moisture escape.
For absorption refrigerators, make sure the unit is level and the cooling coils are clean. Some owners use a refrigerator vent cover to keep critters out.
Stove and Oven
Clean the stove and oven to remove grease and food particles. Turn off the gas supply and disconnect the propane line if possible. Store matches or lighters separately.
HVAC and Ventilation
Cover roof vents with vent covers to keep out rain, snow, and animals. Use foam weatherstripping around windows and doors to seal drafts.
If your RV has a furnace, inspect the intake and exhaust vents for blockages. Some RVers use furnace filters or covers to prevent dust buildup.
Exterior and Tire Care
The outside of your RV is exposed to the elements all winter. Proper care prevents damage and extends its life.
Wash and Wax the Exterior
Give your RV a thorough wash to remove dirt, grime, and road salt. Apply a coat of wax to protect the paint and finish from UV damage and moisture.
Inspect and Seal Seams
Check the roof, windows, and seams for cracks or gaps. Use RV sealant to repair any leaks. Pay special attention to the roof—water intrusion is a common cause of mold and rot.
Protect the Tires
Inflate tires to the recommended pressure. If your RV will be sitting for months, consider using tire covers to prevent dry rot from UV exposure. For long-term storage, elevate the tires off the ground using jack stands or tire cradles to prevent flat spots.
Cover Your RV
Use a high-quality, breathable RV cover to protect against snow, ice, and UV rays. Avoid plastic tarps—they trap moisture and can cause mold. Make sure the cover is securely fastened to prevent wind damage.
Final Checks and Spring Reopening
Before you walk away, do a final walk-through. Double-check that all water is drained, antifreeze is in place, and all systems are off. Lock all doors and windows.
In the spring, reverse the process: flush out the antifreeze, refill the water heater, reconnect the battery, and test all systems. It’s also a good idea to inspect for pests and clean the interior before your first trip.
Frequently Asked Questions
Can I winterise my RV myself?
Yes, most RVers winterise their own rigs using basic tools and supplies. It’s a straightforward process that saves money compared to professional services. Just follow the steps carefully and double-check your work.
How much RV antifreeze do I need?
You’ll typically need 2 to 3 gallons of non-toxic antifreeze, depending on your RV’s size and plumbing layout. Smaller trailers may use less, while larger motorhomes may require more.
Do I need to winterise if I live in a warm climate?
Even in mild areas, occasional cold snaps can occur. It’s still wise to drain water systems and protect batteries. Full winterising may not be necessary, but basic precautions are recommended.
Can I use regular antifreeze in my RV?
No. Automotive antifreeze is toxic and not safe for potable water systems. Always use non-toxic, RV-specific antifreeze labeled for drinking water systems.
How long can an RV sit over winter?
An RV can safely sit for several months if properly winterised. Just check on it periodically to ensure the cover is secure and no pests have moved in.
What if I forget to winterise one year?
Inspect your RV immediately for damage. Check for frozen pipes, cracked seals, or water leaks. If you find issues, thaw the rig slowly and assess repairs before using it again.

At CarLegit, we believe information should be clear, factual, and genuinely helpful. That’s why every guide, review, and update on our website is created with care, research, and a strong focus on user experience.