
Tree sap on your car isn’t just unsightly—it can damage paint if left untreated. This guide walks you through safe, effective removal methods using household items and professional products, plus tips to prevent future buildup.
In This Article
- 1 Key Takeaways
- 2 📑 Table of Contents
- 3 Why Tree Sap Is a Problem for Your Car
- 4 How to Identify Tree Sap on Your Car
- 5 Immediate Steps to Take When You Notice Tree Sap
- 6 Safe and Effective Methods to Remove Tree Sap
- 7 What NOT to Do When Removing Tree Sap
- 8 How to Prevent Tree Sap from Sticking to Your Car
- 9 Post-Removal Care: Washing, Waxing, and Inspection
- 10 Frequently Asked Questions
Key Takeaways
- Act quickly: The sooner you remove tree sap, the less likely it is to bond with your car’s paint and cause permanent damage.
- Use the right tools: Avoid abrasive scrubbers; opt for microfiber cloths, plastic scrapers, and gentle solvents to protect your finish.
- Try household solutions first: Rubbing alcohol, hand sanitizer, or vinegar can dissolve sap without harming clear coat.
- Commercial products work well: Dedicated tar and sap removers are fast and safe when used correctly.
- Wash and wax after removal: Always follow up with a thorough wash and wax to restore protection and shine.
- Prevent future sap buildup: Park away from trees, use a car cover, or apply a ceramic coating for long-term defense.
- Test any cleaner first: Always do a spot test on a small, inconspicuous area to avoid unexpected damage.
📑 Table of Contents
- Why Tree Sap Is a Problem for Your Car
- How to Identify Tree Sap on Your Car
- Immediate Steps to Take When You Notice Tree Sap
- Safe and Effective Methods to Remove Tree Sap
- What NOT to Do When Removing Tree Sap
- How to Prevent Tree Sap from Sticking to Your Car
- Post-Removal Care: Washing, Waxing, and Inspection
Why Tree Sap Is a Problem for Your Car
If you’ve ever parked under a pine, maple, or fir tree, you’ve probably come back to find sticky, amber-colored globs on your windshield, hood, or roof. That’s tree sap—and while it might look harmless, it’s anything but. Tree sap is a natural resin secreted by trees to seal wounds, fight pests, or respond to environmental stress. But when it lands on your car, it becomes a sticky, stubborn invader that can wreak havoc on your vehicle’s appearance and paint integrity.
The real danger lies in what happens over time. Fresh sap is soft and easier to remove, but as it dries and hardens, it bonds tightly with your car’s clear coat. If left untreated, it can etch into the paint, causing discoloration, dullness, or even permanent staining. Worse, if you try to scrape it off with a fingernail or credit card, you risk scratching the surface. And because sap often falls on horizontal surfaces like the roof and hood—areas exposed to sun and heat—it can bake into the finish, making removal even tougher.
But don’t panic. With the right approach, you can safely and effectively remove tree sap without damaging your car. The key is acting fast, using the correct tools, and avoiding aggressive methods that do more harm than good. Whether you’re dealing with a single drop or a full sap storm, this guide will walk you through every step—from immediate cleanup to long-term prevention.
How to Identify Tree Sap on Your Car
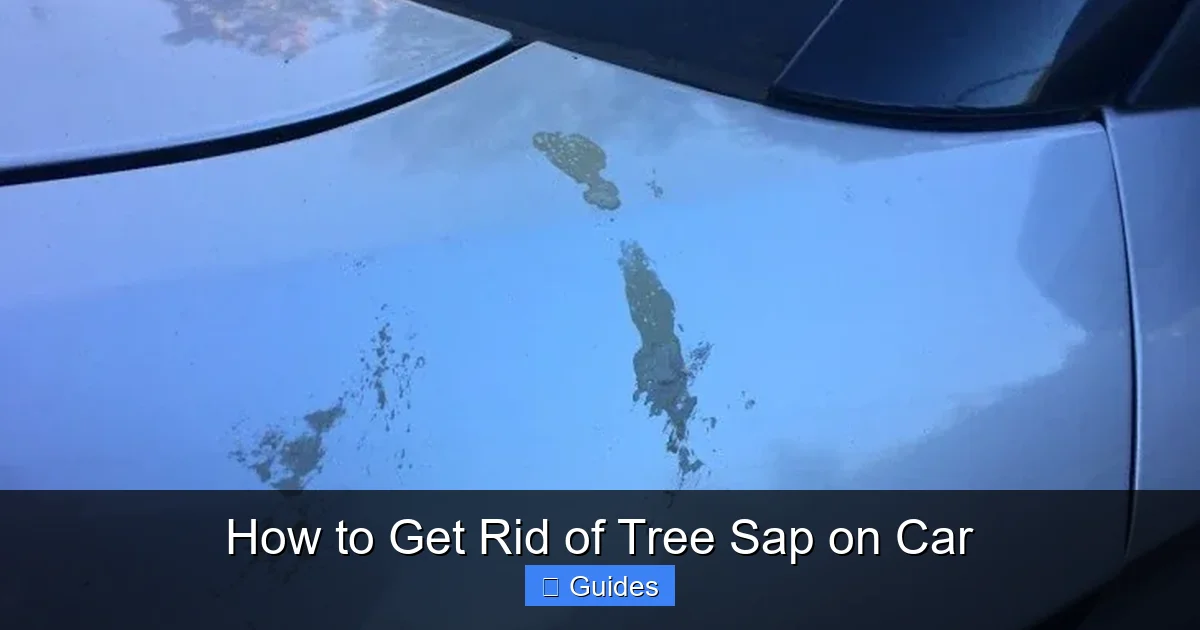
Visual guide about How to Get Rid of Tree Sap on Car
Image source: motoroomph.com
Before you start scrubbing, it’s important to confirm that what you’re dealing with is actually tree sap. While sap is the most common culprit, other substances like bird droppings, bug splatter, or industrial fallout can look similar. Misidentifying the substance could lead to using the wrong cleaning method—and potentially damaging your paint.
Tree sap typically appears as small, translucent or amber-colored droplets. They’re often sticky to the touch and may have a slightly glossy sheen. You’ll usually find them on the roof, hood, windshield, or trunk—places directly under overhanging branches. Fresh sap is soft and gooey, while older sap becomes hard and brittle. It may also attract dirt and dust, making it look darker or dirtier over time.
One quick way to test if it’s sap is to gently press it with your fingernail. If it gives slightly and feels tacky, it’s likely fresh sap. If it’s hard and doesn’t budge, it’s probably dried. You can also use a flashlight to check for a glassy appearance—sap often reflects light differently than paint or dirt.
It’s also worth noting that not all sticky residues are sap. Bird droppings, for example, are acidic and can eat into paint if not removed quickly, but they usually have a white or chalky center. Bug splatter tends to be flatter and more spread out. Industrial fallout—like soot or metal particles—often appears as tiny dark specks that cling to the surface.
Once you’ve confirmed it’s tree sap, you can move forward with confidence. The next step is choosing the right removal method based on how long it’s been there and what tools you have on hand.
Immediate Steps to Take When You Notice Tree Sap
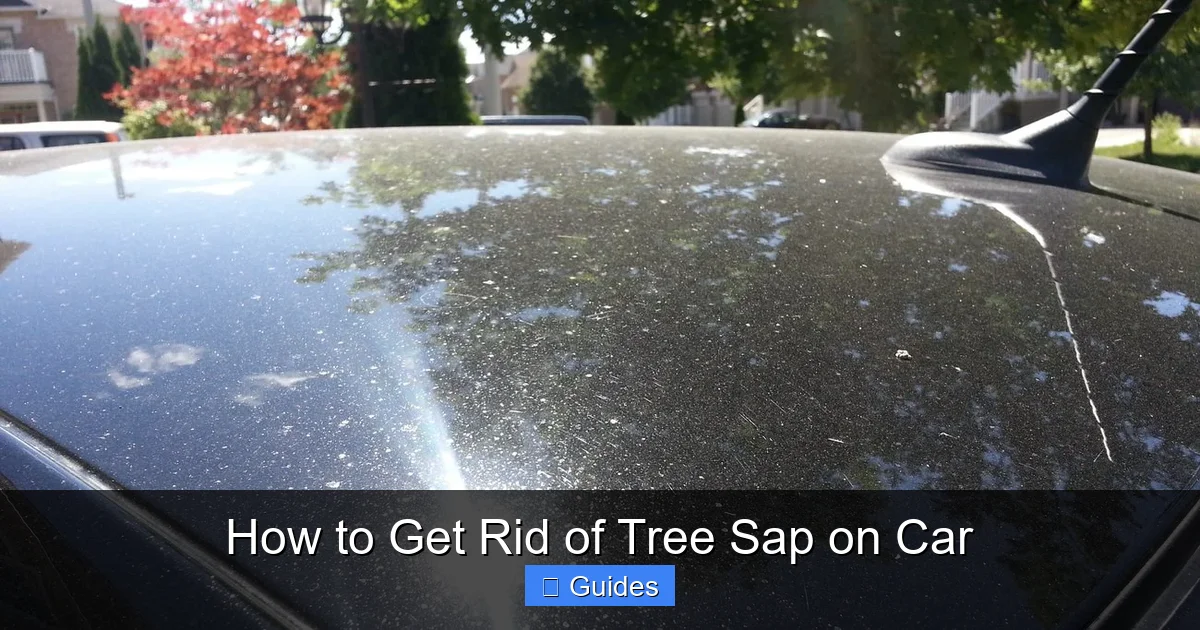
Visual guide about How to Get Rid of Tree Sap on Car
Image source: cjsautobling.com
The moment you spot tree sap on your car, your first instinct might be to wipe it off with a rag or your sleeve. But that’s a mistake. Rubbing sap without lubrication can grind it into the paint, creating micro-scratches or spreading it further. Instead, follow these immediate steps to minimize damage and set yourself up for a successful removal.
Step 1: Don’t Panic—But Don’t Wait
Tree sap is most vulnerable in the first 24 to 48 hours. The longer it sits, the harder it becomes and the more it bonds with your car’s clear coat. So while you don’t need to drop everything and run to the garage, do make it a priority. If you’re at home, tackle it that day. If you’re on the road, note the location and plan to clean it as soon as you get home.
Step 2: Rinse the Area
Start by rinsing the affected area with clean water. Use a hose or a bucket of water to gently wash away loose dirt and debris. This prevents scratching when you begin the removal process. Avoid high-pressure washers, as they can force sap particles deeper into the paint or damage seals around windows.
Step 3: Apply a Lubricant
Never scrape or rub sap dry. Instead, apply a lubricant to soften it and reduce friction. A few drops of soapy water, car wash shampoo, or even a bit of hand sanitizer can work. Let it sit for a minute or two to penetrate the sap. This makes it easier to lift off without scratching.
Step 4: Use a Soft Cloth or Sponge
Gently blot or wipe the sap with a soft microfiber cloth or sponge. Don’t scrub aggressively—let the lubricant do the work. If the sap is fresh, it may come off with minimal effort. For older sap, you might need to repeat the process or move on to a stronger solution.
Step 5: Dry and Inspect
Once the sap is gone, dry the area with a clean microfiber towel. Check under good lighting to make sure all residue is removed. If you see any remaining spots, don’t force them—try a different method rather than risking paint damage.
By acting quickly and gently, you’ll save yourself time and trouble down the road. And remember: the sooner you remove the sap, the better your chances of avoiding permanent damage.
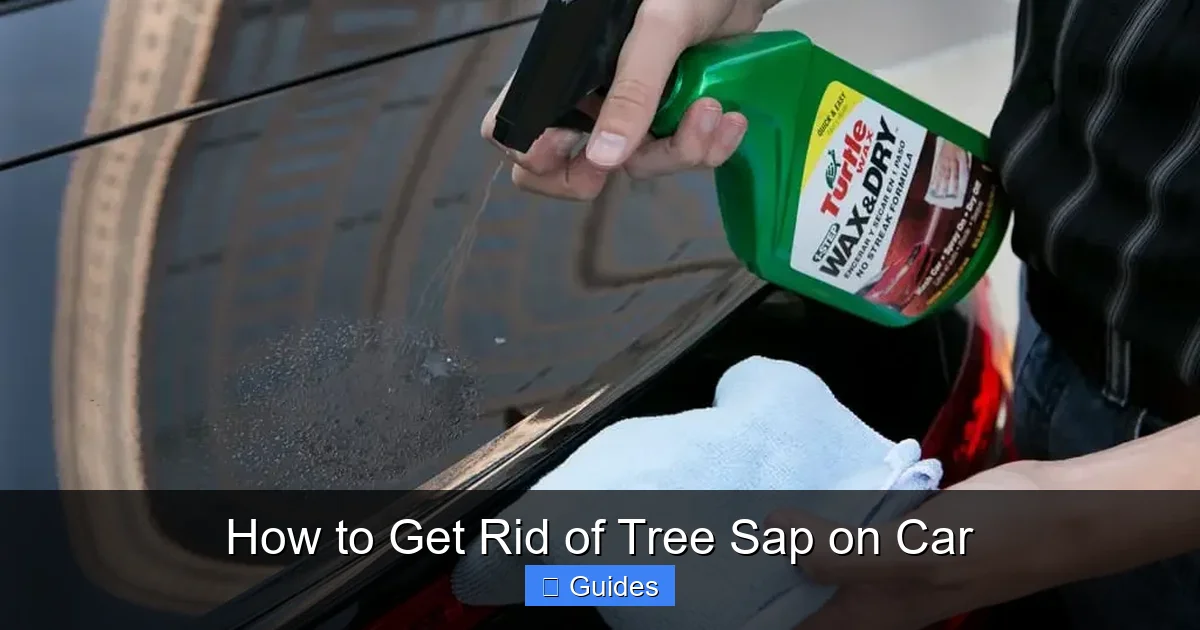
Safe and Effective Methods to Remove Tree Sap
Visual guide about How to Get Rid of Tree Sap on Car
Image source: classiccarmaintenance.com
Now that you’ve identified the sap and taken initial steps, it’s time to choose a removal method. The best approach depends on how long the sap has been there, what tools you have, and how much you’re willing to spend. Below are six proven methods—from household hacks to professional-grade solutions—that are safe for your car’s paint when used correctly.
Method 1: Rubbing Alcohol (Isopropyl Alcohol)
Rubbing alcohol is one of the most effective and accessible solvents for dissolving tree sap. It breaks down the resin without harming most automotive clear coats, especially when used properly.
To use rubbing alcohol:
– Soak a cotton ball or soft cloth in 70% or higher isopropyl alcohol.
– Gently press it onto the sap for 30–60 seconds to soften it.
– Wipe gently in one direction—don’t scrub back and forth.
– Repeat if necessary, then rinse and dry.
Tip: Always test on a small, hidden area first. Alcohol can dry out rubber seals or trim over time, so avoid letting it pool around edges.
Method 2: Hand Sanitizer
If you don’t have rubbing alcohol, hand sanitizer is a great alternative. Most contain alcohol and glycerin, which help dissolve sap while adding lubrication.
Apply a small amount to a microfiber cloth and dab it onto the sap. Let it sit for a minute, then wipe gently. The glycerin helps prevent scratching, making this method especially good for delicate areas like windshields.
Method 3: White Vinegar
White vinegar is a mild acid that can break down sap over time. It’s less aggressive than alcohol, so it’s a good choice if you’re concerned about paint sensitivity.
Mix equal parts white vinegar and water. Soak a cloth in the solution and place it over the sap for 5–10 minutes. This gives the vinegar time to penetrate. Then, wipe gently with a clean cloth. Rinse thoroughly afterward, as vinegar can dull wax if left on.
Method 4: Commercial Tar and Sap Removers
For stubborn or old sap, a dedicated product like Goo Gone Automotive, 3M Adhesive Remover, or Turtle Wax Bug and Tar Remover can be a game-changer. These are formulated specifically for automotive use and are safe on paint when used as directed.
Apply a small amount to a microfiber cloth—not directly to the car—and gently rub the sap. Most will dissolve within seconds. Wipe clean, then wash the area to remove any residue.
Always follow the manufacturer’s instructions and avoid using these products on plastic trim or rubber, as they can cause discoloration.
Method 5: Clay Bar Treatment
A clay bar is a detailing tool that lifts contaminants—including sap—from the surface of your paint. It’s especially useful for older, embedded sap that solvents can’t fully remove.
To use a clay bar:
– Wash and dry the car thoroughly.
– Knead the clay bar to soften it.
– Spray a lubricant (clay lube or quick detailer) on the affected area.
– Glide the clay bar back and forth over the sap until it’s gone.
– Wipe clean and inspect.
Clay bars are safe and effective but require more time and effort. They’re best for detailed cleaning after initial sap removal.
Method 6: Plastic Razor Blade
For very hard, dried sap, a plastic razor blade can be used to gently scrape it off. Unlike metal blades, plastic ones won’t scratch paint if used correctly.
Hold the blade at a shallow angle (15–30 degrees) and scrape in one direction. Use a lubricant like soapy water or quick detailer to reduce friction. Work slowly and stop if you feel resistance.
Never use a metal razor blade on painted surfaces—it will scratch.
What NOT to Do When Removing Tree Sap
While there are many safe ways to remove tree sap, there are also plenty of common mistakes that can do more harm than good. Avoid these pitfalls to protect your car’s finish and save yourself from costly repairs.
Avoid Using Household Cleaners Like Windex or Bleach
Many people reach for glass cleaners like Windex, thinking they’ll dissolve the sap. But these products often contain ammonia or alcohol in concentrations that can strip wax, dry out seals, or even damage paint over time. Bleach is even worse—it’s highly corrosive and can discolor or etch your car’s finish.
Stick to cleaners specifically designed for automotive use or mild household alternatives like vinegar or rubbing alcohol.
Don’t Use Abrasive Tools or Scrubbers
Steel wool, rough sponges, or abrasive pads might seem like a quick fix, but they’ll leave swirl marks and scratches on your paint. Even a stiff-bristled brush can cause micro-scratches that dull the finish over time.
Always use soft microfiber cloths, sponges, or plastic tools designed for car care.
Never Scrape Dry
Scraping sap without lubrication is one of the biggest mistakes. Dry scraping grinds the sap into the paint, creating scratches and spreading residue. Always use a lubricant—soap, water, or a dedicated cleaner—to cushion the surface.
Don’t Use Heat Guns or Hair Dryers
Some people try to melt sap with heat, but this can damage your paint, warp panels, or even crack glass. Automotive paint isn’t designed to handle high heat, and the risk far outweighs any benefit.
If sap is deeply embedded, use a clay bar or professional remover instead.
Avoid Harsh Solvents Like Acetone or Nail Polish Remover
Acetone is a powerful solvent found in nail polish remover, but it’s too strong for car paint. It can dissolve clear coat, strip wax, and leave permanent damage. Never use it on your vehicle.
Stick to gentler alternatives like rubbing alcohol or commercial sap removers.
By avoiding these common errors, you’ll keep your car looking its best and avoid unnecessary repairs.
How to Prevent Tree Sap from Sticking to Your Car
The best way to deal with tree sap is to stop it from landing on your car in the first place. While you can’t control where trees drip, you can take smart steps to minimize exposure and make future cleanups easier.
Choose Your Parking Spot Wisely
The simplest prevention method is parking away from sap-producing trees. Pine, spruce, fir, maple, and sweetgum trees are common culprits. If you must park under trees, try to find a spot with minimal overhang or use a covered garage.
If you’re in a parking lot, look for signs of sap on other cars—amber droplets or sticky patches are dead giveaways.
Use a Car Cover
A high-quality car cover is one of the most effective defenses against sap, bird droppings, and UV damage. Look for a breathable, waterproof cover that fits your vehicle snugly. Remove it regularly to prevent moisture buildup underneath.
For daily use, a lightweight, foldable cover is convenient. For long-term storage, consider a padded or custom-fit model.
Apply a Protective Coating
Wax, sealant, or ceramic coating creates a barrier that makes sap easier to remove and less likely to bond with your paint. Wax needs reapplication every few months, while ceramic coatings can last years.
A good coating not only repels sap but also enhances shine and protects against UV rays, oxidation, and environmental contaminants.
Wash Your Car Regularly
Regular washing removes sap before it has a chance to harden. Aim to wash your car every two weeks, or more often if you park under trees. Use a pH-balanced car shampoo and a two-bucket method to avoid scratching.
After washing, inspect your car for new sap spots—early detection makes removal much easier.
Use a Quick Detailer Between Washes
A spray-on quick detailer can help lift light sap and restore shine between washes. Keep one in your car for on-the-go touch-ups. Just spray, wipe, and go.
Post-Removal Care: Washing, Waxing, and Inspection
Once you’ve successfully removed the tree sap, your job isn’t quite done. Sap removal can strip away wax and expose your paint to the elements. Follow these steps to restore protection and keep your car looking its best.
Wash the Area Thoroughly
After removing sap, wash the affected area with car shampoo and water. This removes any leftover solvent, residue, or debris. Use a microfiber wash mitt and rinse thoroughly.
Inspect for Damage
Check the area under good lighting. Look for scratches, dull spots, or etching. If the paint feels rough or looks cloudy, it may need polishing.
Apply Wax or Sealant
Wax restores shine and adds a protective layer. Apply a thin, even coat using a foam applicator pad. Let it haze, then buff off with a clean microfiber towel.
For longer-lasting protection, consider a synthetic sealant or ceramic coating.
Polish if Necessary
If sap has caused light etching or dullness, use a fine polish with a dual-action polisher or by hand. This removes a microscopic layer of clear coat to restore clarity. Follow with wax to protect the fresh surface.
Schedule Regular Maintenance
Make sap removal part of your regular car care routine. Check for new spots weekly, especially during spring and summer when trees are most active.
Frequently Asked Questions
Can tree sap damage my car’s paint?
Yes, if left untreated, tree sap can bond with your car’s clear coat and cause etching, discoloration, or permanent staining. The longer it sits, the greater the risk of damage.
Is it safe to use WD-40 to remove tree sap?
WD-40 can help loosen sap, but it’s not designed for paint care. It may leave an oily residue and isn’t as effective as dedicated sap removers. Use it sparingly and always wash the area afterward.
Can I use a metal scraper to remove sap?
No, metal scrapers can scratch your paint. Always use a plastic razor blade or soft cloth with a lubricant to avoid damage.
How often should I check for tree sap?
Check your car weekly, especially if you park under trees. Early detection makes removal easier and reduces the risk of paint damage.
Will tree sap come off in the rain?
Rain may soften fresh sap slightly, but it won’t remove it. Hardened sap won’t budge with water alone—you’ll need a solvent or cleaner.
Can I prevent tree sap with wax?
Yes, wax creates a protective barrier that makes sap easier to remove and less likely to stick. Regular waxing is a simple and effective prevention method.

At CarLegit, we believe information should be clear, factual, and genuinely helpful. That’s why every guide, review, and update on our website is created with care, research, and a strong focus on user experience.