

Installing a Kicker 2004 subwoofer to a stock car stereo is easier than you think—no need for a full system overhaul. With the right tools, wiring, and a few simple steps, you can dramatically improve your car’s bass and overall sound quality without breaking the bank.
So, you’ve got a Kicker 2004 subwoofer sitting in your garage, and you’re ready to give your car’s audio system a serious upgrade—but you don’t want to rip out your factory stereo. Good news: you don’t have to! Many car owners assume that adding a subwoofer means replacing the entire head unit, but that’s not true. With a little know-how and the right gear, you can install a Kicker 2004 to your stock car stereo and enjoy deep, powerful bass without losing your factory features like steering wheel controls, Bluetooth, or navigation.
The Kicker 2004 is a compact, high-performance 10-inch subwoofer known for its crisp bass response and durability. It’s a popular choice for car audio enthusiasts who want more punch without sacrificing trunk space. But here’s the catch: most factory stereos aren’t built to drive a subwoofer directly. They lack the necessary outputs and power. That’s where smart installation techniques come in. By using tools like a line output converter and a compatible amplifier, you can integrate the Kicker 2004 seamlessly into your existing setup.
In this guide, we’ll walk you through every step of the process—from planning your installation to fine-tuning the sound. Whether you’re a weekend DIYer or a first-time installer, we’ll keep things simple, clear, and jargon-free. By the end, you’ll have a thumping bass system that turns heads and makes every drive feel like a concert on wheels.
In This Article
- 1 Key Takeaways
- 2 📑 Table of Contents
- 3 Understanding Your Stock Car Stereo and the Kicker 2004
- 4 Gathering the Right Tools and Components
- 5 Step-by-Step Installation Process
- 6 Wiring Tips and Common Mistakes to Avoid
- 7 Tuning Your System for Best Sound
- 8 Final Checks and Maintenance
- 9 Frequently Asked Questions
- 9.1 Can I install a Kicker 2004 without replacing my stock stereo?
- 9.2 Do I need a special enclosure for the Kicker 2004?
- 9.3 What size amplifier should I use with the Kicker 2004?
- 9.4 Will installing a subwoofer drain my car battery?
- 9.5 Can I install the Kicker 2004 myself, or do I need a professional?
- 9.6 Why is there a humming noise after installation?
Key Takeaways
- Check compatibility first: Ensure your stock stereo can support a subwoofer via RCA outputs or speaker-level inputs.
- Use a line output converter (LOC): This device lets you connect the Kicker 2004 to factory speakers when RCA jacks aren’t available.
- Proper power wiring is essential: Run a dedicated power cable from the battery with an inline fuse for safety and performance.
- Ground the amplifier securely: A clean, metal-to-metal ground connection prevents noise and ensures stable operation.
- Tune your settings carefully: Adjust gain, crossover, and phase to match your music and avoid distortion.
- Secure all components: Mount the sub and amp safely to prevent damage while driving.
- Test before finalizing: Always do a sound check and troubleshoot any issues before closing up panels.
📑 Table of Contents
Understanding Your Stock Car Stereo and the Kicker 2004
Before you start drilling holes or running wires, it’s important to understand what you’re working with. Your stock car stereo—also known as the factory head unit—is designed to power the car’s original speakers, usually ranging from 4 to 6 inches in size. These speakers handle midrange and high frequencies well, but they simply can’t reproduce deep bass. That’s where the Kicker 2004 comes in.
The Kicker 2004 is a 10-inch subwoofer with a peak power handling of 400 watts and an RMS rating of 200 watts. It’s built to deliver tight, accurate bass that complements your existing speakers. But here’s the thing: your stock stereo likely doesn’t have a dedicated subwoofer output (RCA jacks). Instead, it sends audio signals through speaker wires. To connect the Kicker 2004, you’ll need an amplifier—and a way to feed that amplifier a clean audio signal.
That’s where compatibility comes into play. Most modern factory stereos can support a subwoofer installation, but you’ll need to check a few things first. Look for RCA output jacks on the back of your head unit. If you see them, you’re in luck—you can connect your amplifier directly. But if not (which is common in many vehicles), you’ll need a line output converter (LOC). This small device converts the high-level speaker signal into a low-level RCA signal that your amp can use.
Another thing to consider is impedance. The Kicker 2004 has a 4-ohm impedance, which is standard for most car subwoofers. Make sure your amplifier is compatible with a 4-ohm load. Most aftermarket amps are, but it’s always good to double-check the specs.
Finally, think about space. The Kicker 2004 is relatively compact, but you’ll still need room for both the subwoofer and the amplifier. Measure your trunk or cabin area to ensure everything fits comfortably. You don’t want to cram components into tight spaces—it can lead to overheating and poor sound quality.
Gathering the Right Tools and Components

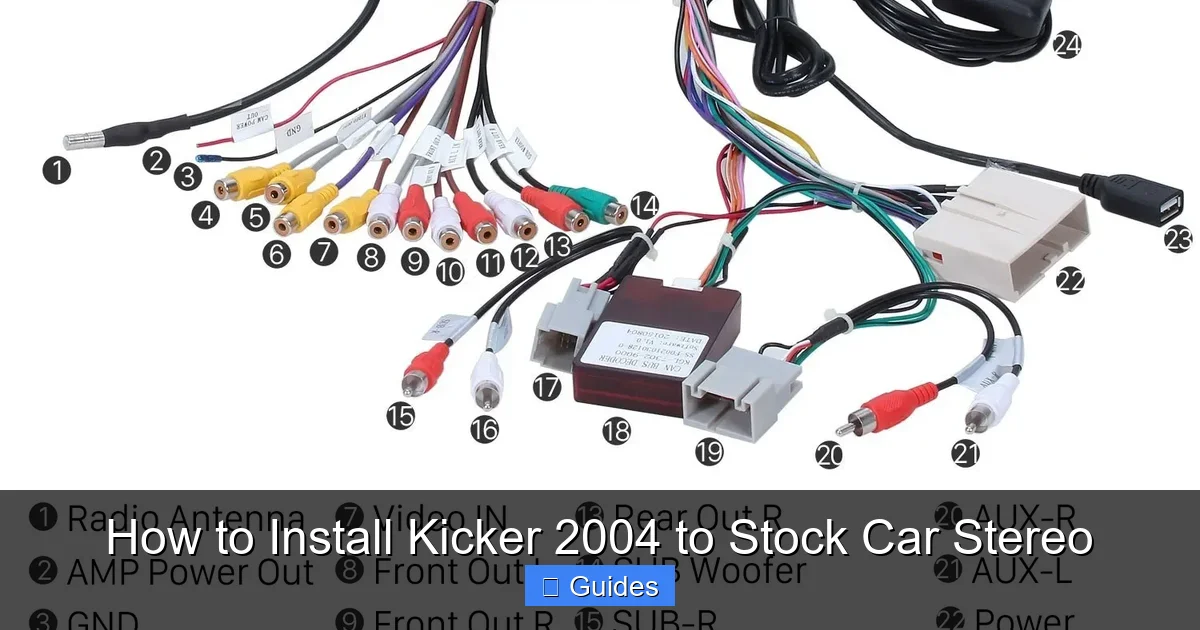
Visual guide about How to Install Kicker 2004 to Stock Car Stereo
Image source: tankbig.com
Now that you understand the basics, it’s time to gather your gear. A successful installation starts with having the right tools and components on hand. You don’t need a professional garage, but you do need to be prepared.
First, you’ll need the Kicker 2004 subwoofer itself. Make sure it’s in good condition and comes with the necessary mounting hardware. Next, you’ll need a compatible amplifier. For the Kicker 2004, a 200–300 watt RMS mono amplifier is ideal. Look for brands like Kicker, Rockford Fosgate, or Alpine—they’re reliable and well-reviewed.
If your stock stereo doesn’t have RCA outputs, you’ll need a line output converter (LOC). This is a small box that plugs into your factory speaker wires and converts the signal for your amp. Choose a 2-channel or 4-channel LOC depending on how many speaker wires you’re tapping into. Some popular models include the PAC LP7-4 or the AudioControl LC2i.
You’ll also need wiring. A 4-gauge or 8-gauge amplifier wiring kit is recommended, depending on the power of your amp. The kit should include:
– Power cable (with inline fuse holder)
– Ground cable
– RCA cables
– Remote turn-on wire
– Speaker wire (for connecting the sub to the amp)
Don’t forget basic tools: wire strippers, crimping tool, electrical tape, zip ties, screwdrivers, and a drill (if you need to mount the sub or amp). A multimeter is also helpful for testing connections and voltage.
Safety gear is important too. Wear gloves and safety glasses when drilling or handling wires. And always disconnect the car’s battery before starting any electrical work—this prevents short circuits and protects your equipment.
Lastly, check your vehicle’s manual or online forums for specific installation tips. Some cars have hidden panels or tricky wiring setups. Knowing your car’s quirks ahead of time can save you hours of frustration.
Step-by-Step Installation Process
Visual guide about How to Install Kicker 2004 to Stock Car Stereo
Image source: i1.wp.com
Now for the fun part—installing your Kicker 2004. Follow these steps carefully, and you’ll have a professional-sounding system in no time.
Step 1: Disconnect the Battery
Safety first! Pop the hood and disconnect the negative terminal of your car battery. This cuts power to the electrical system and prevents accidental shorts while you’re working.
Step 2: Remove Interior Panels
Use a panel removal tool (or a flathead screwdriver wrapped in cloth) to gently pry off the trim panels in your trunk or cabin. You’ll need access to the back of the stereo and the area where you plan to mount the sub and amp. Take photos as you go so you can remember how everything fits back together.
Step 3: Run the Power Cable
Find a grommet in the firewall (the wall between the engine bay and cabin) and feed the power cable through it. Connect one end to the positive terminal of the battery (with an inline fuse within 18 inches of the battery). Run the cable along the car’s frame, using zip ties to secure it. Avoid areas with moving parts or heat sources.
Step 4: Install the Amplifier
Choose a flat, ventilated spot to mount the amp—usually under a seat or in the trunk. Use screws or brackets to secure it. Make sure there’s at least 2 inches of clearance on all sides for airflow.
Step 5: Connect the RCA and Remote Wire
If your stereo has RCA outputs, run RCA cables from the head unit to the amp. If not, install the line output converter. Connect the LOC to the rear speaker wires (usually color-coded), then run RCA cables from the LOC to the amp. Also, connect the remote turn-on wire from the head unit to the amp’s remote terminal. This tells the amp when to turn on.
Step 6: Ground the Amplifier
Find a clean, unpainted metal spot near the amp (like a bolt on the car’s chassis). Sand the area lightly, then attach the ground wire using a ring terminal and bolt. A solid ground is crucial—poor grounding causes noise and amp failure.
Step 7: Wire the Subwoofer
Connect the Kicker 2004 to the amplifier using speaker wire. Match the positive and negative terminals carefully. If you’re using a subwoofer enclosure, make sure the sub is securely mounted with screws.
Step 8: Reconnect the Battery and Test
Reconnect the battery and turn on the stereo. Play some music with deep bass. If everything is wired correctly, you should hear a noticeable improvement. If not, double-check your connections.
Wiring Tips and Common Mistakes to Avoid

Visual guide about How to Install Kicker 2004 to Stock Car Stereo
Image source: i.pinimg.com
Even with a clear plan, wiring can be tricky. Here are some tips to help you avoid common pitfalls.
First, always use the correct wire gauge. A 4-gauge power cable is best for amps over 500 watts, while 8-gauge works for lower-power setups. Using too thin a wire can cause voltage drop and overheating.
Second, avoid running power and signal cables parallel to each other. Keep them at least 12 inches apart to prevent interference. If they must cross, do so at a 90-degree angle.
Third, don’t skip the inline fuse. It protects your car from fire in case of a short circuit. Install it as close to the battery as possible.
Fourth, make sure all connections are tight and secure. Loose wires cause crackling, popping, or no sound at all. Use crimp connectors or solder joints, and cover them with heat shrink tubing.
Fifth, don’t overload your factory wiring. The LOC draws power from your speaker wires, but it shouldn’t strain them. If your stereo starts acting up (like turning off randomly), you may need a higher-quality LOC or a different setup.
Finally, avoid grounding to plastic or painted surfaces. A poor ground is one of the most common causes of amplifier noise. Always ground to bare metal.
Tuning Your System for Best Sound
Installing the hardware is only half the battle—now you need to tune your system for optimal sound.
Start by setting the gain on your amplifier. Turn it all the way down, then play a familiar song at about 75% volume. Slowly increase the gain until the sound starts to distort, then back it off slightly. This ensures maximum volume without clipping.
Next, set the low-pass crossover. This filters out high frequencies so only bass reaches the sub. For most music, set it between 80Hz and 100Hz. Use the crossover knob on your amp or a separate processor.
Adjust the phase switch (usually 0° or 180°). This aligns the sub’s sound waves with your main speakers. Try both settings and choose the one that sounds fuller.
Finally, fine-tune the bass boost (if your amp has one). Use it sparingly—too much can muddy the sound. A little goes a long way.
Final Checks and Maintenance
Once everything sounds great, do a final inspection. Secure all wires with zip ties, replace interior panels, and test all functions—radio, Bluetooth, steering wheel controls.
To maintain your system, check connections every few months. Look for loose wires, corrosion, or overheating. Keep the sub and amp clean and dry.
With proper care, your Kicker 2004 will deliver powerful bass for years to come.
Frequently Asked Questions
Can I install a Kicker 2004 without replacing my stock stereo?
Yes, absolutely! You can connect the Kicker 2004 to your factory stereo using a line output converter and an external amplifier. This setup lets you keep all your original features while adding deep bass.
Do I need a special enclosure for the Kicker 2004?
The Kicker 2004 works best in a sealed or ported enclosure designed for a 10-inch subwoofer. You can build your own or buy a pre-made box. Make sure the enclosure volume matches the sub’s specifications for optimal performance.
What size amplifier should I use with the Kicker 2004?
A mono amplifier that delivers 200–300 watts RMS at 4 ohms is ideal. This matches the sub’s power handling and ensures clean, distortion-free bass.
Will installing a subwoofer drain my car battery?
Not if installed correctly. The amplifier only draws power when the stereo is on. However, a weak battery or alternator may struggle with high-power systems. Consider upgrading if you notice dimming lights or slow starts.
Can I install the Kicker 2004 myself, or do I need a professional?
Most people can install it themselves with basic tools and patience. Follow the steps carefully, and don’t rush. If you’re unsure about wiring or electrical work, consult a professional to avoid damage.
Why is there a humming noise after installation?
Humming is usually caused by a poor ground connection or ground loop. Check that your amp is grounded to clean metal, and ensure RCA cables aren’t running parallel to power wires. A ground loop isolator can also help.

At CarLegit, we believe information should be clear, factual, and genuinely helpful. That’s why every guide, review, and update on our website is created with care, research, and a strong focus on user experience.