
Knowing where the battery in a 2013 Dodge Avenger is located can save you time and stress during maintenance or jump-starts. This guide walks you through the exact location, step-by-step removal, safety tips, and expert advice to keep your Avenger running smoothly.
In This Article
- 1 Key Takeaways
- 2 📑 Table of Contents
- 3 Where Is the Battery in a 2013 Dodge Avenger?
- 4 Why Knowing the Battery Location Matters
- 5 Step-by-Step Guide to Accessing the Battery
- 6 Safety Tips When Handling the Battery
- 7 Common Battery Issues in the 2013 Dodge Avenger
- 8 How to Replace the Battery in a 2013 Dodge Avenger
- 9 Jump-Starting the 2013 Dodge Avenger
- 10 Maintaining Your Battery for Longer Life
- 11 Conclusion
- 12 Frequently Asked Questions
- 12.1 Where exactly is the battery located in a 2013 Dodge Avenger?
- 12.2 Can I jump-start my 2013 Dodge Avenger using the battery terminals?
- 12.3 How often should I replace the battery in my 2013 Dodge Avenger?
- 12.4 What tools do I need to replace the battery?
- 12.5 Is it safe to replace the battery myself?
- 12.6 Why does my battery keep dying?
Key Takeaways
- Location: The battery in a 2013 Dodge Avenger is located in the engine bay on the driver’s side, near the front of the vehicle.
- Access: You can easily access it by opening the hood and removing the plastic battery cover.
- Safety First: Always disconnect the negative terminal first and wear safety gear like gloves and goggles.
- Common Issues: Corrosion, loose connections, and age-related wear are frequent battery problems in this model.
- Replacement Tips: Use a compatible 12-volt battery with at least 600 CCA and consider professional installation for warranty purposes.
- Maintenance: Clean terminals regularly and check voltage to extend battery life.
- Jump-Starting: Use the designated jump points under the hood—never connect jumper cables directly to the battery if it’s sealed.
📑 Table of Contents
- Where Is the Battery in a 2013 Dodge Avenger?
- Why Knowing the Battery Location Matters
- Step-by-Step Guide to Accessing the Battery
- Safety Tips When Handling the Battery
- Common Battery Issues in the 2013 Dodge Avenger
- How to Replace the Battery in a 2013 Dodge Avenger
- Jump-Starting the 2013 Dodge Avenger
- Maintaining Your Battery for Longer Life
- Conclusion
Where Is the Battery in a 2013 Dodge Avenger?
If you’re a proud owner of a 2013 Dodge Avenger, you might find yourself asking, “Where is the battery in a 2013 Dodge Avenger?” Whether you’re jump-starting your car, replacing the battery, or just doing routine maintenance, knowing the exact location and how to access it is essential. Unlike some modern vehicles that hide the battery in the trunk or under the rear seats, the 2013 Dodge Avenger keeps things simple and straightforward.
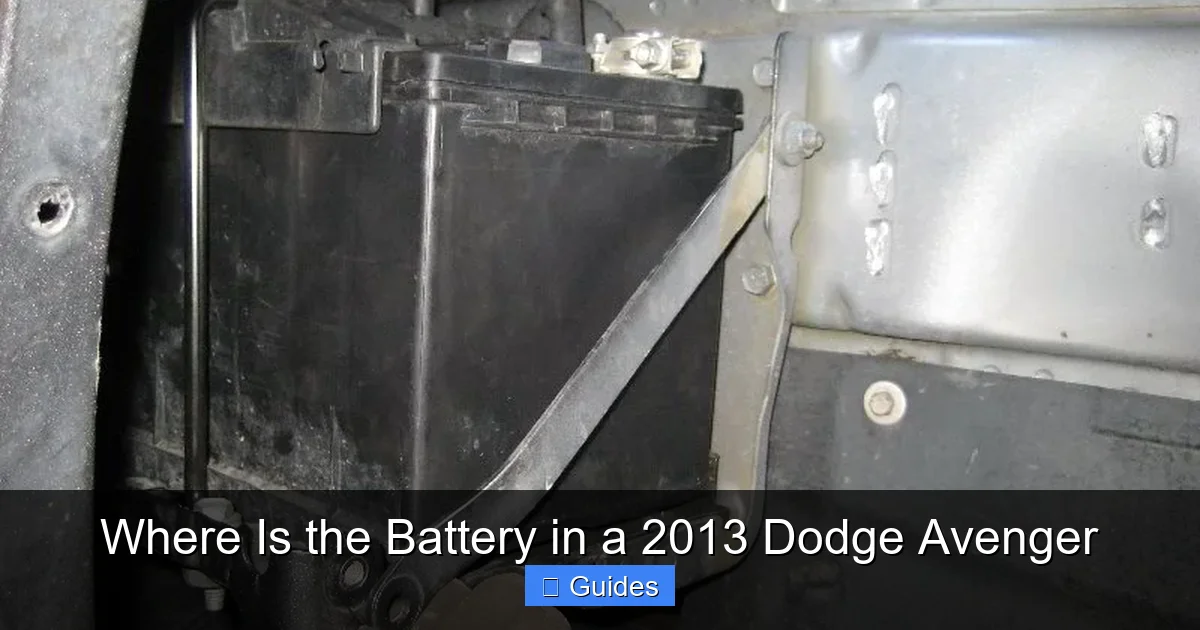
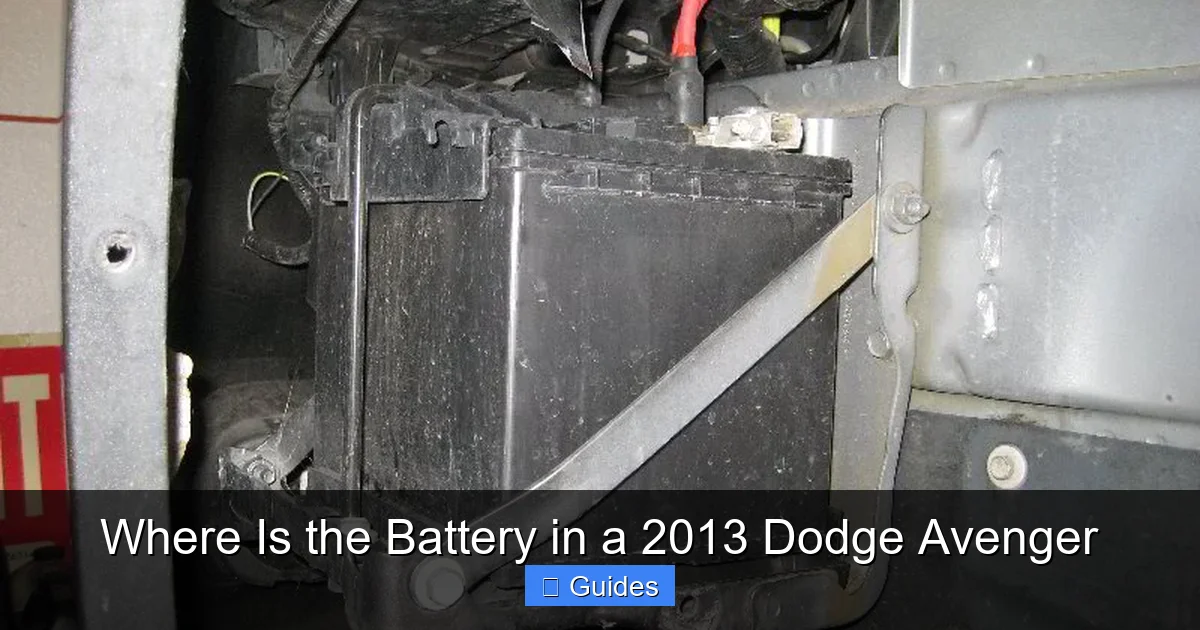
The battery in a 2013 Dodge Avenger is located in the engine compartment, specifically on the driver’s side. It sits near the front of the engine bay, close to the firewall and just behind the headlight assembly. This placement makes it relatively easy to access for most DIYers, though it’s tucked in a spot that can get a bit cramped depending on what other components are nearby. The battery is housed under a plastic cover that helps protect it from dirt, moisture, and accidental contact.
One of the first things you’ll notice when you pop the hood is the black plastic cover labeled “Battery.” This cover isn’t just for looks—it shields the battery terminals and helps prevent short circuits. Removing it is simple: just lift the front edge and pull it upward. Underneath, you’ll see the battery itself, held in place by a metal hold-down clamp and connected to the vehicle’s electrical system via two cables—one red (positive) and one black (negative).
Understanding where the battery in a 2013 Dodge Avenger is located is more than just a convenience. It’s a key part of vehicle ownership. Whether you’re troubleshooting a no-start condition, performing a voltage test, or preparing for winter, having quick and safe access to the battery can make all the difference. In this comprehensive guide, we’ll walk you through everything you need to know—from locating the battery to safely removing it, maintaining it, and even jump-starting your Avenger the right way.
Why Knowing the Battery Location Matters
Visual guide about Where Is the Battery in a 2013 Dodge Avenger
Image source: paulstravelpictures.com
You might think, “It’s just a battery—how hard can it be to find?” But when your car won’t start on a cold morning or you’re stranded in a parking lot with a dead battery, every second counts. Knowing exactly where the battery in a 2013 Dodge Avenger is located can save you time, frustration, and even money.
Imagine this: It’s 7 a.m., you’re running late for work, and your Avenger won’t start. The dashboard lights flicker, and the engine just clicks. You pop the hood, but now what? If you’ve never located the battery before, you might spend precious minutes searching, pulling at wires, or even calling for help unnecessarily. But if you know the battery is on the driver’s side, under a labeled plastic cover, you can jump into action immediately.
Beyond emergencies, regular maintenance is another reason to know your battery’s location. Over time, battery terminals can corrode, connections can loosen, and the battery itself can degrade. Checking these things periodically—especially before winter or long trips—can prevent unexpected breakdowns. And if you’re planning to replace the battery yourself, knowing where it is and how to access it safely is the first step.
Another practical reason? Jump-starting. If your battery dies and you need a jump, knowing where the battery is—and more importantly, where the proper jump points are—is crucial. The 2013 Dodge Avenger has designated jump-start terminals under the hood, but they’re not always obvious if you’re unfamiliar with the layout. Misconnecting jumper cables can damage your car’s electrical system or even cause injury.
Finally, understanding your vehicle’s battery location empowers you as a driver. It reduces reliance on mechanics for simple tasks and builds confidence in handling basic car care. Whether you’re a seasoned DIYer or just starting to learn about your car, knowing where the battery in a 2013 Dodge Avenger is located is a foundational skill.
Step-by-Step Guide to Accessing the Battery
Visual guide about Where Is the Battery in a 2013 Dodge Avenger
Image source: paulstravelpictures.com
Now that you know where the battery in a 2013 Dodge Avenger is located, let’s walk through how to access it safely and efficiently. This step-by-step guide is designed for anyone—whether you’re a first-time car owner or just need a refresher.
Step 1: Park Safely and Turn Off the Engine
Before you do anything, make sure your vehicle is parked on a flat, stable surface. Engage the parking brake and turn off the ignition completely. Remove the key from the ignition or, if you have a push-button start, ensure the car is in “Off” mode. This prevents any accidental electrical surges or short circuits while you’re working.
It’s also a good idea to let the engine cool down if you’ve been driving. Hot engine components can cause burns, and working in a hot engine bay increases the risk of injury.
Step 2: Open the Hood and Secure It
Locate the hood release lever inside the car—usually under the dashboard on the driver’s side. Pull it to release the hood, then go to the front of the vehicle and lift the hood. Use the hood prop rod to secure it in the open position. Never rely on the hydraulic struts alone, especially if they’re old or weak.
Once the hood is open, take a moment to familiarize yourself with the engine bay layout. The battery is on the driver’s side, near the front. You’ll see a black plastic cover with the word “Battery” printed on it. This cover is your first clue.
Step 3: Remove the Battery Cover
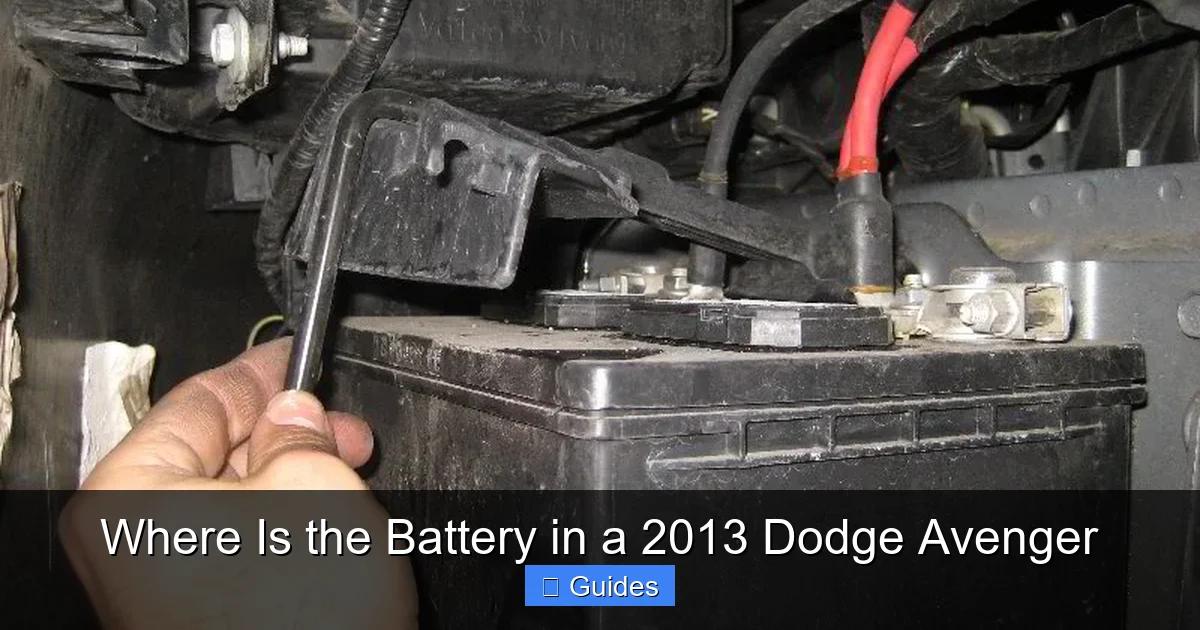
The plastic battery cover is held in place by clips or a simple snap-fit design. To remove it, gently lift the front edge (the side closest to the grille) and pull upward. It should come off easily—no tools required. Set the cover aside in a safe place where it won’t get damaged or lost.
Underneath, you’ll see the battery itself. It’s a standard 12-volt automotive battery, rectangular in shape, and held down by a metal clamp. You’ll also notice two cables connected to the top: a red one (positive) and a black one (negative).
Step 4: Identify the Terminals and Hold-Down Clamp
Take a close look at the battery. The positive terminal (marked with a “+” sign) is usually covered by a red plastic cap. The negative terminal (marked with a “–” sign) is black and may not have a cap. These terminals are where the cables connect to the battery.
The battery is secured by a metal hold-down clamp that runs across the top and is fastened to the battery tray with bolts or wing nuts. This clamp prevents the battery from shifting during driving, which could damage cables or cause a short circuit.
Step 5: Disconnect the Cables (If Needed)
If you’re replacing the battery or performing maintenance, you’ll need to disconnect the cables. Always disconnect the negative cable first, then the positive. This reduces the risk of sparking or short circuits.
Use a wrench or socket (usually 10mm) to loosen the nut on the negative terminal. Once loose, carefully wiggle the cable off the terminal. Repeat the process for the positive terminal, but only after the negative is disconnected.
Never let the wrench touch both terminals at the same time—this can cause a dangerous spark.
Step 6: Remove the Hold-Down Clamp
Once the cables are disconnected, remove the hold-down clamp. Use a socket or wrench to loosen the bolts or wing nuts. Once removed, set the clamp aside.
Now you can lift the battery out of the tray. Be careful—batteries are heavy (typically 30–50 pounds) and contain corrosive acid. Lift with your legs, not your back, and avoid tipping the battery.
Step 7: Inspect and Clean (Optional)
While the battery is out, take a moment to inspect the battery tray and cables. Look for signs of corrosion (a white, powdery substance), rust, or damage. If you see corrosion, clean it with a mixture of baking soda and water and a wire brush.
Also, check the cables for fraying or wear. Damaged cables should be replaced to ensure proper electrical connection.
Safety Tips When Handling the Battery
Visual guide about Where Is the Battery in a 2013 Dodge Avenger
Image source: paulstravelpictures.com
Working with a car battery isn’t rocket science, but it does come with risks. The battery in a 2013 Dodge Avenger contains sulfuric acid and produces flammable hydrogen gas, so safety should always be your top priority.
Wear Protective Gear
Always wear safety goggles and gloves when handling the battery. Acid can cause serious burns to your skin and eyes, and even a small splash can be dangerous. If you don’t have gloves, at least use a clean rag to handle the battery and cables.
Work in a Well-Ventilated Area
Never work on your battery in a closed garage or confined space. Hydrogen gas can build up and become explosive if ignited by a spark. Open the garage door or work outside whenever possible.
Disconnect the Negative Terminal First
This is a golden rule of battery safety. Always disconnect the negative (black) cable before the positive (red) one. Why? Because the negative terminal is connected to the car’s chassis. If your wrench touches the positive terminal and the car’s metal frame at the same time, it can cause a short circuit, sparks, or even an explosion.
By disconnecting the negative first, you eliminate the risk of grounding the positive terminal accidentally.
Keep Metal Objects Away
Avoid wearing jewelry, watches, or carrying metal tools near the battery. A dropped wrench or ring can bridge the terminals and cause a dangerous short.
Dispose of Old Batteries Properly
Car batteries are considered hazardous waste. Never throw them in the trash. Most auto parts stores and service centers will take old batteries for recycling—often for free. Some even offer a small credit toward a new battery.
Don’t Over-Tighten Connections
When reconnecting cables, tighten the nuts securely—but don’t overdo it. Over-tightening can strip the threads or crack the terminal, leading to poor connections and potential failure.
Check for Leaks or Damage
Before installing a new battery, inspect it for cracks, leaks, or swelling. A damaged battery can leak acid or fail prematurely. If you notice any issues, return it to the store immediately.
Common Battery Issues in the 2013 Dodge Avenger
Even with proper care, the battery in a 2013 Dodge Avenger can develop problems over time. Knowing what to look for can help you catch issues early and avoid being stranded.
Corrosion on Terminals
One of the most common issues is corrosion buildup on the battery terminals. This white, powdery substance is caused by acid vapors escaping from the battery and reacting with metal. Corrosion acts as an insulator, preventing proper electrical flow.
To fix it, disconnect the cables (negative first), then clean the terminals and cable ends with a wire brush and a baking soda-water solution. Rinse with water and dry thoroughly before reconnecting.
Loose or Damaged Cables
Over time, vibration and temperature changes can loosen battery cable connections. Loose cables can cause intermittent starting problems, dim lights, or electrical glitches.
Check the tightness of the cable nuts regularly. If the cables are frayed, cracked, or corroded, replace them. Most auto parts stores sell replacement cable ends or complete harnesses.
Old or Weak Battery
Car batteries typically last 3–5 years, depending on climate and usage. If your Avenger is struggling to start—especially in cold weather—it might be time for a replacement.
Signs of a weak battery include:
– Slow engine crank
– Dim headlights
– Clicking sound when turning the key
– Check engine or battery warning light
Use a multimeter to test the voltage. A healthy battery should read around 12.6 volts when the car is off and 13.7–14.7 volts when the engine is running.
Parasitic Drain
Sometimes, a component in the car continues to draw power even when the engine is off. This is called a parasitic drain and can kill your battery overnight.
Common culprits include:
– Faulty alternator
– Aftermarket electronics (alarms, stereos)
– Interior lights that won’t turn off
If your battery keeps dying, have a mechanic perform a parasitic drain test.
Extreme Temperatures
The 2013 Dodge Avenger is sold in various climates, and extreme heat or cold can shorten battery life. Cold weather reduces battery capacity, while heat accelerates internal corrosion.
If you live in a cold region, consider a battery with a higher cold cranking amp (CCA) rating. In hot climates, park in the shade or use a battery insulation kit.
How to Replace the Battery in a 2013 Dodge Avenger
Replacing the battery in a 2013 Dodge Avenger is a straightforward task that most people can do in under 30 minutes. Here’s how to do it safely and correctly.
Step 1: Choose the Right Battery
Not all batteries are created equal. The 2013 Dodge Avenger requires a 12-volt battery with a minimum of 600 cold cranking amps (CCA). Check your owner’s manual or the label on your old battery for the exact specifications.
Popular group sizes for this model include Group 96R or Group 48. Make sure the new battery fits in the tray and has the terminals on the correct sides (positive on the right, negative on the left, when facing the battery).
Step 2: Gather Your Tools
You’ll need:
– A wrench or socket set (usually 10mm)
– Safety goggles and gloves
– A wire brush (for cleaning)
– Baking soda and water (optional, for cleaning)
– A new battery
Step 3: Remove the Old Battery
Follow the steps outlined earlier: disconnect the negative cable, then the positive, remove the hold-down clamp, and lift out the old battery.
Step 4: Clean the Tray and Cables
Before installing the new battery, clean the tray and cable ends. Remove any corrosion or debris. This ensures a solid connection and prevents future problems.
Step 5: Install the New Battery
Place the new battery in the tray, making sure it’s oriented correctly (terminals on the right side). Secure it with the hold-down clamp and tighten the bolts.
Step 6: Reconnect the Cables
Connect the positive cable first, then the negative. Tighten the nuts securely, but don’t over-tighten. Replace the plastic cover over the positive terminal.
Step 7: Test the Installation
Close the hood and start the engine. Check that all electrical systems (lights, radio, etc.) are working properly. If everything looks good, you’re all set.
Jump-Starting the 2013 Dodge Avenger
If your battery dies, you may need to jump-start your Avenger. But don’t connect jumper cables directly to the battery unless necessary. The 2013 Dodge Avenger has designated jump-start points under the hood.
Locate the Jump Points
The positive jump point is a red, capped terminal near the battery. The negative jump point is a bare metal bolt on the engine block or chassis, usually labeled “Ground.”
Connect the Cables
1. Connect the red (positive) jumper cable to the positive jump point.
2. Connect the other red end to the positive terminal of the good battery.
3. Connect the black (negative) cable to the negative jump point on your Avenger.
4. Connect the other black end to the negative terminal of the good battery.
Start the Engine
Start the donor vehicle and let it run for a few minutes. Then try starting your Avenger. Once it’s running, disconnect the cables in reverse order.
Maintaining Your Battery for Longer Life
A little maintenance goes a long way. Here are some tips to keep your battery in top shape:
– Check terminals monthly for corrosion.
– Keep the battery clean and dry.
– Test voltage regularly with a multimeter.
– Avoid short trips that don’t allow the battery to fully charge.
– Turn off lights and electronics when the engine is off.
Conclusion
Knowing where the battery in a 2013 Dodge Avenger is located is more than just a handy fact—it’s a key part of responsible car ownership. With this guide, you now have the knowledge to access, maintain, and replace your battery safely and confidently. Whether you’re jump-starting, cleaning terminals, or installing a new battery, you’re equipped to handle it like a pro.
Frequently Asked Questions
Where exactly is the battery located in a 2013 Dodge Avenger?
The battery is located in the engine bay on the driver’s side, near the front of the vehicle. It’s under a black plastic cover labeled “Battery” and is easily accessible once the hood is open.
Can I jump-start my 2013 Dodge Avenger using the battery terminals?
Yes, but it’s safer to use the designated jump-start points under the hood. Connect the positive cable to the red jump point near the battery and the negative to a grounded metal bolt on the engine block.
How often should I replace the battery in my 2013 Dodge Avenger?
Most car batteries last 3–5 years. If your Avenger struggles to start, especially in cold weather, or if the battery is over 4 years old, consider testing or replacing it.
What tools do I need to replace the battery?
You’ll need a wrench or socket set (usually 10mm), safety goggles, gloves, and a wire brush for cleaning. A multimeter is helpful for testing voltage.
Is it safe to replace the battery myself?
Yes, as long as you follow safety precautions: disconnect the negative cable first, wear protective gear, and work in a well-ventilated area. If you’re unsure, consult a professional.
Why does my battery keep dying?
Common causes include a weak battery, parasitic drain, loose connections, or extreme temperatures. Have a mechanic test the battery and charging system if problems persist.

At CarLegit, we believe information should be clear, factual, and genuinely helpful. That’s why every guide, review, and update on our website is created with care, research, and a strong focus on user experience.