
Turning on the Heads-Up Display (HUD) in your GMC Acadia is simple and can greatly improve your driving safety and convenience. This guide walks you through every step, from locating the controls to customizing display settings for optimal visibility and comfort.
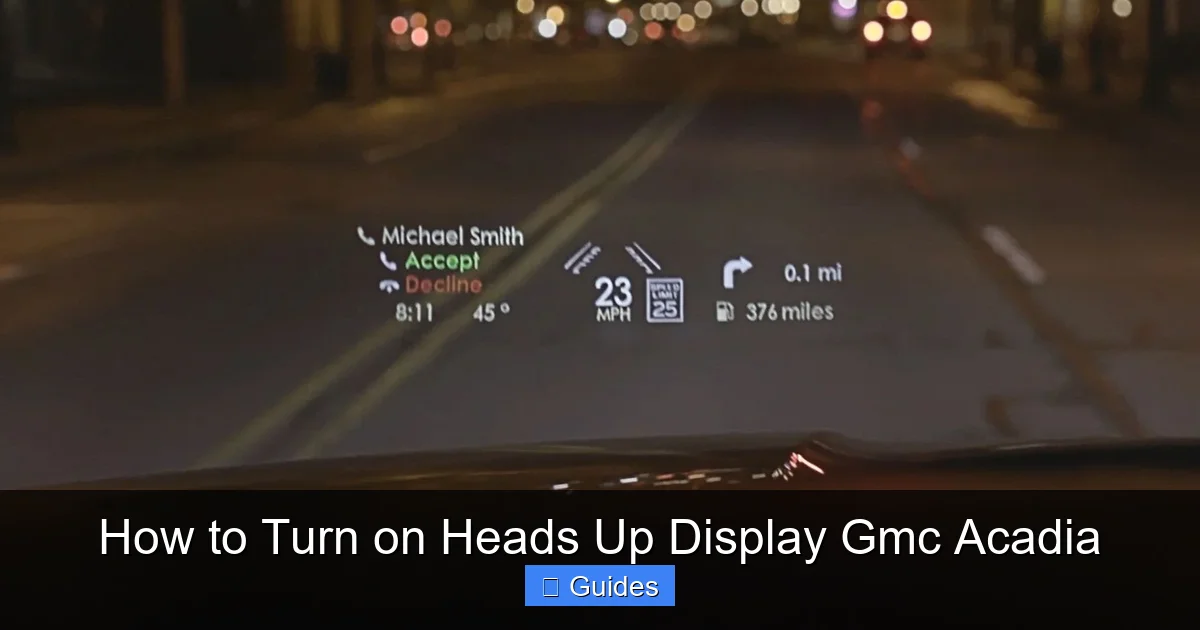
If you’ve ever driven a high-tech vehicle, you’ve probably noticed how much easier it is to stay focused on the road when key information appears right in your line of sight. That’s exactly what the Heads-Up Display (HUD) in the GMC Acadia offers—a futuristic yet practical feature that projects essential driving data onto the windshield. No more glancing down at the dashboard or squinting at the center console. With the HUD, your speed, navigation directions, safety alerts, and more float just ahead of you, blending seamlessly into your view of the road.
But here’s the thing: many GMC Acadia owners don’t even realize their vehicle has this feature—or they know it exists but aren’t sure how to turn it on. Maybe you’ve seen a faint glow on the windshield at night and wondered what it was. Or perhaps you’ve tried pressing random buttons and nothing happened. Don’t worry—you’re not alone. The HUD system is designed to be intuitive, but it does require knowing where to look and how to activate it properly. In this comprehensive guide, we’ll walk you through everything you need to know about turning on and customizing the Heads-Up Display in your GMC Acadia, whether you’re driving a 2017 model or a brand-new 2024 version.
In This Article
- 1 Key Takeaways
- 2 📑 Table of Contents
- 3 What Is a Heads-Up Display and Why Does It Matter?
- 4 Step-by-Step Guide: How to Turn On the Heads-Up Display
- 5 Customizing Your Heads-Up Display Settings
- 6 Troubleshooting Common HUD Issues
- 7 Tips for Getting the Most Out of Your HUD
- 8 Conclusion
- 9 Frequently Asked Questions
Key Takeaways
- Understanding How To Turn On Heads Up Display Gmc Acadia: Provides essential knowledge
📑 Table of Contents
What Is a Heads-Up Display and Why Does It Matter?
The Heads-Up Display, commonly known as HUD, is an advanced driver assistance feature that projects real-time vehicle and navigation information onto the lower portion of the windshield. Instead of looking down at your instrument cluster or infotainment screen, you can keep your eyes on the road while still seeing critical data like your current speed, turn-by-turn directions, lane departure warnings, and even adaptive cruise control status.
This technology isn’t just about looking cool—it’s about safety and convenience. Studies have shown that drivers spend less time looking away from the road when using a HUD, which can significantly reduce the risk of accidents. For long commutes, highway driving, or navigating unfamiliar areas, the HUD acts like a co-pilot, quietly feeding you the information you need without distraction.
In the GMC Acadia, the HUD is available on higher trims such as the SLT and Denali models, typically as part of the Driver Confidence Package or Premium Package. It’s not standard on base models, so if you’re unsure whether your Acadia has it, check your window sticker, owner’s manual, or look for a small projector unit near the base of the windshield behind the steering wheel.
Step-by-Step Guide: How to Turn On the Heads-Up Display
Visual guide about How to Turn on Heads Up Display Gmc Acadia
Image source: i.pinimg.com
Activating the Heads-Up Display in your GMC Acadia is straightforward once you know where the controls are. The system is operated primarily through the steering wheel buttons, and the process takes just a few seconds. Here’s how to do it:
Locate the HUD Control Buttons
Start by sitting in the driver’s seat and adjusting your seat and steering wheel to your normal driving position. On the left side of the steering wheel, you’ll find a cluster of buttons labeled with icons. Look for a button that resembles a small windshield or has an arrow pointing upward—this is your HUD control button. It’s usually located near the cruise control and audio controls.
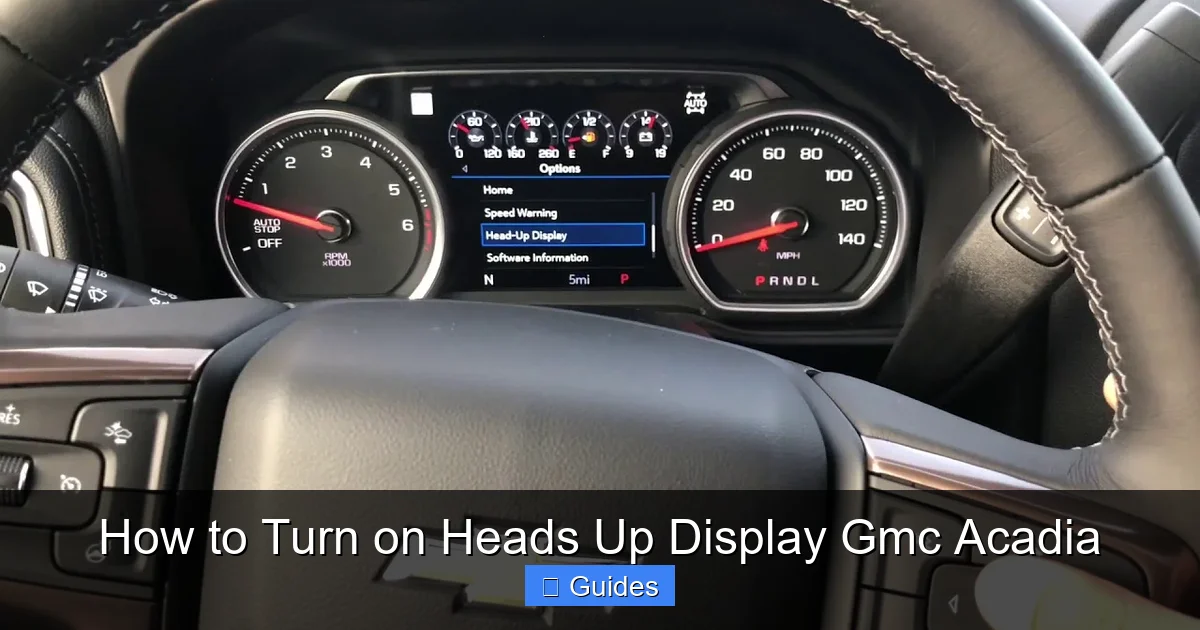
If you don’t see it immediately, don’t panic. Some Acadia models integrate the HUD controls into the instrument cluster menu. In that case, you’ll use the steering wheel’s “Menu” or “Info” button to navigate to the HUD settings.
Turn On the Ignition
Make sure your vehicle is in the “On” or “Accessory” mode. You don’t need to start the engine to activate the HUD, but the ignition must be powered. If the vehicle is completely off, press the brake pedal and push the start button (or turn the key, depending on your model year) to power up the electronics.
Press the HUD Activation Button
Once the vehicle is powered, press and hold the HUD button on the steering wheel for about two seconds. You should see a faint green or white glow appear on the lower part of the windshield. This is the projection of the HUD. If nothing happens, try pressing the button again or check that your vehicle actually has the HUD feature installed.
Adjust the Display Using Steering Wheel Controls
After activation, you can fine-tune the HUD using the same button or adjacent controls. Press the “+” or “-” buttons (often labeled with up and down arrows) to raise or lower the position of the display on the windshield. This ensures the information appears at a comfortable height in your field of vision.
You can also adjust the brightness. During the day, you may want a brighter projection, while at night, a dimmer setting prevents glare. Use the brightness controls—usually integrated into the same button cluster—to find the perfect level.
Confirm Activation in the Instrument Cluster
On some Acadia models, a small HUD icon will appear in the instrument cluster when the system is active. This serves as a confirmation that the display is on and functioning. If you don’t see the icon, try cycling the HUD on and off again or consult your owner’s manual for model-specific indicators.
Customizing Your Heads-Up Display Settings
Visual guide about How to Turn on Heads Up Display Gmc Acadia
Image source: i.ytimg.com
One of the best things about the GMC Acadia’s HUD is its flexibility. You’re not stuck with a one-size-fits-all display—you can tailor it to show exactly what you want, when you want it. Here’s how to make the most of your customization options.
Choose What Information to Display
The HUD can show a variety of data, but you don’t have to display everything at once. To customize what appears, use the steering wheel’s “Menu” or “Info” button to access the vehicle settings. Navigate to “Display” or “Heads-Up Display” and select your preferences.
Common options include:
– Current speed
– Speed limit (if your vehicle has traffic sign recognition)
– Navigation directions (turn arrows, street names, distance to next turn)
– Adaptive cruise control status
– Lane departure warnings
– Forward collision alerts
For example, if you’re on a long highway drive, you might want to see your speed and cruise control status. But if you’re navigating city streets, turn-by-turn directions become more important. You can switch between these modes depending on your driving needs.
Adjust Brightness for Day and Night Driving
The HUD automatically adjusts brightness based on ambient light, but you can override this setting for better visibility. During bright daylight, increase the brightness so the projection doesn’t get washed out. At night, reduce it to avoid distracting glare.
To manually adjust brightness:
1. Press the HUD button to activate the display.
2. Use the “+” or “-” buttons to increase or decrease brightness.
3. Test the setting by driving in different lighting conditions.
Some drivers prefer to set a higher brightness during the day and let the system auto-dim at night. Others like full manual control. Experiment to find what works best for you.
Set the Vertical Position
The height of the HUD projection is crucial for comfort. If it’s too high, it can block your view of the road. If it’s too low, you have to look down to see it—defeating the purpose of a heads-up display.
To adjust the position:
– Use the up and down arrow buttons near the HUD control.
– Raise or lower the display until it sits just below your natural line of sight.
– A good rule of thumb: the information should appear as if it’s floating about 6 to 10 feet ahead of the vehicle.
If you share the vehicle with another driver, you may need to readjust the position each time. Some Acadia models remember individual driver profiles, including HUD settings, if you’ve set up personalized keys or driver memory.
Enable or Disable Specific Alerts
Safety alerts like forward collision warnings or lane departure notifications can be helpful, but they might also feel overwhelming if they pop up too often. You can choose which alerts appear on the HUD.
For instance, if you find lane departure warnings distracting on winding roads, you can disable them in the settings while keeping speed and navigation visible. Conversely, if you want maximum awareness, enable all available alerts.
To manage alerts:
1. Go to the vehicle settings menu.
2. Select “Safety” or “Driver Assistance.”
3. Toggle on or off the alerts you want displayed on the HUD.
This level of control ensures the HUD enhances your driving experience without becoming a source of distraction.
Troubleshooting Common HUD Issues

Visual guide about How to Turn on Heads Up Display Gmc Acadia
Image source: i.ytimg.com
Even the most reliable technology can occasionally act up. If your GMC Acadia’s Heads-Up Display isn’t working as expected, don’t assume it’s broken. Many common issues have simple fixes.
HUD Won’t Turn On
If pressing the HUD button does nothing, start with the basics:
– Confirm your vehicle has the HUD feature. Check your trim level and optional packages.
– Ensure the ignition is on. The HUD won’t activate if the vehicle is fully off.
– Try restarting the vehicle. Turn it off completely, wait 30 seconds, then restart. This resets the electronic systems.
– Check the fuse. The HUD is powered by a fuse in the cabin fuse box. Refer to your owner’s manual for the correct fuse location and rating.
If none of these steps work, there may be a software glitch or hardware issue. Visit a GMC dealership for diagnostics.
Display Is Too Dim or Too Bright
If the HUD is barely visible during the day or too harsh at night:
– Manually adjust the brightness using the steering wheel controls.
– Make sure the automatic brightness sensor (usually near the rearview mirror) isn’t blocked by stickers, covers, or dirt.
– Clean the inside of the windshield where the HUD projects. Smudges or film can reduce clarity.
Image Is Blurry or Misaligned
A blurry or off-center HUD can be annoying and unsafe. This often happens if the projector lens is dirty or if the windshield has been replaced with a non-OEM part.
– Clean the projector lens gently with a microfiber cloth.
– Ensure the windshield is the original or a GMC-approved replacement. Aftermarket windshields may not have the special reflective coating needed for the HUD to work properly.
– If the image is consistently misaligned, a dealership may need to recalibrate the system.
HUD Turns Off Unexpectedly
If the display shuts off while driving:
– Check if the “Eco” or “Economy” mode is active. Some vehicles disable non-essential features in this mode.
– Ensure the HUD isn’t set to turn off after a period of inactivity. This setting can usually be adjusted in the menu.
– Look for software updates. GMC occasionally releases updates that fix HUD-related bugs.
Tips for Getting the Most Out of Your HUD
Now that you know how to turn on and customize your Heads-Up Display, here are some pro tips to enhance your experience:
Use It in All Driving Conditions
Don’t reserve the HUD for night driving or long trips. Use it daily—even for short errands. The more you use it, the more natural it becomes, and the more you’ll appreciate its benefits.
When using the built-in navigation system, the HUD becomes even more powerful. Turn-by-turn directions appear directly in your line of sight, so you never miss a turn. Make sure your destination is entered before you start driving for the best experience.
Keep the Windshield Clean
A dirty windshield can scatter the HUD projection, making it hard to read. Regularly clean both the inside and outside of the glass, especially the lower portion where the image appears.
Update Your Software
GMC periodically releases software updates that improve HUD performance and add new features. Visit your local dealership or check the GMC website to see if your vehicle is eligible for an update.
Teach Other Drivers
If family members or friends drive your Acadia, show them how to use the HUD. It’s a safety feature that benefits everyone, not just you.
Conclusion
The Heads-Up Display in your GMC Acadia is more than just a high-tech gadget—it’s a smart, safety-focused tool that can make every drive smoother and more secure. By projecting vital information directly into your field of vision, it reduces distractions and helps you stay focused on the road ahead.
Turning it on is simple: locate the control button on your steering wheel, press and hold, then adjust brightness and position to your liking. From there, customize the display to show the data that matters most to you—whether it’s your speed, navigation cues, or safety alerts.
If you run into issues, most problems can be resolved with a quick restart, a settings adjustment, or a visit to the dealership. And with regular maintenance and smart usage, your HUD will continue to enhance your driving experience for years to come.
So the next time you get behind the wheel of your GMC Acadia, don’t overlook that small button on the steering wheel. Press it, customize it, and enjoy the peace of mind that comes from knowing your most important driving information is always right where you need it—right in front of you.
Frequently Asked Questions
Does every GMC Acadia have a heads-up display?
No, the heads-up display is not standard on all GMC Acadia models. It’s typically available on higher trims like the SLT and Denali, often as part of an optional package. Check your vehicle’s window sticker or owner’s manual to confirm if your Acadia includes this feature.
Can I install a heads-up display if my Acadia doesn’t have one?
While aftermarket HUD units exist, they won’t integrate with your Acadia’s systems like the factory-installed version. They also require a compatible windshield and may not display navigation or safety alerts. For full functionality, it’s best to purchase a model that includes the OEM HUD.
Why is my HUD image blurry?
A blurry HUD image is often caused by a dirty projector lens or windshield. Clean both gently with a microfiber cloth. If the problem persists, the windshield may not have the special reflective coating required, especially if it was replaced with a non-OEM part.
Can I turn off the heads-up display permanently?
Yes, you can disable the HUD through the vehicle settings menu or by not activating it with the steering wheel button. However, it’s recommended to keep it on for safety, especially during long drives or in heavy traffic.
Does the HUD work at night?
Absolutely. The HUD is designed to work in all lighting conditions. It automatically adjusts brightness at night to prevent glare, and you can manually fine-tune it for optimal visibility.
Will a new windshield affect my HUD?
Yes, if the new windshield doesn’t have the special reflective coating required for the HUD, the projection may not appear or could be distorted. Always use a GMC-approved replacement windshield to maintain HUD functionality.

At CarLegit, we believe information should be clear, factual, and genuinely helpful. That’s why every guide, review, and update on our website is created with care, research, and a strong focus on user experience.