
Featured image for How To Change Spark Plugs On 2016 Mazda Cx 5
Image source: paulstravelpictures.com
Changing the spark plugs on a 2016 Mazda CX-5 is a manageable DIY task that enhances engine performance and saves on mechanic costs. Our step-by-step guide outlines the process using basic tools and emphasizes critical torque specifications for a safe, successful replacement. Tackle this job to boost your vehicle’s efficiency and longevity with confidence.
In This Article
- 1 How To Change Spark Plugs On 2016 Mazda CX5 Step By Step
- 1.1 Key Takeaways
- 1.2 📑 Table of Contents
- 1.3 Why Changing Your Spark Plugs Matters
- 1.4 Gathering Your Tools and Parts
- 1.5 Prepping Your Vehicle and Workspace
- 1.6 The Step-by-Step Removal and Installation
- 1.7 Post-Installation Steps and Verification
- 1.8 Common Mistakes to Avoid
- 1.9 Conclusion: Enjoy the Smooth Ride
- 1.10 Frequently Asked Questions
- 1.10.1 What tools do I need to change spark plugs on a 2016 Mazda CX5?
- 1.10.2 How often should I change the spark plugs on my 2016 Mazda CX5?
- 1.10.3 Is it difficult to change spark plugs on a 2016 Mazda CX5 myself?
- 1.10.4 What are the basic steps to change spark plugs on a 2016 Mazda CX5?
- 1.10.5 What type of spark plugs are best for a 2016 Mazda CX5?
- 1.10.6 What should I avoid when changing spark plugs on my 2016 Mazda CX5?
How To Change Spark Plugs On 2016 Mazda CX5 Step By Step
Let me paint a picture for you. It’s a crisp Saturday morning, you’ve got your coffee, and you’re about to head out for a weekend adventure in your trusty 2016 Mazda CX-5. You turn the key, and instead of that smooth, eager purr you’re used to, you’re greeted with a hesitant cough, a rough idle, or maybe a check engine light that just won’t quit. Your heart sinks a little. A trip to the shop means waiting, a big bill, and a weekend plan down the drain.
But what if I told you that the likely culprit—worn-out spark plugs—is something you can tackle yourself in your own driveway? I know, I know. It sounds like a “mechanic-only” job. I thought the same thing once. But after helping a friend with his CX-5 and then doing my own, I realized it’s one of the most satisfying and money-saving maintenance tasks you can do. It’s like giving your car’s engine a fresh set of lungs.
This guide is for you—the curious car owner who wants to understand their vehicle better and save some serious cash. We’ll walk through how to change spark plugs on a 2016 Mazda CX5 together, step-by-step, with no mechanic-speak or intimidation. Grab your coffee again, and let’s get your CX-5 running like new.
Key Takeaways
- Disconnect the battery first: ensures safety and prevents electrical damage.
- Use the correct spark plug type: OEM-recommended for optimal engine performance.
- Remove ignition coils carefully: unplug and lift to access spark plugs.
- Torque new plugs precisely: avoid over-tightening to prevent thread damage.
- Check spark plug gap: adjust if necessary for proper ignition.
- Reconnect all components securely: test the engine after reassembly.
📑 Table of Contents
Why Changing Your Spark Plugs Matters
Before we get our hands dirty, it’s good to know why we’re doing this. Think of spark plugs as the tiny lightning bolts inside your engine. Their sole job is to ignite the mix of fuel and air in each cylinder. When they’re fresh, they create a strong, precise spark. When they’re old and worn, that spark gets weak and lazy.
The Symptoms of Worn Spark Plugs
Your car will tell you when it’s time. For the 2016 Mazda CX5, the recommended interval is about every 75,000 to 90,000 miles, but symptoms can appear earlier. Listen and feel for:
- Rough Idling: The car feels shaky or vibrates more when stopped at a light.
- Poor Acceleration: It feels sluggish or struggles when you press the gas pedal.
- High Fuel Consumption: You’re visiting the gas station more often for no clear reason.
- Hard Starting: The engine cranks longer than usual before firing up.
- Check Engine Light: Often with codes like P0300 (random misfire) or other cylinder-specific misfire codes.
Ignoring these signs is like ignoring a persistent cough. It gets worse, stresses the engine, and can lead to more expensive problems like damaging the catalytic converter. Changing them is preventative medicine for your car.
Gathering Your Tools and Parts
Success here is all about being prepared. There’s nothing worse than being halfway through a job and realizing you’re missing a crucial tool. Let’s build our toolkit like we’re packing for a hike.
The Essential Tool List
You don’t need a professional garage full of tools. Here’s the simple list:
- New Spark Plugs: This is critical. The 2016 CX-5 with the 2.5L SKYACTIV-G engine uses specific plugs. I’ll detail exact part numbers below.
- Socket Set: You’ll need a 5/8 inch (16mm) spark plug socket with a magnetic tip or rubber insert. This grips the plug so it doesn’t fall out. A standard deep-well socket won’t work.
- Ratchet and Extensions: A 3/8-inch drive ratchet with a 6-inch extension is perfect. A universal joint (swivel) is also a huge help for tricky angles.
- Gap Tool (Optional but Recommended): Even pre-gapped plugs should be checked.
- Torque Wrench: This is the most important tool for this job. Overtightening can crack the engine head; undertightening can cause poor performance. A must-have.
- Needle-Nose Pliers or Tweezers: For gently removing the ignition coil electrical connectors.
- Compressed Air or Small Brush: To clean out the spark plug wells before removal—you don’t want dirt falling into the cylinders.
- A Drop of Anti-Seize Compound & Dielectric Grease: The debate is big on anti-seize, but a tiny amount is good practice. Dielectric grease for the coil boot is a yes.
Choosing the Right Spark Plugs
This isn’t a place to guess. Using the wrong plug can cause serious engine damage. The 2016 Mazda CX5 2.5L engine originally used a specific type. Here’s a quick data table to clarify your options:
2016 Mazda CX-5 Spark Plug Specifications
| Plug Type | OEM Part Number / Common Brand | Gap (Inches) | |
|---|---|---|---|
| Iridium | Mazda PE5R-18-110 / NGK 94124 ILKAR7L11 | 0.044″ (Pre-gapped) | Factory original. Long-life (75k-90k mi), best for performance and fuel economy. |
| Iridium (Alternative) | Denso 4716 | 0.044″ (Pre-gapped) | Direct equivalent to NGK, often more available. Excellent quality. |
| Double Platinum | Other aftermarket options | Check specifically | May have shorter life. Stick with Iridium for this engine if possible. |
My strong recommendation? Go with the NGK or Denso Iridium plugs. They’re designed for the long interval and ensure your 2016 Mazda CX5 runs as Mazda intended. Buy a set of four.
Prepping Your Vehicle and Workspace
Safety and preparation first. This isn’t a race. A calm, methodical start makes the whole process smoother.
Step 1: Engine Cold, Car Secure
Always, always work on a cold engine. Spark plugs get extremely hot, and touching a hot engine component is a sure way to get burned. Park on a flat surface, set the parking brake firmly, and if you have them, pop wheel chocks behind the rear tires for extra safety.
Step 2: Open the Hood and Locate
Pop the hood and secure it with the prop rod. You’re looking for the engine cover—it’s a large plastic piece sitting on top. On the 2016 Mazda CX5, it’s usually just held by a few plastic push-pins. Gently pry these up with a flat-head screwdriver or your fingers, and lift the cover off. Now you’ll see four black plastic components with wires coming out of them. These are the ignition coils, and each one sits directly on top of a spark plug.
Step 3: Clean the Area
Take your compressed air or small brush and gently clean around the base of each ignition coil. Blow any debris away from the engine. This is a crucial step to prevent dirt from falling into the spark plug tube when you remove the coil. A little cleaning now saves big headaches later.
The Step-by-Step Removal and Installation
Here’s the main event. We’ll work on one cylinder at a time. This prevents you from mixing up coils or dropping anything into an open hole. Take your time.
Step 4: Disconnect the Ignition Coil
Find the electrical connector on the first ignition coil. There’s a small locking tab you need to press. Use your needle-nose pliers or fingers to press this tab down while you gently wiggle and pull the connector straight off. Don’t pull by the wires!
Step 5: Remove the Coil
Each coil is held down by one 10mm bolt. Use your ratchet (a short socket works best here) to remove this bolt. Set it somewhere safe. Now, grasp the coil firmly and pull it straight up with a steady, rocking motion. It might be snug, but it should come free. You’ll now see down into the spark plug well.
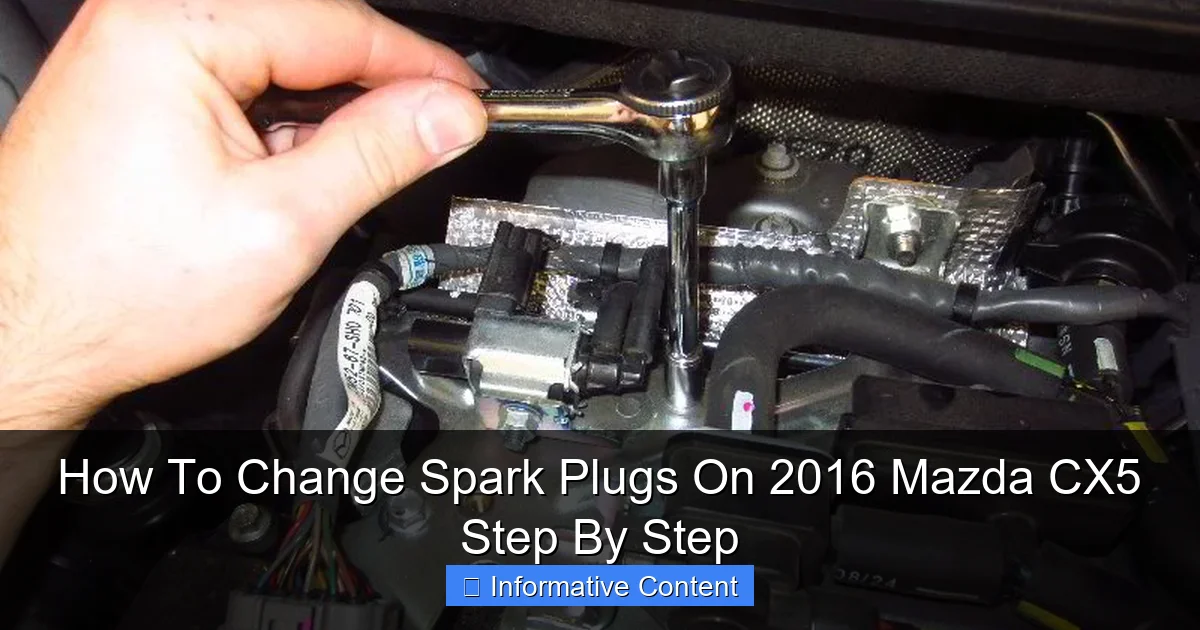
Step 6: Remove the Old Spark Plug
Insert your 6-inch extension into the spark plug socket. Attach the ratchet. Carefully lower the socket into the well until it seats firmly onto the spark plug. You might need to use the swivel joint here to get a straight angle. Turn the ratchet counter-clockwise to loosen. Once it’s loose, you can finish unscrewing it by hand. Gently lift the extension and socket out, with the old plug held securely by the magnetic or rubber insert.
Step 7: Gap and Prepare the New Plug (If Needed)
Take your new spark plug out of the box. Even if it says “pre-gapped,” use your gap tool to check the distance between the center and ground electrode. It should be 0.044 inches. If you need to adjust, gently bend the ground electrode only. Now, apply a tiny, rice-grain-sized amount of anti-seize compound to the threads of the new plug. Avoid getting any on the electrode tip. Then, put a small dab of dielectric grease inside the rubber boot of the ignition coil you just removed.
Step 8: Install and Torque the New Spark Plug
This is where the torque wrench is key. Hand-thread the new spark plug into the hole. This is the most sensitive part—if it feels gritty or doesn’t thread in smoothly by hand, STOP. You may have cross-threaded it. Back it out and try again. Once it’s hand-tight, attach your torque wrench to the extension and socket. The factory specification for the 2016 Mazda CX5 is 14-21 ft-lbs. I aim for the middle at about 18 ft-lbs. Set your torque wrench and tighten until it clicks. Do not overtighten!
Step 9: Reinstall the Coil and Connector
Take the ignition coil and push it straight down over the new plug until it seats fully. You should feel it click onto the plug. Reinstall the 10mm bolt and tighten it snugly, but don’t go crazy. Finally, reconnect the electrical connector until you hear a definitive click. One cylinder done! Repeat Steps 4-9 for the remaining three cylinders.
Post-Installation Steps and Verification
You’re almost there! Don’t rush the finish line. A few simple checks now ensure everything works perfectly.
Step 10: Double-Check Everything
Walk around the engine bay. Make sure all four ignition coil connectors are firmly clicked in place. Verify all four 10mm bolts are tight. Wipe away any tools or rags from the engine area. Reinstall the engine cover by pressing the plastic pins back into their holes.
Step 11: The Moment of Truth – Start the Engine
Close the hood. Get in the driver’s seat. Turn the key to the “On” position (don’t start it yet) and wait a few seconds for the fuel pump to prime. Then, start the engine. It might crank for a second longer the first time as the system builds pressure. Listen closely. A smooth, steady idle is your reward. The rough vibration should be gone. Take it for a short, gentle test drive around the block. Feel for smoother acceleration.
Step 12: Reset the Check Engine Light (If Applicable)
If your check engine light was on for a misfire, it may turn off on its own after a few drive cycles. If it doesn’t, you can use an OBD2 scanner to clear the code, or simply disconnect the negative battery terminal for 15 minutes (this will also reset your radio presets, so be warned).
Common Mistakes to Avoid
I’ve made some of these, so you don’t have to. Learning from others’ hiccups is a great shortcut.
Over-Torquing the Spark Plugs
This is the big one. The aluminum cylinder head is soft. Cranking down on the plugs with all your might can strip the threads, leading to a catastrophic and expensive repair. The torque wrench is not a suggestion; it’s your best friend.
Dropping Debris into the Cylinder
Skipping the cleaning step is a gamble. A small piece of grit falling into the cylinder can score the walls or cause a hot spot, leading to engine damage. Five minutes of cleaning is cheap insurance.
Mixing Up the Coils and Wires
Working on one cylinder at a time completely eliminates this risk. If you did remove them all, the connectors are usually different lengths, but it’s still easy to get confused. One-at-a-time is the golden rule.
Forgetting the Dielectric Grease
This grease protects the electrical connection from moisture and corrosion and makes the coil boot easier to remove next time. Don’t skip it.
Conclusion: Enjoy the Smooth Ride
And that’s it! You’ve just successfully learned how to change spark plugs on a 2016 Mazda CX5. What felt like a daunting mechanic’s job at the beginning is now a skill in your back pocket. You’ve saved yourself anywhere from $150 to $300 in labor, you know the job was done right with quality parts, and you’ve connected with your vehicle on a whole new level.
The real reward comes every time you start your car for the next 75,000 miles. That smooth, instant start. The confident pull when you need to merge onto the highway. The knowledge that your engine is breathing easy. Regular maintenance like this is what keeps the 2016 Mazda CX5, a fantastic and reliable vehicle, running beautifully for years and miles to come. So pat yourself on the back, take your CX-5 for a proper spin, and enjoy that renewed sense of power and efficiency. You’ve earned it.
Frequently Asked Questions
What tools do I need to change spark plugs on a 2016 Mazda CX5?
You will need a ratchet set with extensions, a spark plug socket (typically 14mm or 16mm), a torque wrench, and possibly a gap tool if the plugs aren’t pre-gapped. Having a magnetic pickup tool and a clean workspace can also make the job easier and prevent lost parts.
How often should I change the spark plugs on my 2016 Mazda CX5?
Mazda generally recommends replacing spark plugs every 75,000 to 100,000 miles for the 2016 CX-5, but always consult your owner’s manual for the exact interval. Symptoms like misfires, poor fuel economy, or rough idling can signal that a change is needed sooner.
Is it difficult to change spark plugs on a 2016 Mazda CX5 myself?
Changing spark plugs on a 2016 Mazda CX5 is a straightforward DIY project for most people with basic tools and mechanical comfort. Just follow a reliable step-by-step guide, work on a cool engine, and take care not to cross-thread or overtighten the new plugs.
What are the basic steps to change spark plugs on a 2016 Mazda CX5?
To change spark plugs on a 2016 Mazda CX5, start by disconnecting the battery, then remove the ignition coils to access the plugs. Use a spark plug socket to carefully remove the old plugs, install new ones with the correct gap and torque, and reassemble everything in reverse order.
What type of spark plugs are best for a 2016 Mazda CX5?
The 2016 Mazda CX-5 typically uses long-life iridium spark plugs, such as NGK ILKAR7L11 or equivalent. Always double-check your vehicle’s specifications or owner’s manual to ensure you purchase the correct part number for your engine model.
What should I avoid when changing spark plugs on my 2016 Mazda CX5?
Avoid working on a hot engine to prevent burns, and never force or overtighten the spark plugs, as this can damage the cylinder head threads. Also, ensure you properly reconnect all ignition coils and electrical connections to avoid engine misfires after the change.

At CarLegit, we believe information should be clear, factual, and genuinely helpful. That’s why every guide, review, and update on our website is created with care, research, and a strong focus on user experience.