
Installing an RV skylight can transform your travel experience by adding natural light and improving airflow. This guide walks you through every step—from choosing the right skylight to sealing it properly—so you can do it safely and correctly the first time.
In This Article
- 1 Key Takeaways
- 2 📑 Table of Contents
- 3 Why Install an RV Skylight?
- 4 Choosing the Right RV Skylight
- 5 Preparing Your RV Roof for Installation
- 6 Installing the RV Skylight
- 7 Testing for Leaks and Final Checks
- 8 Maintenance Tips for Long-Term Performance
- 9 Common Mistakes to Avoid
- 10 Conclusion
- 11 Frequently Asked Questions
Key Takeaways
- Choose the right skylight size and type: Measure your RV roof and select a model designed for RVs to ensure a proper fit and avoid leaks.
- Gather the right tools and materials: You’ll need a drill, rivet gun, sealant, screws, and a marker—plus safety gear like gloves and goggles.
- Mark and cut the opening carefully: Precision is key—measure twice, cut once to avoid damaging the roof structure.
- Seal thoroughly to prevent leaks: Use high-quality RV roof sealant around the edges and fasteners to keep water out.
- Test for leaks after installation: Spray water on the roof and check inside for drips before hitting the road.
- Consider ventilation options: Some skylights open for airflow—ideal for kitchens or bathrooms to reduce moisture.
- Follow manufacturer instructions: Always read the manual that comes with your skylight for specific installation tips and warranty details.
📑 Table of Contents
Why Install an RV Skylight?
If you’ve ever spent time inside an RV on a sunny day, you know how dark and cave-like it can feel—even with the lights on. That’s where an RV skylight comes in. It’s not just about aesthetics; it’s about transforming your living space into a bright, airy, and welcoming environment. Natural light boosts mood, reduces reliance on artificial lighting, and makes small spaces feel larger. Plus, many modern RV skylights are designed to open, offering much-needed ventilation in areas prone to moisture, like the kitchen or bathroom.
But beyond the feel-good benefits, installing an RV skylight can also improve your overall camping experience. Imagine waking up to sunlight streaming through the ceiling instead of fumbling for a switch. Or cooking dinner in the galley with fresh air circulating through an open skylight. These small upgrades make a big difference in comfort and functionality. And the best part? You don’t need to be a professional contractor to do it. With the right tools, a bit of patience, and this guide, you can install an RV skylight yourself—saving money and gaining a sense of accomplishment.
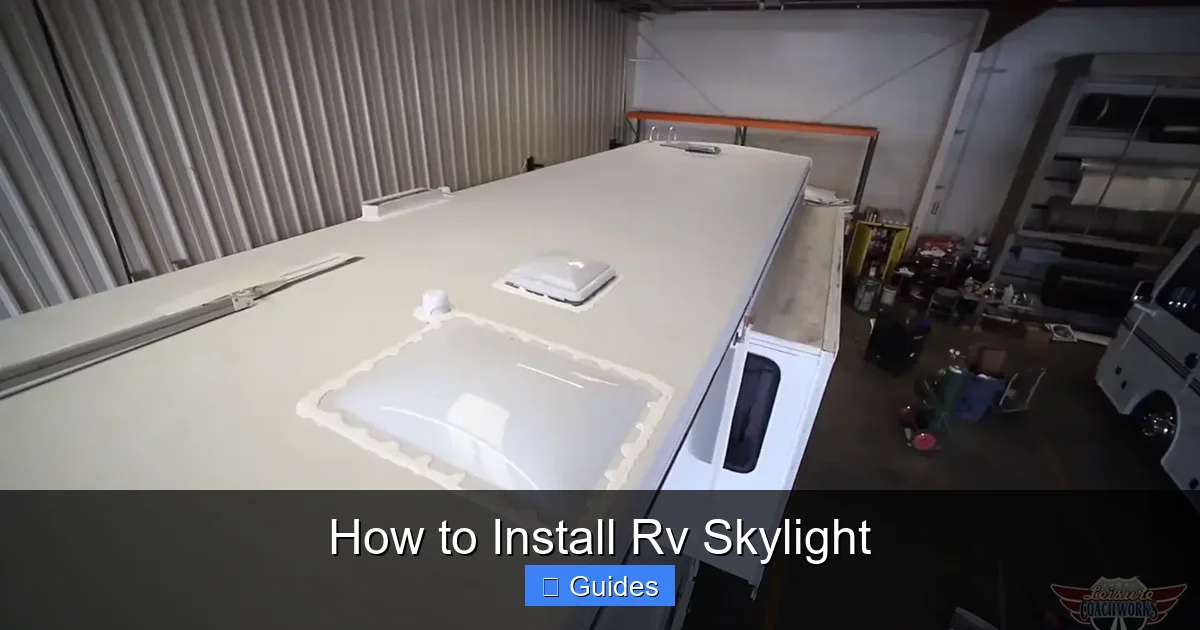
Choosing the Right RV Skylight
Visual guide about How to Install Rv Skylight
Image source: images.squarespace-cdn.com
Before you grab your drill, it’s essential to choose the right skylight for your RV. Not all skylights are created equal, and using the wrong one can lead to leaks, poor insulation, or even structural damage. Start by measuring the area where you plan to install the skylight. Most RV skylights are round or rectangular and come in standard sizes like 14” x 14”, 14” x 22”, or 17” in diameter. Measure the interior ceiling space first, then check the exterior roof to ensure there’s enough clearance and no obstructions like roof vents, air conditioners, or support beams.
Next, consider the type of skylight. Fixed skylights are sealed shut and provide only light—great for living areas. Venting skylights, on the other hand, can be opened manually or with a crank to allow airflow. These are ideal for bathrooms or kitchens where steam and odors build up. Some models even come with built-in screens or blinds for privacy and sun control. Look for skylights made from durable, UV-resistant acrylic or polycarbonate, which resist yellowing and cracking over time.
Brand matters too. Stick with reputable manufacturers like Ventline, Fan-Tastic Vent, or MaxxAir, which design products specifically for RVs. These brands often include detailed installation instructions and compatible hardware. Avoid cheap, generic skylights from big-box stores—they may not fit properly or withstand the rigors of travel. Also, check if your RV’s roof is flat or curved. Most modern RVs have slightly curved roofs, so choose a skylight with a flexible flange or one designed for curved surfaces to ensure a tight seal.
Materials and Tools You’ll Need
Once you’ve selected the perfect skylight, it’s time to gather your tools and materials. Having everything ready before you start will save time and prevent frustration. Here’s a checklist of what you’ll need:
– **RV skylight kit** (includes the dome, frame, and hardware)
– **Measuring tape**
– **Marker or pencil**
– **Drill with assorted bits**
– **Jigsaw or hole saw** (size depends on your skylight)
– **Rivet gun and rivets** (usually included)
– **Screwdriver or impact driver**
– **High-quality RV roof sealant** (like Dicor self-leveling lap sealant or Eternabond tape)
– **Caulking gun**
– **Utility knife**
– **Sandpaper or file** (to smooth rough edges)
– **Safety gear**: gloves, safety goggles, and a dust mask
Optional but helpful tools include a laser level (for precise alignment), a reciprocating saw (for tricky cuts), and a helper to hold the skylight in place during installation. If you’re installing a venting skylight, you might also need wire strippers and electrical tape if it includes a motorized option—though most are manual.
Preparing Your RV Roof for Installation
Visual guide about How to Install Rv Skylight
Image source: images.squarespace-cdn.com
Preparation is the most critical part of the installation process. A rushed or sloppy prep job can lead to leaks, misalignment, or even roof damage. Start by parking your RV on a level surface and ensuring the roof is clean and dry. Use a mild detergent and water to remove dirt, grease, or old sealant from the installation area. Let it dry completely—moisture trapped under the skylight can cause mold or rot.
Next, locate the ideal spot for your skylight. Avoid areas near roof seams, vents, or air conditioners. If you’re installing over a bathroom or kitchen, that’s usually the best location for ventilation. Use your measuring tape to find the center point of the desired area. Mark it lightly with a pencil. Then, use the skylight’s template (usually included in the package) to trace the outline of the opening onto the roof. Double-check your measurements—once you cut, there’s no going back.
Before cutting, inspect the interior ceiling. Remove any panels or trim to expose the roof structure. This will help you confirm there are no wires, ducts, or support beams in the way. If you find obstructions, you may need to adjust the location slightly. Once you’re confident the path is clear, it’s time to drill the pilot holes.
Drilling and Cutting the Opening
Start by drilling a small pilot hole inside the marked area—this will serve as the starting point for your jigsaw or hole saw. Use a drill bit slightly smaller than the width of your cutting tool. For round skylights, a hole saw is ideal. For rectangular ones, a jigsaw with a fine-tooth blade works best. Go slow and steady—RVs often have thin aluminum or fiberglass roofs that can crack if you apply too much pressure.
As you cut, keep the tool perpendicular to the roof to ensure a clean, straight edge. If you’re using a jigsaw, support the blade with a piece of wood underneath to prevent vibration. Once the opening is complete, use sandpaper or a file to smooth any rough edges. Sharp metal can cut through sealant over time, leading to leaks.
Now, test-fit the skylight frame into the opening. It should fit snugly without forcing. If it’s too tight, carefully enlarge the hole a little at a time. If it’s too loose, you may need to adjust the sealant application later. Once it fits properly, remove the frame and set it aside.
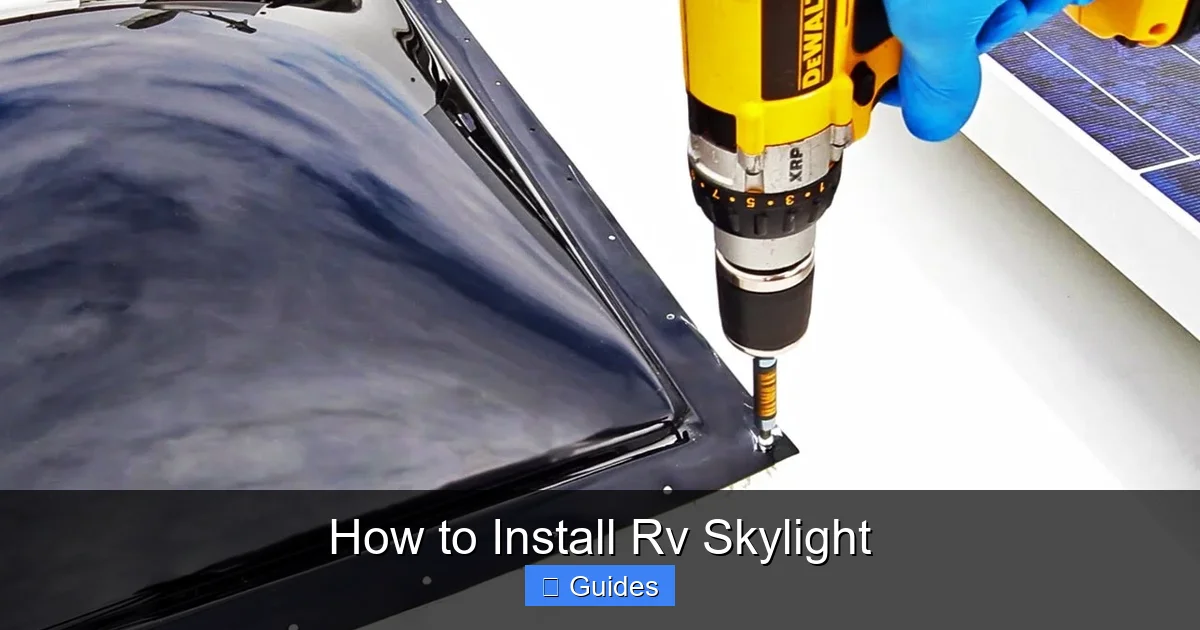
Installing the RV Skylight
Visual guide about How to Install Rv Skylight
Image source: gocarlife.com
With the opening ready, it’s time to install the skylight. Begin by applying a generous bead of RV roof sealant around the underside of the skylight flange. Use a high-quality, UV-resistant sealant designed for outdoor use. Dicor self-leveling lap sealant is a popular choice because it flows into gaps and cures into a flexible, waterproof barrier.
Carefully position the skylight over the opening, aligning it with your marks. Press down firmly to ensure the sealant makes full contact with the roof. If your skylight uses screws or rivets, insert them through the pre-drilled holes in the flange. Don’t overtighten—this can warp the frame or crack the dome. Use a rivet gun for rivets, or a screwdriver for screws, and space them evenly around the perimeter.
For added protection, apply a second bead of sealant over the top of the flange and around each fastener. This creates a double barrier against water intrusion. Smooth the sealant with a putty knife or your finger (wearing gloves) to ensure a clean, even finish. If you’re using Eternabond tape, wrap it around the edges of the flange before applying the skylight for extra waterproofing.
Securing the Interior Trim
Once the exterior is sealed, move inside to install the interior trim ring. This piece covers the rough edges of the opening and gives the skylight a finished look. Most kits include a plastic or metal trim ring that snaps or screws into place. Align it with the opening and secure it using the provided hardware.
If your skylight is venting, attach the crank mechanism or handle according to the manufacturer’s instructions. Test the operation to make sure it opens and closes smoothly. For fixed skylights, simply snap the interior cover into place. Finally, reinstall any ceiling panels or trim you removed earlier.
Testing for Leaks and Final Checks
No installation is complete without a leak test. This step is crucial—even a small gap can lead to major water damage over time. Wait at least 24 hours for the sealant to cure before testing. Then, use a garden hose to spray water directly over the skylight for several minutes. Start from the edges and work your way inward, mimicking heavy rain.
While spraying, have someone inside the RV watch for any signs of dripping or moisture. Check around the edges, near the fasteners, and along the interior trim. If you spot a leak, don’t panic. Turn off the water, dry the area, and apply additional sealant to the problem spot. Re-test after it cures.
In addition to the leak test, inspect the skylight for proper operation. Open and close venting models several times to ensure smooth movement. Check that the dome is secure and doesn’t rattle when you tap it. Finally, clean the exterior dome with a soft cloth and mild cleaner to remove fingerprints or residue from installation.
Maintenance Tips for Long-Term Performance
An RV skylight can last for years with proper care. Regular maintenance helps prevent leaks, keeps the dome clear, and ensures smooth operation. Inspect the sealant around the edges at least twice a year—especially before and after long trips. Look for cracks, peeling, or gaps, and reapply sealant as needed.
Clean the dome every few months using a non-abrasive cleaner and a soft sponge. Avoid harsh chemicals or abrasive pads, which can scratch the surface and reduce clarity. If your skylight has a screen, remove it periodically and wash it with soap and water to prevent clogging.
During winter or extended storage, consider covering the skylight with a protective shield to prevent snow buildup or UV damage. If you live in a rainy climate, check the drainage holes (if your model has them) to ensure they’re not blocked by debris.
Finally, listen for unusual noises while driving. A loose skylight can rattle or vibrate, which may indicate a problem with the seal or fasteners. Address issues promptly to avoid bigger repairs down the road.
Common Mistakes to Avoid
Even experienced DIYers can make mistakes when installing an RV skylight. One of the most common errors is rushing the cutting process. Taking your time ensures a clean, precise opening that fits the skylight perfectly. Another mistake is using the wrong type of sealant. Household caulk or silicone may seem like a quick fix, but it won’t hold up under UV exposure or temperature changes. Always use RV-specific sealant.
Skipping the leak test is another critical error. It’s easy to assume everything is sealed properly, but water can find the smallest gap. Always test thoroughly before considering the job done. Also, avoid installing a skylight too close to roof seams or edges, where structural integrity is weaker.
Finally, don’t ignore the manufacturer’s instructions. Each skylight model has unique requirements, and deviating from them can void your warranty or compromise performance. Read the manual carefully and follow it step by step.
Conclusion
Installing an RV skylight is a rewarding project that enhances both the functionality and comfort of your home on wheels. With the right tools, careful planning, and attention to detail, you can complete the job in a few hours and enjoy the benefits for years to come. From brighter interiors to improved airflow, a well-installed skylight makes every trip more enjoyable.
Remember, the key to success is preparation and patience. Choose the right skylight, measure accurately, seal thoroughly, and test for leaks. Don’t rush—take your time to do it right the first time. And if you’re ever unsure, consult a professional or reach out to the manufacturer for guidance.
Whether you’re upgrading an older RV or customizing a new one, adding a skylight is a smart, cost-effective improvement. So grab your tools, head up to the roof, and let the light in. Your future self—and your travel companions—will thank you.
Frequently Asked Questions
Can I install an RV skylight myself?
Yes, most RV owners can install a skylight themselves with basic tools and careful preparation. Follow the manufacturer’s instructions and take your time to ensure a proper seal and fit.
What size skylight do I need for my RV?
Measure the interior ceiling space and check your roof for obstructions. Most RVs use 14” x 14” or 14” x 22” skylights, but always confirm with your specific model and manufacturer recommendations.
Will installing a skylight void my RV warranty?
It depends on your warranty terms. Modifying the roof can affect coverage, so check with your dealer or manufacturer before starting. Using approved parts and professional installation may help preserve warranty protection.
How do I prevent leaks after installation?
Use high-quality RV roof sealant, apply it generously around the flange and fasteners, and perform a thorough leak test with a garden hose after the sealant cures.
Can I install a skylight on a curved RV roof?
Yes, many modern skylights are designed for curved roofs. Look for models with flexible flanges or those specifically labeled for curved surfaces to ensure a proper seal.
Do I need to reinforce the roof before cutting?
Generally, no—RV roofs are designed to support skylights. However, avoid cutting near structural seams or support beams, and always inspect the interior for obstructions before drilling.

At CarLegit, we believe information should be clear, factual, and genuinely helpful. That’s why every guide, review, and update on our website is created with care, research, and a strong focus on user experience.