
Mounting a TV in your camper can transform your travel experience, but it requires careful planning and the right tools. This guide walks you through choosing the right TV, selecting a secure mount, finding the perfect location, and ensuring safe installation—all while protecting your investment and your safety on the road.
In This Article
- 1 Key Takeaways
- 2 📑 Table of Contents
- 3 Why Mount a TV in Your Camper?
- 4 Choosing the Right TV for Your Camper
- 5 Selecting the Right TV Mount for Your Camper
- 6 Finding the Perfect Location to Mount Your TV
- 7 Step-by-Step Installation Guide
- 8 Power, Cables, and Signal Solutions
- 9 Maintenance and Safety Tips
- 10 Conclusion
- 11 Frequently Asked Questions
Key Takeaways
- Choose a lightweight, low-power TV: Opt for LED or OLED models under 32 inches to reduce strain on walls and conserve battery life.
- Use a dedicated RV-rated TV mount: Standard mounts aren’t built for constant vibration; RV-specific mounts absorb shocks and prevent loosening.
- Locate a structurally sound wall area: Avoid thin paneling; anchor into studs or reinforced framing for maximum stability.
- Plan for cable management and power: Route wires neatly and use a surge protector to safeguard electronics from voltage spikes.
- Test before hitting the road: Secure all bolts, check for wobble, and simulate travel vibrations to ensure everything stays put.
- Consider a swivel or tilt mount: These allow flexible viewing angles from bed, dinette, or outdoor seating areas.
- Prioritize safety over aesthetics: A securely mounted TV prevents injury and damage during sudden stops or rough terrain.
📑 Table of Contents
Why Mount a TV in Your Camper?
Imagine unwinding after a long day of hiking or exploring a new city—only to kick back in your cozy camper with your favorite show playing on the screen. For many RV and camper owners, a mounted TV isn’t just a luxury; it’s a key part of making life on the road feel like home. Whether you’re parked at a scenic overlook, waiting out a rainy day at a campsite, or simply enjoying downtime, having entertainment at your fingertips can make all the difference.
But mounting a TV in a camper isn’t as simple as drilling a few holes and calling it a day. Campers face unique challenges: constant movement, vibrations, limited space, and fluctuating power sources. A poorly installed TV can become a dangerous projectile during sudden stops or bumpy roads. That’s why it’s essential to approach this project with care, the right tools, and a solid understanding of your camper’s structure. This guide will walk you through every step—from choosing the right TV to securing it safely—so you can enjoy your shows worry-free, mile after mile.
Choosing the Right TV for Your Camper
Not all TVs are created equal—especially when it comes to life on the road. When selecting a TV for your camper, you’ll want to balance size, weight, power consumption, and durability. A bulky 55-inch plasma might look great in a living room, but it’s a nightmare in a small, mobile space.
Visual guide about How to Mount Tv in Camper
Image source: camperguide.org
Size and Weight Matter
Start with size. Most campers have limited wall space, so a TV between 24 and 32 inches is ideal. Anything larger may overwhelm the room or require a heavy-duty mount that stresses the walls. Weight is equally important. A lighter TV reduces the load on your mounting hardware and minimizes the risk of detachment during travel. Look for models under 15 pounds if possible.
LED or OLED: The Best Choices
LED TVs are the go-to for campers. They’re energy-efficient, lightweight, and produce bright, clear images even in daylight. OLED TVs offer superior contrast and deeper blacks, but they tend to be more expensive and slightly heavier. Both are excellent options, but LED is usually the better value for RV use.
Power Consumption and Battery Life
Your camper’s electrical system likely runs on a 12V battery or a combination of shore power and solar. High-wattage TVs can drain your battery quickly, leaving you without lights or refrigeration. Check the TV’s power rating—most modern LED TVs use between 30 and 60 watts. For off-grid adventures, consider a model with an “Eco” mode or low-power standby feature.
Durability and Viewing Angle
Campers endure constant vibration and temperature changes. Choose a TV with a sturdy build and wide viewing angles so you can see the screen from different spots—like the bed or dinette. Some manufacturers even offer “RV-ready” TVs designed specifically for mobile use, with reinforced casings and anti-glare screens.
Practical Example: The Perfect Camper TV
Take the TCL 32S327 32-Inch 1080p Smart Roku TV. It weighs just 10.6 pounds, uses only 45 watts, and has built-in streaming apps—no need for extra devices. Its slim profile fits easily on most camper walls, and the Roku interface is user-friendly for all ages. Plus, it’s affordable, typically under $200, making it a smart investment for budget-conscious travelers.
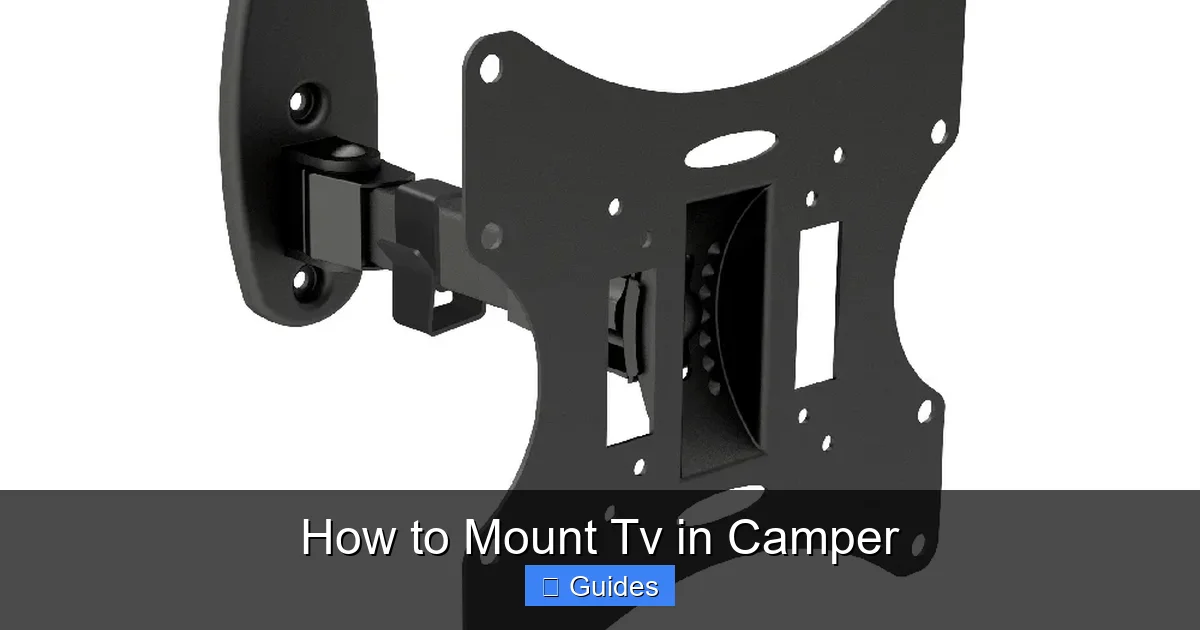
Selecting the Right TV Mount for Your Camper
Once you’ve picked your TV, the next step is choosing a mount that can handle the rigors of travel. Standard wall mounts from big-box stores aren’t designed for constant motion. They may loosen over time, leading to a wobbly screen or, worse, a fallen TV.
Visual guide about How to Mount Tv in Camper
Image source: i.etsystatic.com
RV-Specific Mounts: Built for the Road
Look for mounts labeled “RV-rated” or “motorhome-compatible.” These are engineered to absorb vibrations and resist loosening. They often feature reinforced brackets, locking mechanisms, and rubber gaskets to dampen movement. Brands like Ultra-Fab, Progressive Industries, and Camco specialize in RV accessories and offer reliable mounting solutions.
Fixed vs. Swivel vs. Full-Motion Mounts
Your choice depends on how you plan to use the TV. A fixed mount holds the TV flat against the wall—simple and secure, but limited in viewing angle. A swivel mount allows you to rotate the screen left or right, ideal for viewing from multiple spots. A full-motion mount (also called articulating) lets you tilt, swivel, and extend the TV, offering the most flexibility—perfect if you want to watch from bed or an outdoor awning area.
Weight and VESA Compatibility
Always check the mount’s weight capacity. It should support at least 1.5 times your TV’s weight for safety. Also, ensure it matches your TV’s VESA pattern—the standard screw layout on the back of the screen. Common patterns include 75x75mm, 100x100mm, and 200x200mm. Most mounts list compatible VESA sizes, so double-check before buying.
Installation Depth and Clearance
Consider how much space the mount will take up. Fixed mounts are the thinnest, adding just 1–2 inches to the wall. Full-motion mounts can extend 12 inches or more when pulled out. Make sure there’s enough clearance behind the TV for cables and airflow, especially in tight camper spaces.
Pro Tip: Add a Safety Strap
Even with a high-quality mount, it’s wise to add a secondary safety measure. Use a TV safety strap or bungee cord to anchor the top of the TV to a nearby cabinet or frame. This prevents the screen from tipping forward if the mount fails—a simple step that could save your TV and prevent injury.
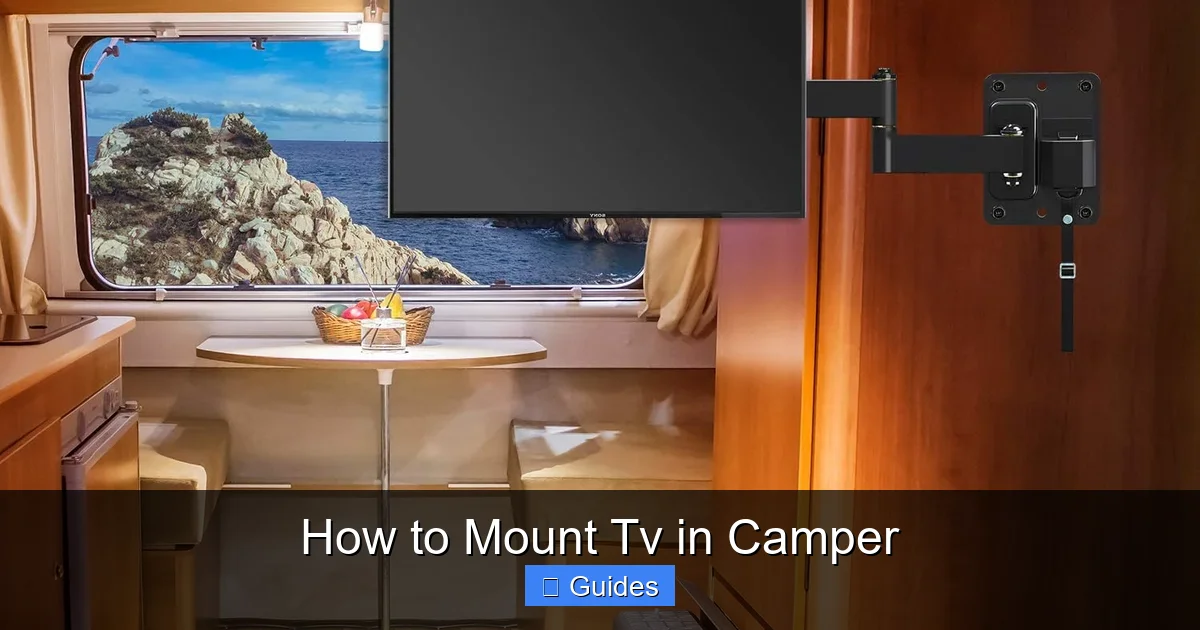
Finding the Perfect Location to Mount Your TV
Where you mount your TV can make or break your viewing experience. The ideal spot balances visibility, structural support, and practicality. Avoid areas near doors, windows, or high-traffic zones where the TV could be bumped or blocked.
Visual guide about How to Mount Tv in Camper
Image source: i.etsystatic.com
Check for Studs and Reinforced Framing
Never mount a TV directly into thin wall paneling or insulation. You need to anchor into solid framing—wood or metal studs—for a secure hold. Use a stud finder to locate studs behind the wall. In some campers, especially older models, walls may have aluminum framing or no studs at all. In these cases, use heavy-duty toggle bolts or a backer board to distribute the weight.
Consider Viewing Height and Angle
Mount the TV at eye level when seated. For a bed-mounted setup, aim for a height where you can comfortably watch while lying down. If using a swivel mount, position it so the screen can rotate toward the dinette or outdoor area without hitting walls or cabinets.
Avoid Heat Sources and Moisture
Keep the TV away from heaters, stoves, or windows where condensation might form. Excessive heat can damage electronics, and moisture can cause corrosion. Also, ensure there’s adequate ventilation around the TV to prevent overheating.
Test the Viewing Angle
Before drilling, sit in your usual viewing spots and check the line of sight. Is the screen visible from the bed? Can you see it while cooking? Adjust the location if needed. A little planning now saves frustration later.
Practical Example: Mounting Over the Dinette
Many campers mount their TV above the dinette table. This spot is central, often near power outlets, and allows viewing from both the table and nearby seating. Just make sure the mount is high enough to avoid blocking the table but low enough to see comfortably. A swivel mount works perfectly here, letting you angle the screen toward the bed or outside.
Step-by-Step Installation Guide
Now that you’ve chosen your TV, mount, and location, it’s time to install. Follow these steps carefully to ensure a safe, secure setup.
Gather Your Tools and Materials
You’ll need:
- Stud finder
- Drill and drill bits
- Level
- Screwdriver or impact driver
- Measuring tape
- Pencil
- Socket wrench (if needed)
- Safety goggles and gloves
Also, have your TV, mount, and all mounting hardware ready. Read the mount’s instruction manual thoroughly before starting.
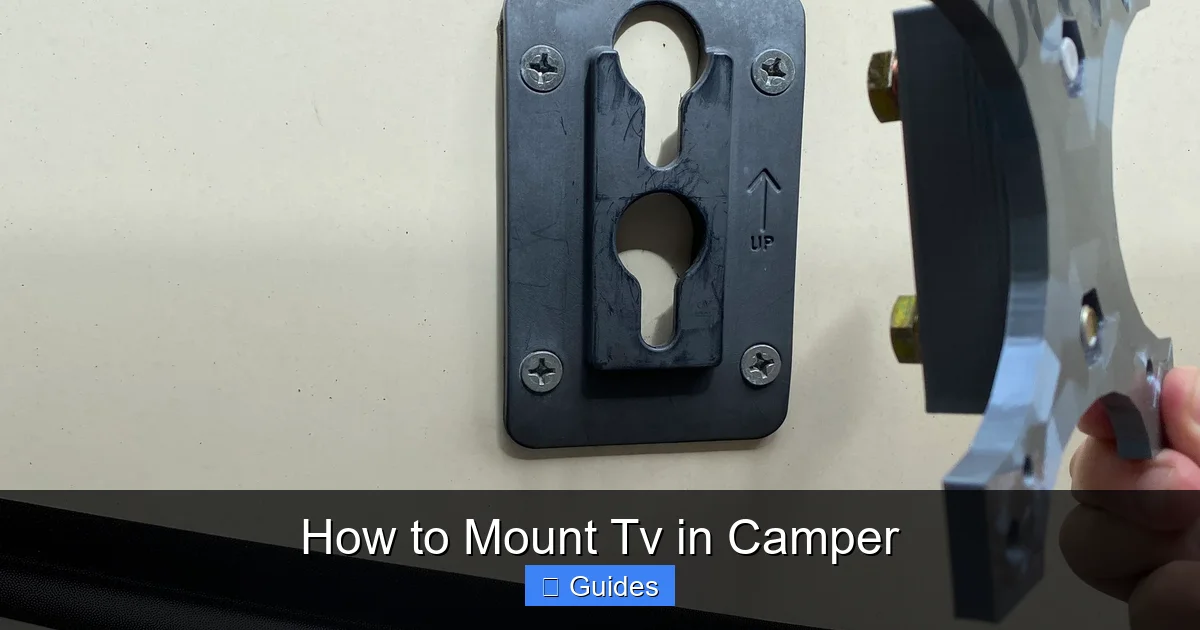
Step 1: Mark the Mounting Location
Hold the mount’s wall plate against the wall where you want to install it. Use a level to ensure it’s straight. Mark the screw holes with a pencil. Double-check the height and alignment from your viewing spots.
Step 2: Locate and Mark Studs
Use the stud finder to confirm the location of studs. Mark them clearly. If your mount’s holes don’t align with studs, you may need to use toggle bolts or install a backer board (a piece of plywood secured to multiple studs) to distribute the load.
Step 3: Drill Pilot Holes
Drill pilot holes at the marked spots. This prevents the wood from splitting and makes screwing easier. Use a bit slightly smaller than your screws for a tight fit.
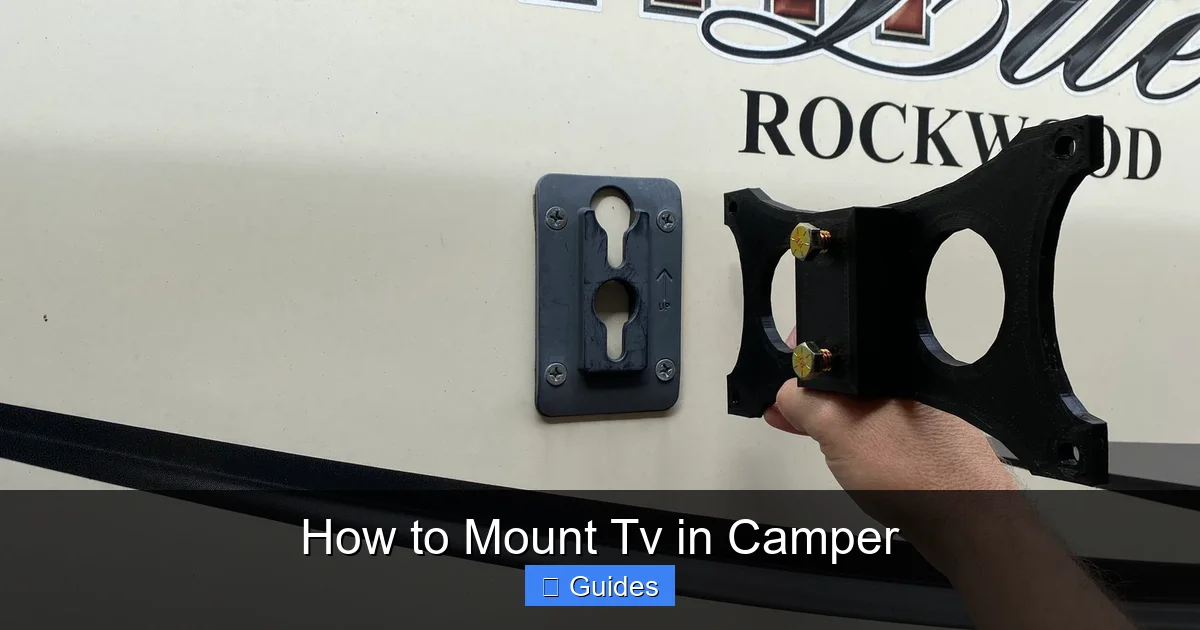
Step 4: Attach the Wall Plate
Secure the wall plate to the wall using the provided lag bolts or screws. Tighten them firmly with a wrench or driver, but don’t over-tighten—this can strip the threads or damage the wall.
Step 5: Attach the Mounting Bracket to the TV
Follow the mount’s instructions to attach the bracket to the back of your TV. Use the correct screws for your VESA pattern. Ensure they’re snug but not over-tightened.
Step 6: Hang the TV
With a helper, lift the TV and hook it onto the wall plate. Make sure it’s fully seated and secure. Test the movement if using a swivel or tilt mount.
Step 7: Secure and Test
Tighten any locking screws or bolts on the mount. Gently shake the TV to check for wobble. If it moves, recheck all connections. Add a safety strap if desired.
Step 8: Manage Cables
Route power and HDMI cables neatly along the wall or through a cable management sleeve. Avoid loose wires that could snag or get damaged. Use zip ties or adhesive clips to keep them tidy.
Power, Cables, and Signal Solutions
A mounted TV is only useful if it has power and a signal. Campers often face unique challenges with electricity and connectivity.
Powering Your TV Safely
Most campers have 12V DC systems, but TVs run on 120V AC. You’ll need an inverter to convert power. Choose a pure sine wave inverter for sensitive electronics. Plug the TV into a surge protector to guard against voltage spikes from generators or campground outlets.
Cable Management Tips
Use cable raceways, adhesive clips, or flexible conduit to hide wires. Label each cable (e.g., “HDMI 1 – Fire Stick”) for easy troubleshooting. Keep extra length coiled neatly behind the TV.
Getting a Signal on the Road
For over-the-air channels, install a roof-mounted antenna. For streaming, use a mobile hotspot or campground Wi-Fi. Consider a Wi-Fi extender to boost weak signals. Many RVs now support 5G hotspots for reliable internet anywhere.
Example Setup: Streaming with a Fire Stick
Plug an Amazon Fire Stick into the TV’s HDMI port. Connect to Wi-Fi via the Fire Stick’s settings. Use a USB power adapter plugged into a 12V socket (with inverter) or a dedicated USB port if your TV has one. This setup gives you access to Netflix, Hulu, and more—no cable needed.
Maintenance and Safety Tips
Once your TV is mounted, regular maintenance ensures it stays secure and functional.
Check Mounts Before Every Trip
Inspect all screws and bolts for tightness. Look for cracks in the wall or mount. Re-tighten if needed.
Clean the Screen and Vents
Use a microfiber cloth to wipe the screen. Avoid harsh chemicals. Dust the vents to prevent overheating.
Store Properly When Not in Use
If you remove the TV for storage, keep it in a padded case. Store the mount securely to avoid losing parts.
Upgrade as Needed
As technology evolves, consider upgrading to a smarter, more efficient TV. Many newer models are even more camper-friendly.
Conclusion
Mounting a TV in your camper is a rewarding project that enhances your travel experience. With the right TV, a sturdy RV-rated mount, and careful installation, you can enjoy your favorite shows safely and comfortably—no matter where the road takes you. Remember, safety comes first: always anchor into solid framing, use quality hardware, and test everything before hitting the highway. A little effort now means years of entertainment on the go. So grab your tools, pick your spot, and get ready to binge-watch under the stars.
Frequently Asked Questions
Can I mount a TV on a curved camper wall?
Yes, but it’s more challenging. Use a flexible mount or a custom backer board to create a flat surface. Some RV-specific mounts are designed for curved walls—check the manufacturer’s specs.
Do I need a special TV for a camper?
Not necessarily, but a lightweight, energy-efficient LED TV under 32 inches is ideal. Avoid heavy plasmas or large screens that strain walls and drain power.
How do I prevent my TV from falling while driving?
Use an RV-rated mount with locking features, anchor into studs, and add a safety strap. Always check tightness before trips and avoid over-tightening screws.
Can I mount a TV in a pop-up camper?
Yes, but space and wall strength are limited. Use a lightweight TV and a fixed or slim swivel mount. Ensure the wall can support the weight—reinforce if needed.
What’s the best way to hide TV cables in a camper?
Use adhesive cable clips, raceways, or flexible conduit. Route wires along trim or behind cabinets. Label cables for easy identification and future upgrades.
Is it safe to leave the TV on while driving?
No. Always turn off and secure the TV before moving. Even with a strong mount, sudden stops or vibrations can cause damage or injury. Use a screen lock or cover if needed.

At CarLegit, we believe information should be clear, factual, and genuinely helpful. That’s why every guide, review, and update on our website is created with care, research, and a strong focus on user experience.