
Taking off a Hyundai Elantra door panel might seem tricky, but with the right tools and careful steps, it’s a manageable DIY task. Whether you’re replacing a speaker, fixing a window regulator, or upgrading your interior, this guide walks you through the entire process with clear instructions and safety tips.
In This Article
- 1 Key Takeaways
- 2 📑 Table of Contents
- 3 Why You Might Need to Remove Your Hyundai Elantra Door Panel
- 4 Tools and Materials You’ll Need
- 5 Step-by-Step Guide to Removing the Door Panel
- 5.1 Step 1: Disconnect the Battery (Safety First!)
- 5.2 Step 2: Remove the Door Handle Cover
- 5.3 Step 3: Take Off the Armrest or Switch Panel
- 5.4 Step 4: Locate and Remove All Visible Screws
- 5.5 Step 5: Release the Plastic Clips
- 5.6 Step 6: Lift the Panel Up and Off
- 5.7 Step 7: Disconnect Electrical Connectors
- 6 Common Mistakes to Avoid
- 7 Reinstalling the Door Panel
- 8 Tips for Specific Repairs and Upgrades
- 9 When to Call a Professional
- 10 Final Thoughts
- 11 Frequently Asked Questions
- 11.1 How long does it take to remove a Hyundai Elantra door panel?
- 11.2 Can I remove the door panel without disconnecting the battery?
- 11.3 What if a plastic clip breaks during removal?
- 11.4 Do I need special tools to remove the Hyundai Elantra door panel?
- 11.5 Will removing the door panel affect my car’s warranty?
- 11.6 Can I drive my Elantra with the door panel removed?
Key Takeaways
- Use the right tools: A trim removal tool, Phillips screwdriver, and socket wrench are essential to avoid damaging clips or screws.
- Disconnect the battery: Always disconnect the negative terminal before working on electrical components to prevent short circuits.
- Locate hidden screws: Check behind door handles, armrests, and trim pieces—many screws are concealed under plastic covers.
- Handle clips gently: Door panels are held by plastic clips that can break if forced; use a prying tool to release them evenly.
- Label wires and connectors: Take photos or use tape to label electrical connections so reassembly is easier and error-free.
- Work in a well-lit area: Good lighting helps you spot small screws and avoid missing critical steps.
- Test before final reassembly: Reconnect the battery and test windows, locks, and speakers before snapping the panel back into place.
📑 Table of Contents
Why You Might Need to Remove Your Hyundai Elantra Door Panel
So, you’re sitting in your Hyundai Elantra, and suddenly the window won’t go up. Or maybe the door lock is acting up, or you want to upgrade your speakers for better sound. Whatever the reason, knowing how to take off the Hyundai Elantra door panel is a valuable skill that can save you time and money.
Door panels aren’t just cosmetic—they protect internal components like wiring, window regulators, speakers, and latches. Over time, these parts may wear out or break, requiring access behind the panel. Instead of paying a mechanic $100+ just to open the door, you can do it yourself with a few basic tools and some patience. Plus, once you’ve done it once, you’ll feel confident tackling future repairs or upgrades.
Whether you’re a weekend DIYer or just trying to fix a minor issue, this guide will walk you through the entire process. We’ll cover everything from the tools you need to the exact steps for removing the panel safely. No prior experience? No problem. We’ll keep things simple, clear, and jargon-free.
Tools and Materials You’ll Need
Before you start, gather the right tools. Using the wrong ones can damage your door panel or interior trim, leading to costly repairs. Here’s what you’ll need to take off your Hyundai Elantra door panel like a pro:
Visual guide about How to Take Off Hyundai Elantra Door Panel
Image source: paulstravelpictures.com
Essential Tools
- Trim removal tool (plastic pry tool): This is your best friend. It helps you pop clips without scratching or cracking the panel. Metal tools can damage plastic, so avoid screwdrivers unless absolutely necessary.
- Phillips head screwdriver: Most screws in the door panel are Phillips head. A #2 size usually works, but keep a #1 handy just in case.
- Socket wrench with 10mm socket: Some models use 10mm bolts, especially near the door handle or latch mechanism.
- Flathead screwdriver (optional): Useful for prying off small plastic covers, but use gently to avoid marring surfaces.
- Needle-nose pliers: Helpful for disconnecting small electrical connectors or pulling out stubborn clips.
Optional but Helpful Items
- Magnetic tray or bowl: Keeps screws and small parts from getting lost.
- Flashlight or work light: Helps you see hidden screws and connectors in dim areas.
- Electrical tape or zip ties: For labeling wires or securing loose harnesses during reassembly.
- Work gloves: Protect your hands from sharp edges or broken plastic.
Having everything ready before you start makes the process smoother and reduces frustration. Trust me—there’s nothing worse than being halfway through and realizing you need a different tool.
Step-by-Step Guide to Removing the Door Panel
Now that you’ve got your tools, let’s get into the nitty-gritty. Removing the Hyundai Elantra door panel is a multi-step process, but if you follow each step carefully, you’ll avoid common pitfalls. We’ll go through it methodically, starting from the outside and working inward.
Visual guide about How to Take Off Hyundai Elantra Door Panel
Image source: paulstravelpictures.com
Step 1: Disconnect the Battery (Safety First!)
Before touching any electrical components, disconnect the negative terminal of your car battery. This prevents accidental short circuits when you unplug wiring harnesses behind the panel. Use a wrench to loosen the clamp and gently remove the cable. Set it aside where it won’t touch metal.
Even if you’re only replacing a speaker or handle, it’s smart to disconnect power. One wrong move with a live wire could fry your audio system or trigger warning lights. Safety isn’t optional—it’s essential.
Step 2: Remove the Door Handle Cover
Look at the interior door handle—the one you pull to open the door from inside. On most Elantra models, there’s a small plastic cover over the screw that holds the handle in place. Use your trim tool or a flathead screwdriver to gently pry it off. Be careful not to snap it—these covers are brittle and hard to replace.
Once the cover is off, you’ll see a Phillips head screw. Remove it and set it aside in your magnetic tray. This screw secures the handle assembly to the door frame. Don’t lose it—you’ll need it for reassembly.
Step 3: Take Off the Armrest or Switch Panel
Next, locate the armrest or the panel where your power window and lock switches are mounted. This piece often snaps into place and may have hidden screws underneath. Use your trim tool to carefully pry around the edges. Start at the front and work your way back.
On some Elantra models, the switch panel is held by two screws beneath a small cover. If you see a tiny notch or seam, that’s your clue. Pop it open, remove the screws, and gently lift the panel away. Be mindful of the wiring—don’t yank it out. You’ll need to disconnect the electrical connectors later.
Step 4: Locate and Remove All Visible Screws
Now scan the entire door panel for screws. Common locations include:
- Behind the door handle (already removed)
- Under the armrest or switch panel
- Inside the door pull cup (the recessed area where you grab to close the door)
- Near the bottom edge of the panel
Some screws are hidden under plastic caps or felt pads. Use your trim tool to lift these covers. If you’re unsure, gently press around the panel—areas that feel stiff or don’t flex are likely screwed in.
Remove every screw you find. Count them if it helps. Missing even one can make reassembly difficult or cause rattling noises later.
Step 5: Release the Plastic Clips
This is where many people go wrong. The door panel is held in place by a series of plastic clips around the perimeter. These clips snap into the door frame and can be tricky to release without breaking.
Start at the bottom of the panel. Insert your trim tool between the panel and the door frame. Gently pry outward—don’t force it. Work your way around the edges, releasing each clip one by one. You’ll hear a soft “pop” when a clip releases.
If a clip breaks, don’t panic. Replacement clips are cheap and available at auto parts stores. But try to avoid breaking them—use slow, steady pressure and angle your tool slightly outward, not straight in.
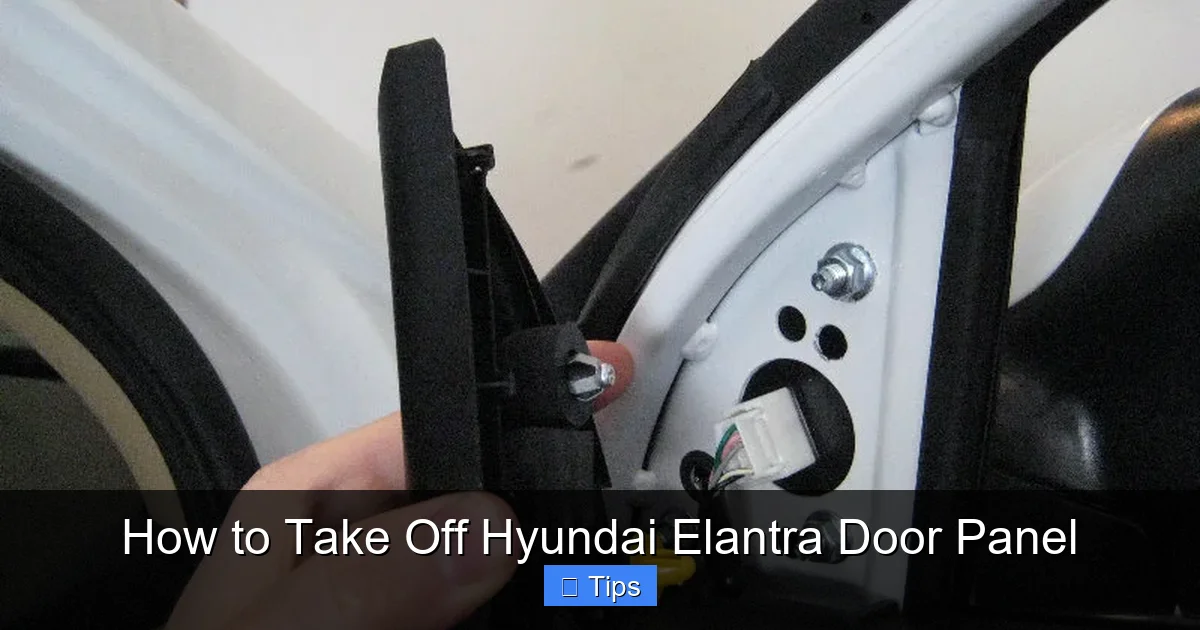
Step 6: Lift the Panel Up and Off
Once all clips are free, the panel should lift away from the door. But wait—there’s usually one more step. Most Elantra door panels have a hook or slot at the top that slides over a metal rod in the door frame.
Gently lift the panel upward about 1–2 inches to disengage this hook. Then tilt the top outward and pull the panel away from the door. Be careful not to scratch the paint or damage the weather seal.
Step 7: Disconnect Electrical Connectors
With the panel removed, you’ll see several wiring harnesses connected to switches, speakers, or motors. These must be disconnected before you can fully remove the panel.
Look for plastic connectors with tabs. Press the tab and pull the connector apart. Don’t pull on the wires—grasp the connector itself. If a connector feels stuck, wiggle it slightly while pressing the tab.
Take a photo or label each connector with tape so you remember where it goes during reassembly. This saves time and prevents mix-ups.
Common Mistakes to Avoid
Even with careful steps, it’s easy to make mistakes when removing a door panel. Here are some common pitfalls and how to avoid them:
Visual guide about How to Take Off Hyundai Elantra Door Panel
Image source: paulstravelpictures.com
Forcing the Panel Off
One of the biggest errors is trying to yank the panel off before all clips and screws are released. This can crack the plastic, break clips, or damage the door frame. Always double-check that every screw is out and every clip is free before lifting.
Using Metal Tools
Metal screwdrivers or pry bars can scratch, dent, or gouge your interior trim. Always use plastic trim tools designed for automotive use. They’re inexpensive and worth every penny.
Ignoring Electrical Connections
Forgetting to disconnect the battery or pulling connectors too hard can damage sensitive electronics. Take your time, label everything, and handle wires with care.
Misplacing Screws and Clips
It’s easy to lose small parts when working in a cluttered space. Use a magnetic tray or lay out screws in order on a clean towel. This makes reassembly much easier.
Rushing the Process
Door panel removal isn’t a race. Rushing increases the risk of damage. Set aside 30–45 minutes, work in good lighting, and stay patient.
Reinstalling the Door Panel
Once your repair or upgrade is complete, it’s time to put everything back. Reassembly is basically the reverse of removal, but a few tips will ensure a smooth finish.
Reconnect Electrical Connectors
Start by plugging in all wiring harnesses. Match the labels or photos you took earlier. Make sure each connector clicks securely into place.
Position the Panel
Hold the panel near the door and align the top hook with the metal rod in the frame. Slide it down until it seats properly.
Press Clips Into Place
Starting at the top, press the panel firmly around the edges to re-engage the plastic clips. You should hear them snap in. Work your way around the panel, applying even pressure.
Reinstall Screws and Covers
Replace all screws in their original locations. Don’t overtighten—plastic threads can strip easily. Snap the handle cover and switch panel back into place.
Reconnect the Battery and Test
Reattach the negative battery cable. Turn on the ignition and test the windows, locks, and speakers to make sure everything works. Listen for unusual noises or rattles.
If something doesn’t work, double-check your connections. It’s better to fix it now than later.
Tips for Specific Repairs and Upgrades
Now that you know how to take off the Hyundai Elantra door panel, you might be wondering what you can do once it’s off. Here are a few common projects and tips for each:
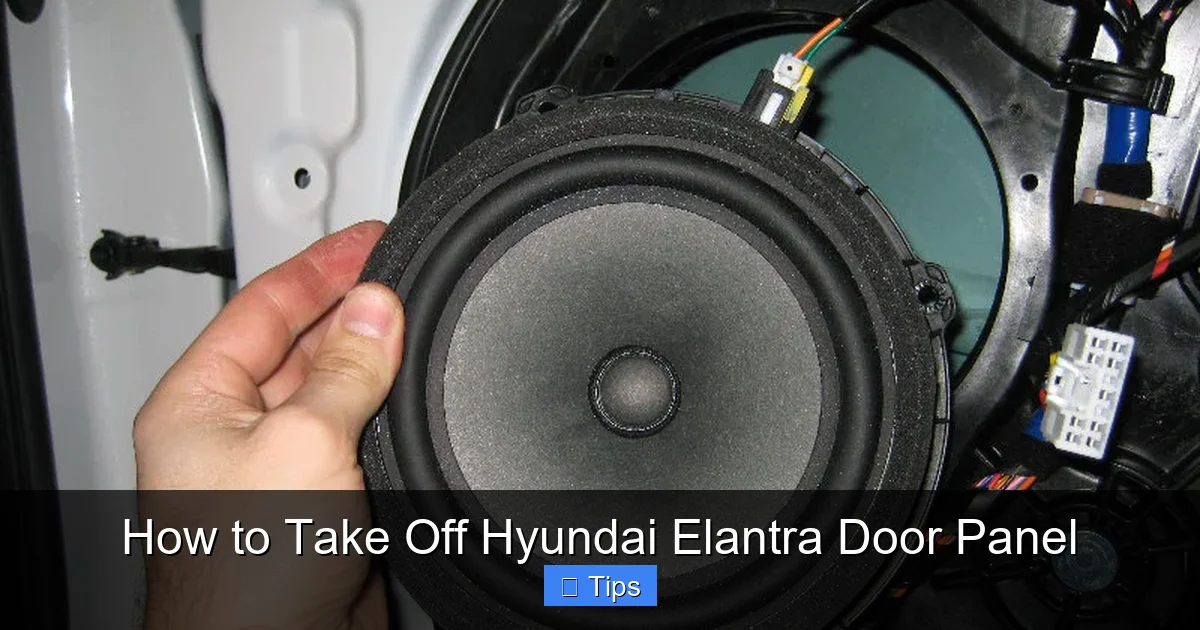
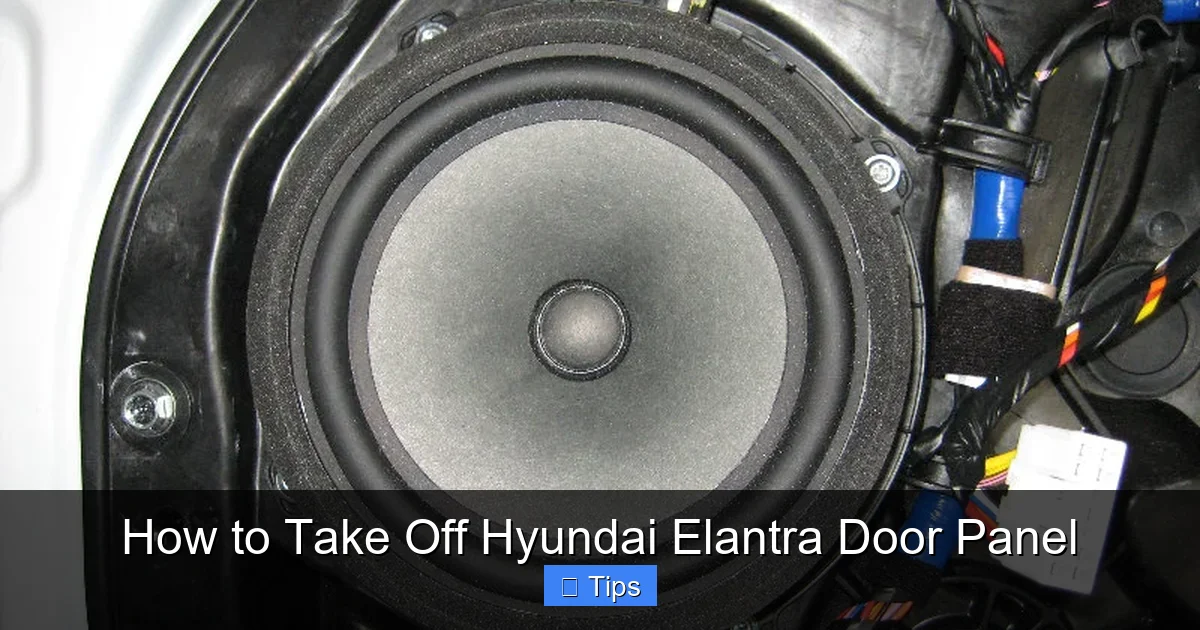
Replacing a Speaker
If your audio sounds weak or distorted, the speaker may be blown. Once the panel is off, locate the speaker—it’s usually held by four screws. Disconnect the wiring harness, remove the old speaker, and install the new one. Make sure the polarity matches (positive to positive, negative to negative).
Fixing a Window Regulator
A window that won’t go up or down is often due to a faulty regulator or motor. Access the regulator by removing the plastic moisture barrier behind the panel. Be careful not to tear it—you’ll need to reseal it to prevent water leaks.
Upgrading Door Handles or Latches
Some owners upgrade to aftermarket handles for a sportier look or better ergonomics. Just make sure the new part is compatible with your Elantra’s year and model.
Adding Sound Deadening Material
Want quieter rides? Install sound-deadening mats like Dynamat or Noico behind the panel. They reduce road noise and improve audio quality. Clean the surface first and apply the material in sheets, avoiding wires and moving parts.
When to Call a Professional
While most door panel removals are DIY-friendly, some situations call for expert help. If you encounter rusted screws, broken clips, or complex electrical issues, it may be safer to consult a mechanic. Also, if your Elantra is still under warranty, DIY repairs could void coverage—check your manual first.
Remember, knowing your limits is part of being a smart car owner. There’s no shame in asking for help when needed.
Final Thoughts
Learning how to take off your Hyundai Elantra door panel opens the door—literally—to countless repair and upgrade possibilities. With the right tools, a careful approach, and this guide, you can tackle everything from speaker swaps to window fixes with confidence.
Take your time, stay safe, and don’t rush. The more you practice, the easier it gets. And who knows? You might just discover a new passion for DIY car maintenance. Your Elantra will thank you—and so will your wallet.
Frequently Asked Questions
How long does it take to remove a Hyundai Elantra door panel?
For a first-timer, it typically takes 30 to 45 minutes. With experience, you can do it in under 20 minutes. Rushing increases the risk of damage, so patience is key.
Can I remove the door panel without disconnecting the battery?
Technically yes, but it’s not recommended. Disconnecting the battery prevents accidental shorts or damage to electrical components like window motors or speakers.
What if a plastic clip breaks during removal?
Don’t worry—replacement clips are inexpensive and widely available. Look for “door panel clip” kits online or at auto parts stores. Match the size and shape to your original clips.
Do I need special tools to remove the Hyundai Elantra door panel?
Basic tools like a trim removal tool, screwdriver, and socket wrench are sufficient. You don’t need expensive equipment, but plastic pry tools are highly recommended to avoid damage.
Will removing the door panel affect my car’s warranty?
Generally, no—unless you damage something during the process. However, if your vehicle is under warranty and the repair is covered, it’s safer to let a dealer handle it.
Can I drive my Elantra with the door panel removed?
It’s not advisable. The panel protects internal components and helps maintain structural integrity. Also, loose wires or parts could interfere with window or lock operation while driving.

At CarLegit, we believe information should be clear, factual, and genuinely helpful. That’s why every guide, review, and update on our website is created with care, research, and a strong focus on user experience.