
If your RV running lights aren’t working, it’s often due to simple issues like blown fuses, bad ground connections, or faulty bulbs. This guide walks you through step-by-step troubleshooting, from checking the vehicle’s electrical system to inspecting wiring and switches, so you can fix the problem quickly and safely.
In This Article
- 1 Key Takeaways
- 2 📑 Table of Contents
- 3 Why Your RV Running Lights Might Not Be Working
- 4 Understanding RV Running Lights and Their Purpose
- 5 Common Causes of RV Running Lights Not Working
- 6 Step-by-Step Troubleshooting Guide
- 7 Preventing Future Running Light Failures
- 8 When to Call a Professional
- 9 Final Thoughts
- 10 Frequently Asked Questions
- 10.1 Why are only some of my RV running lights not working?
- 10.2 Can a bad battery cause running lights to fail?
- 10.3 Do I need special tools to fix RV running lights?
- 10.4 Can I drive my RV if the running lights aren’t working?
- 10.5 How often should I replace RV running light bulbs?
- 10.6 Why do my running lights flicker while driving?
Key Takeaways
- Check the fuse first: A blown fuse is one of the most common reasons RV running lights fail—always inspect the fuse box in both your tow vehicle and RV.
- Inspect ground connections: Poor grounding can cause intermittent or total light failure; clean and tighten all ground wires.
- Test bulbs and sockets: Burnt-out bulbs or corroded sockets are frequent culprits—replace damaged components promptly.
- Verify trailer plug wiring: Loose, damaged, or incorrectly wired 7-pin connectors often disrupt power to running lights.
- Use a multimeter for diagnostics: A simple voltage test can pinpoint whether power is reaching the lights or where the circuit breaks.
- Consider environmental factors: Moisture, corrosion, and vibration during travel can degrade electrical connections over time.
- Safety first: Always disconnect the RV from power and use proper tools when working on electrical systems.
📑 Table of Contents
Why Your RV Running Lights Might Not Be Working
Imagine you’re all set for a weekend camping trip—your RV is packed, the route is planned, and you’re ready to hit the road. But as the sun begins to set, you flip the switch for your running lights and… nothing. No glow. No illumination. Just darkness where your clearance and side marker lights should be shining bright.
This frustrating scenario is more common than you might think. RV running lights—also known as clearance lights, marker lights, or side lights—are essential for visibility and safety, especially during low-light conditions or when parked on the side of the road. When they stop working, it’s not just an inconvenience; it’s a potential hazard. The good news? Most causes of RV running lights not working are fixable with some basic troubleshooting and a little know-how.
In this comprehensive guide, we’ll walk you through the most common reasons your RV running lights might fail, how to diagnose the issue step by step, and practical solutions to get them working again. Whether you’re a seasoned RVer or new to the lifestyle, understanding your RV’s electrical system can save you time, money, and stress on the road.
Understanding RV Running Lights and Their Purpose
Before diving into fixes, it helps to understand what running lights do and why they matter. Running lights on an RV are low-intensity lights mounted along the sides, front, and rear of the vehicle. They’re not as bright as headlights or brake lights, but they serve a critical role: making your RV visible to other drivers, especially at night or in poor weather.
Visual guide about Rv Running Lights Not Working
Image source: rvprofy.nyc3.cdn.digitaloceanspaces.com
Types of RV Running Lights
There are several types of running lights commonly found on RVs:
- Clearance lights: Positioned at the front and rear corners, these indicate the width of the RV.
- Side marker lights: Located along the sides, they help other drivers see the length of your rig.
- Identification lights: A cluster of three red lights at the rear center, signaling the top of the vehicle.
- License plate lights: Though not always classified as running lights, they often share the same circuit and should be checked if others are out.
These lights are typically wired into the same circuit and powered through the 7-pin trailer connector from your tow vehicle. When one or more aren’t working, it’s usually a sign of an electrical issue somewhere in the system.
Why Running Lights Matter for Safety
Running lights aren’t just about compliance with DOT regulations—they’re a vital part of road safety. Without them, your RV becomes much harder to see, increasing the risk of side collisions, especially on highways or in foggy conditions. Additionally, many states require functioning running lights for legal travel, and failing an inspection could result in fines or being pulled over.
Even if you’re parked at a campsite, running lights help other RVers and vehicles see your rig in the dark, preventing accidental bumps or scrapes. In short, keeping them in working order isn’t optional—it’s essential.
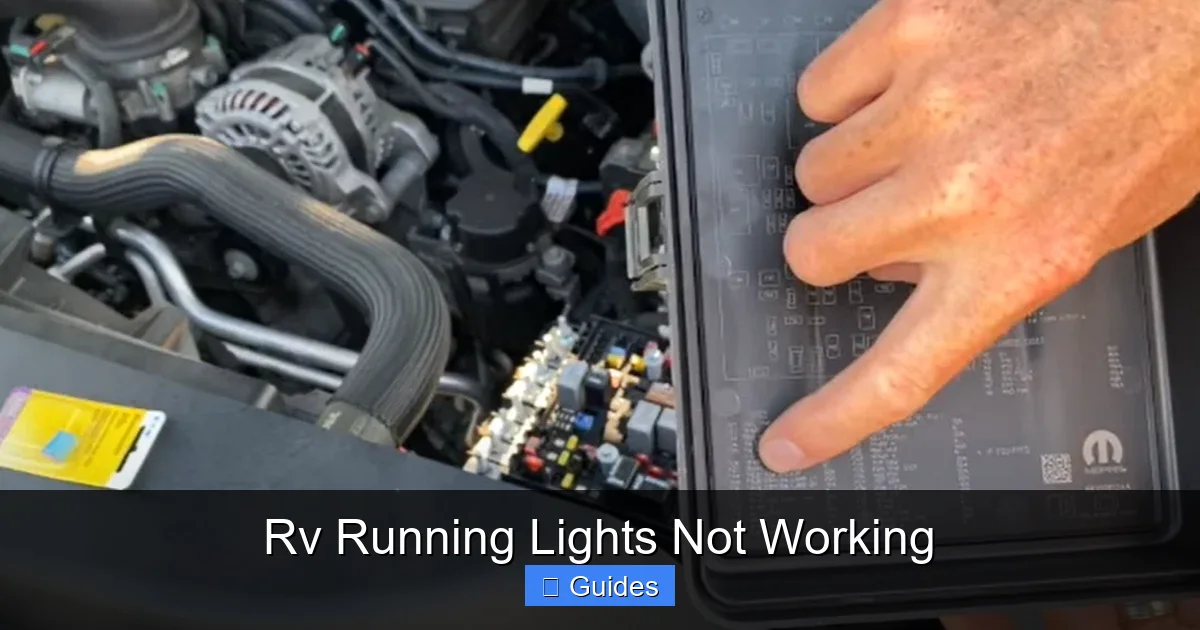
Common Causes of RV Running Lights Not Working
When your RV running lights stop working, the root cause is usually electrical. Unlike mechanical failures, electrical issues can be tricky because they often involve hidden connections, corrosion, or intermittent faults. Let’s break down the most common culprits.
Visual guide about Rv Running Lights Not Working
Image source: i.ytimg.com
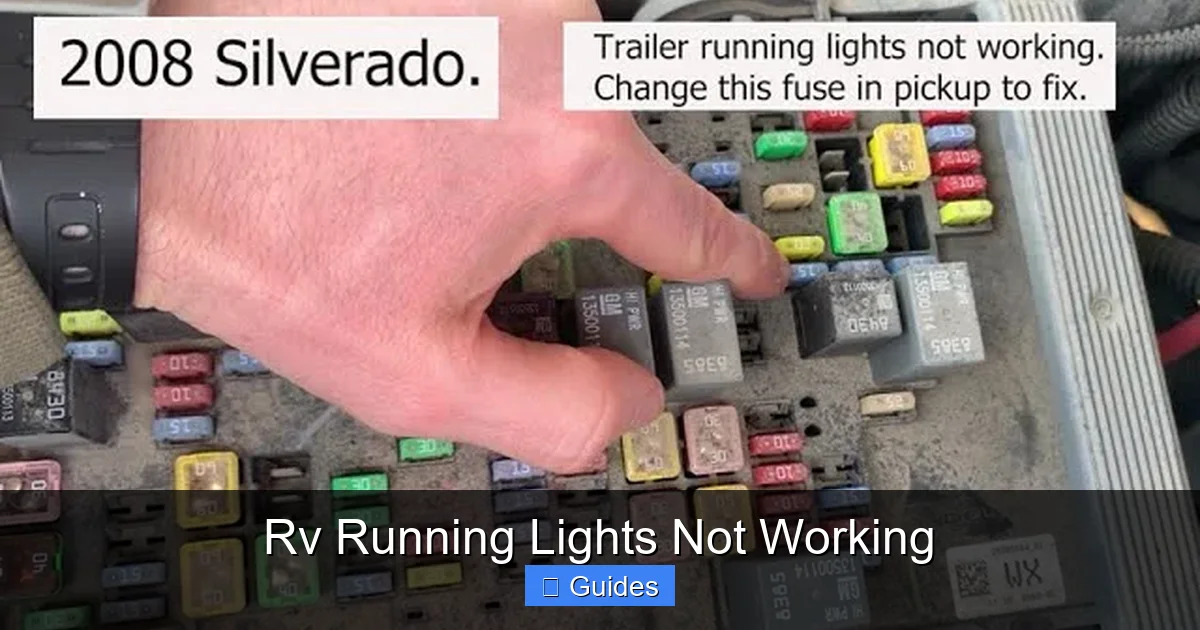
1. Blown Fuse
The fuse is the first line of defense in any electrical circuit. It’s designed to blow when too much current flows, protecting the wiring and components from damage. If your running lights suddenly stop working, a blown fuse is one of the first things to check.
Fuses for RV running lights are typically located in two places: the fuse box in your tow vehicle and the converter or distribution panel inside the RV. The tow vehicle fuse controls power sent through the 7-pin connector, while the RV’s internal fuse protects the lights once the power reaches the coach.
Tip: Always carry spare fuses rated for the correct amperage. A 10-amp fuse is common for running light circuits, but check your owner’s manual to be sure.
2. Faulty Ground Connection
Grounding is essential for completing an electrical circuit. If the ground wire is loose, corroded, or disconnected, power can’t flow properly—even if everything else is working. This is especially common in older RVs or those that have been exposed to moisture.
The ground wire usually connects the light fixture to the RV’s chassis. Over time, vibration and weather can loosen this connection. You might notice that some lights work intermittently or only when the RV is moving—a classic sign of a bad ground.
How to fix it: Locate the ground wire (usually black) at the light fixture, remove any corrosion with a wire brush, and tighten the connection to the chassis. For extra security, use a star washer to prevent loosening.
3. Burnt-Out Bulbs or Corroded Sockets
It sounds obvious, but sometimes the simplest explanation is the right one: the bulbs are simply burnt out. RV running lights often use 12-volt incandescent bulbs, which have a limited lifespan—especially when subjected to constant vibration on the road.
Even if a bulb looks intact, the filament inside may be broken. Additionally, the socket itself can corrode due to moisture exposure, preventing proper contact. This is common in lights near the ground or on the sides of the RV, where road spray and rain can accumulate.
Pro tip: Carry a few spare bulbs and a bulb tester. If a bulb is out, replace it and check the socket for white or green corrosion. Clean it with electrical contact cleaner if needed.
4. Damaged or Loose 7-Pin Trailer Plug
The 7-pin connector is the lifeline between your tow vehicle and RV. It carries power for brakes, turn signals, and running lights. If the plug is damaged, loose, or improperly wired, your running lights won’t get power.
Common issues include bent pins, frayed wires, or moisture inside the plug. You might also have a wiring mismatch—especially if you’ve recently changed vehicles or installed a new hitch.
Check this first: Inspect the plug for physical damage. Use a multimeter to test each pin for voltage when the running lights are turned on. The running light circuit is usually pin 4 (white is ground, brown is running lights).
5. Faulty Light Switch or Relay
Some RVs have a dedicated switch for running lights, while others rely on the vehicle’s headlight switch. If the switch is faulty or the relay (an electromagnetic switch that controls high-current circuits) has failed, the lights won’t turn on—even if power is reaching the system.
This is less common than fuse or ground issues, but still worth checking if other fixes don’t work. A relay might click when activated, but if it’s internally damaged, it won’t complete the circuit.
How to test: Swap the relay with a known working one (like the horn relay) to see if the lights come on. If they do, replace the faulty relay.
Step-by-Step Troubleshooting Guide
Now that you know the common causes, let’s walk through a systematic approach to diagnosing and fixing your RV running lights. Follow these steps in order to save time and avoid unnecessary repairs.
Visual guide about Rv Running Lights Not Working
Image source: rvprofy.com
Step 1: Check the Fuses
Start by inspecting the fuses in both your tow vehicle and RV. Turn off all power sources, including the vehicle ignition and RV battery disconnect.
Locate the fuse box in your truck (usually under the dashboard or hood) and find the fuse labeled “Trailer” or “Running Lights.” Remove it and check if the filament is broken. If it’s blown, replace it with an identical fuse.
Next, go to your RV’s converter or distribution panel (often near the entrance door) and check the fuse for the running lights circuit. Again, replace if necessary.
Note: If a fuse blows immediately after replacement, there’s likely a short circuit somewhere in the wiring—don’t keep replacing fuses without investigating further.
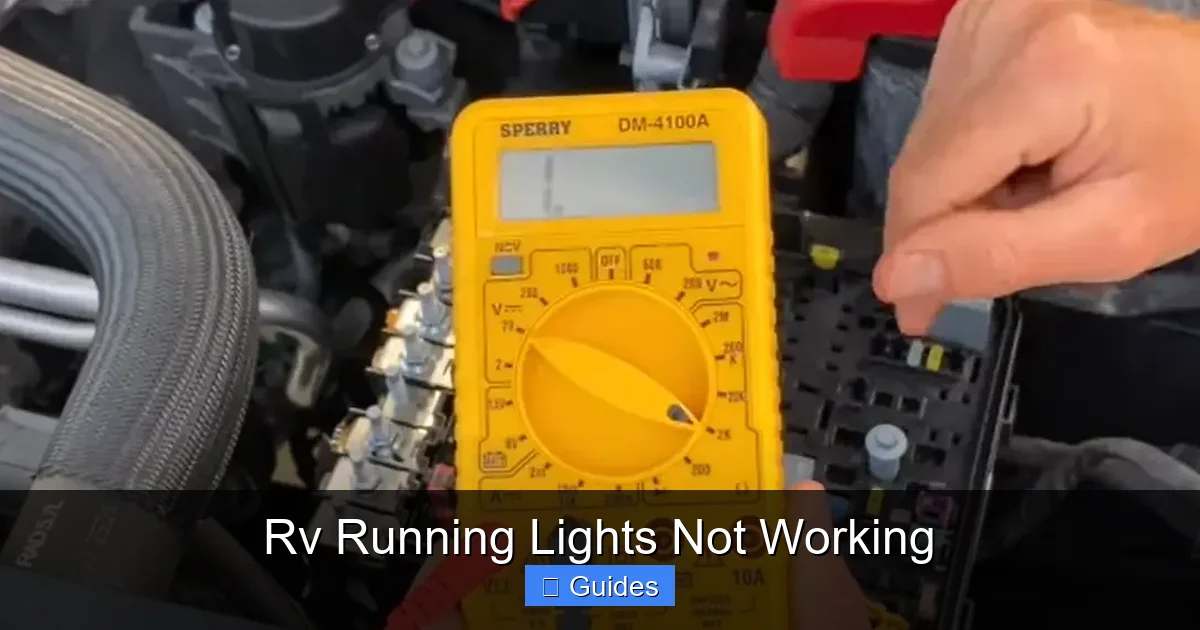
Step 2: Test the 7-Pin Connector
With the tow vehicle running and the headlight switch on, use a multimeter to test the 7-pin connector. Set the meter to DC voltage and touch the red probe to pin 4 (brown wire, running lights) and the black probe to pin 1 (white wire, ground).
You should see around 12 volts. If there’s no voltage, the issue is in the tow vehicle’s wiring or switch. If voltage is present, the problem lies in the RV’s side of the circuit.
Tip: If you don’t have a multimeter, you can use a test light or even a spare bulb to check for power.
Step 3: Inspect Bulbs and Sockets
Remove each running light lens and check the bulb. Look for a broken filament or darkened glass. Replace any burnt-out bulbs.
While the lens is off, inspect the socket for corrosion, melted plastic, or loose wires. Clean corroded contacts with electrical cleaner and a small wire brush. If the socket is damaged, replace the entire fixture.
Pro tip: Consider upgrading to LED running lights. They last longer, use less power, and are more resistant to vibration.
Step 4: Check Ground Connections
Locate the ground wire at each light fixture. It’s usually a black wire bolted to the RV’s frame. Remove the bolt, clean the contact area with sandpaper or a wire brush, and reattach it securely.
If the ground wire is frayed or corroded, cut off the damaged section and splice in a new piece of 14- or 16-gauge wire. Use heat-shrink tubing or electrical tape to insulate the connection.
Bonus: Apply dielectric grease to the connection to prevent future corrosion.
Step 5: Trace the Wiring
If all else fails, the issue might be a broken wire or loose connection somewhere along the circuit. Start at the 7-pin connector and follow the wiring harness toward the lights.
Look for pinched, frayed, or disconnected wires—especially near hinges, under the RV, or where the wiring passes through the frame. Use a continuity tester or multimeter to check for breaks.
Safety note: Always disconnect the RV from shore power and turn off the battery before working on wiring.
Preventing Future Running Light Failures
Once your running lights are working again, take steps to prevent the problem from recurring. Regular maintenance and smart upgrades can keep your electrical system in top shape.
Regular Inspections
Make it a habit to inspect your running lights before every trip. Check for cracked lenses, loose fixtures, and signs of corrosion. A quick visual scan can catch problems early.
Upgrade to LED Lights
LED running lights are more durable, energy-efficient, and longer-lasting than traditional incandescent bulbs. They’re also less prone to failure from vibration—a major plus for RVers.
Many LED kits are direct replacements for standard fixtures and come with built-in resistors to prevent hyper-flashing or compatibility issues.
Protect Electrical Connections
Use dielectric grease on all electrical connections to repel moisture and prevent corrosion. Seal outdoor fixtures with silicone caulk if they’re exposed to the elements.
Consider installing a weatherproof cover over the 7-pin connector when not in use to keep dirt and water out.
Secure Wiring Harnesses
Loose wiring can rub against sharp edges or get pinched during travel. Use zip ties or conduit to secure harnesses and prevent damage.
Route wires away from heat sources, moving parts, and areas prone to water accumulation.
When to Call a Professional
Most running light issues can be fixed with basic tools and a little patience. However, if you’ve tried all the steps above and the lights still won’t work, it’s time to consult a professional.
An RV technician or automotive electrician can perform advanced diagnostics, such as checking for voltage drops, testing relays under load, or tracing complex wiring diagrams. They also have specialized tools like circuit tracers and thermal cameras to find hidden faults.
Don’t risk further damage or safety hazards by forcing a repair you’re not confident in. Sometimes, the smartest move is to call in an expert.
Final Thoughts
RV running lights not working can be a real headache, but in most cases, the fix is simpler than you think. By understanding the common causes—blown fuses, bad grounds, faulty bulbs, and wiring issues—you can diagnose and resolve the problem quickly and safely.
Remember, regular maintenance and proactive upgrades like LED lights can save you from future headaches. And when in doubt, don’t hesitate to seek professional help. Your safety—and the safety of others on the road—depends on it.
So next time your running lights go dark, don’t panic. Grab your multimeter, check the fuse, and follow the steps in this guide. With a little know-how, you’ll be back on the road with bright, reliable lights in no time.
Frequently Asked Questions
Why are only some of my RV running lights not working?
This usually points to a localized issue like a burnt-out bulb, corroded socket, or bad ground at a specific fixture. Check each non-working light individually, starting with the bulb and ground connection.
Can a bad battery cause running lights to fail?
Yes, if the RV battery is severely drained or the charging system isn’t working, it can affect the 12-volt system that powers the lights. Check the battery voltage and ensure the converter is charging properly.
Do I need special tools to fix RV running lights?
A basic multimeter, screwdrivers, wire strippers, and electrical tape are usually enough. For more advanced repairs, a continuity tester or circuit tracer can be helpful but aren’t essential.
Can I drive my RV if the running lights aren’t working?
It’s not recommended. Running lights are required for legal and safe travel, especially at night or in low visibility. Driving without them increases the risk of accidents and may result in a traffic citation.
How often should I replace RV running light bulbs?
Incandescent bulbs typically last 1,000 to 2,000 hours. If you use your RV frequently, consider replacing them annually or upgrading to LEDs, which can last 25,000 hours or more.
Why do my running lights flicker while driving?
Flickering often indicates a loose connection, poor ground, or a failing bulb. Check all ground points and wiring connections, especially at the 7-pin plug and light fixtures.

At CarLegit, we believe information should be clear, factual, and genuinely helpful. That’s why every guide, review, and update on our website is created with care, research, and a strong focus on user experience.