
Placing your E-ZPass correctly in a Tesla Model Y ensures reliable toll detection and avoids missed charges. This guide covers the ideal mounting location, materials to avoid, and practical tips for seamless travel.
In This Article
- 1 Key Takeaways
- 2 📑 Table of Contents
- 3 Why Proper E-ZPass Placement Matters in Your Tesla Model Y
- 4 Understanding How E-ZPass Works
- 5 The Best Location for E-ZPass in a Tesla Model Y
- 6 Alternative Mounting Options for Tesla Model Y
- 7 Tips for Ensuring Reliable E-ZPass Performance
- 8 Common Mistakes to Avoid
- 9 Final Thoughts: Get It Right the First Time
- 10 Frequently Asked Questions
- 10.1 Can I mount my E-ZPass on the side of the windshield in a Tesla Model Y?
- 10.2 Will window tint affect my E-ZPass signal in a Tesla Model Y?
- 10.3 Can I use a phone mount and E-ZPass at the same time?
- 10.4 What if my E-ZPass isn’t being detected after installation?
- 10.5 Is it safe to mount the E-ZPass over the Autopilot camera?
- 10.6 Can I use a magnetic mount for my E-ZPass in a Tesla?
Key Takeaways
- Mount behind the rearview mirror: The center-top windshield area offers the clearest line of sight for E-ZPass signal transmission.
- Avoid metalized window tints: These can block RFID signals; use non-metallic tint or mount outside the tint line.
- Use the E-ZPass adhesive mount: Most transponders come with a secure, removable mount designed for windshields.
- Don’t place near sensors: Keep the E-ZPass away from Tesla’s Autopilot cameras and radar to prevent interference.
- Test after installation: Drive through a toll lane to confirm the device is detected before long trips.
- Consider a vent or dash mount alternative: If windshield mounting isn’t ideal, use a non-metallic holder on the dashboard or air vent.
- Check state-specific rules: Some states require specific placement or have unique transponder models.
📑 Table of Contents
- Why Proper E-ZPass Placement Matters in Your Tesla Model Y
- Understanding How E-ZPass Works
- The Best Location for E-ZPass in a Tesla Model Y
- Alternative Mounting Options for Tesla Model Y
- Tips for Ensuring Reliable E-ZPass Performance
- Common Mistakes to Avoid
- Final Thoughts: Get It Right the First Time
Why Proper E-ZPass Placement Matters in Your Tesla Model Y
If you drive a Tesla Model Y and use toll roads, you know how convenient E-ZPass can be. No more fumbling for cash or slowing down at toll booths—just smooth, uninterrupted travel. But here’s the catch: if your E-ZPass isn’t placed correctly, you might not get that seamless experience. In fact, you could end up with missed tolls, unexpected fees, or even violations.
The Tesla Model Y, like many modern vehicles, comes with advanced technology packed into its sleek design. From the Autopilot cameras to the radar sensors and premium glass, there’s a lot going on behind that windshield. And while all that tech is amazing for safety and convenience, it can sometimes interfere with devices like your E-ZPass transponder. That’s why knowing exactly where to put your E-ZPass in a Tesla Model Y isn’t just helpful—it’s essential.
In this guide, we’ll walk you through the best practices for mounting your E-ZPass in your Model Y. Whether you’re a new Tesla owner or just upgrading your toll setup, we’ve got you covered. We’ll cover ideal locations, common mistakes to avoid, and even alternative mounting options if the windshield isn’t your preferred spot. By the end, you’ll be confident that your E-ZPass is working perfectly every time you hit the road.
Understanding How E-ZPass Works
Visual guide about Where to Put Ez Pass on Tesla Model Y
Image source: c2.staticflickr.com
Before we dive into placement, let’s quickly cover how E-ZPass actually works. E-ZPass uses RFID (Radio Frequency Identification) technology to communicate with toll readers installed above or beside toll lanes. When your vehicle passes through, the reader sends a signal to your transponder, which responds with your account information. The toll is then automatically deducted—no stopping, no hassle.
The key to this system working smoothly is signal clarity. The transponder needs a clear path to receive and send signals. If something blocks that path—like metal, thick glass coatings, or even other electronic devices—the signal can weaken or fail entirely. That’s why placement is so critical.
In most vehicles, the windshield offers the best line of sight for the transponder. But in the Tesla Model Y, the windshield is more than just glass. It’s part of a high-tech system that includes cameras, sensors, and sometimes aftermarket tints. All of these can affect how well your E-ZPass communicates with toll readers.
So, while the general rule is “mount it high and center,” the Model Y requires a bit more thought. You need to balance signal strength with the car’s existing tech. The good news? With the right approach, you can have both flawless Autopilot performance and reliable toll detection.
The Best Location for E-ZPass in a Tesla Model Y

Visual guide about Where to Put Ez Pass on Tesla Model Y
Image source: evpartsonline.com
Now, let’s get to the heart of the matter: where should you actually put your E-ZPass in a Tesla Model Y?
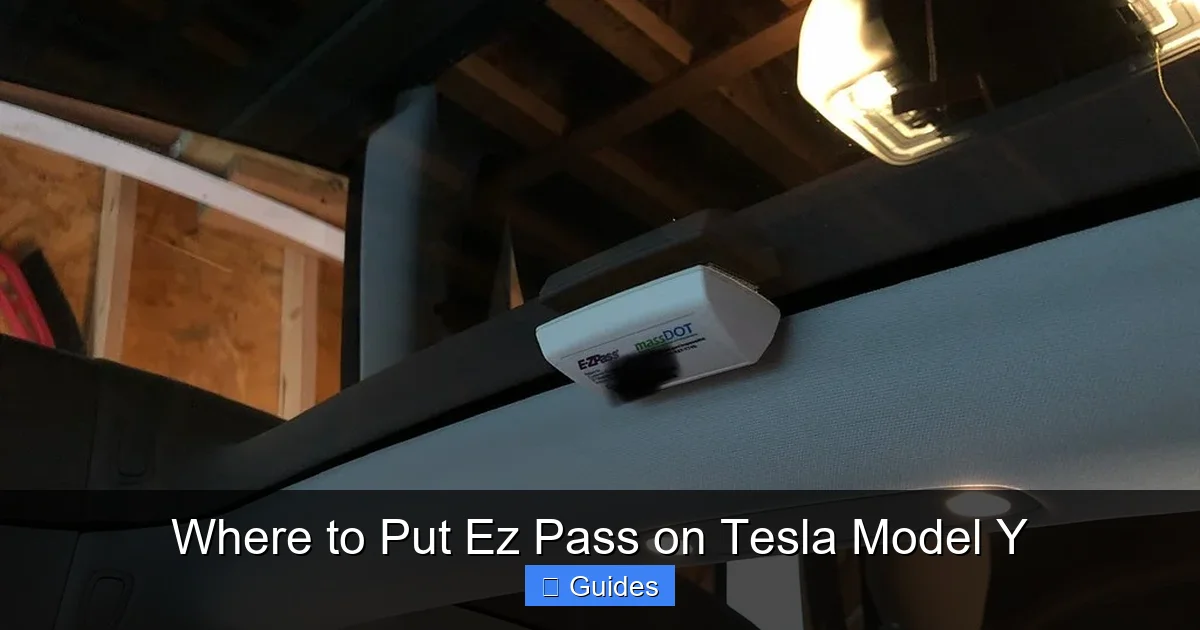
The most recommended spot is behind the rearview mirror, centered on the top of the windshield. This area typically has the least interference from sensors and offers a direct line of sight to overhead toll readers. It’s also out of your direct field of vision, so it won’t distract you while driving.
In the Model Y, the rearview mirror is mounted to the windshield with a small stalk, and there’s usually enough space just below it to mount the E-ZPass transponder. Most E-ZPass devices come with a clear adhesive mount designed specifically for this purpose. Simply clean the area with isopropyl alcohol, let it dry, and press the mount firmly into place.
But here’s a pro tip: don’t mount it directly over the mirror stalk or any black dots or shading on the windshield. Tesla windshields often have a shaded band at the top, and sometimes small black dots (called frit patterns) around the edges. These aren’t just for looks—they help with structural integrity and UV protection. Mounting over them can weaken the bond or block signals.
Instead, aim for the clear glass area just below the shaded band and centered horizontally. This spot is usually free of obstructions and gives your E-ZPass the best chance to work reliably.
Why the Center-Top Position Works Best
You might be wondering why the center-top position is so important. After all, couldn’t you just stick it on the side of the windshield or even on the dashboard?
The reason is simple: toll readers are typically mounted directly above the lane or on gantries that span the road. They’re designed to read transponders that are high up and centered. If your E-ZPass is mounted low on the windshield or off to the side, the signal might not reach it—or it might be too weak to register.
Additionally, the center position minimizes interference from the car’s own electronics. The Model Y’s Autopilot system uses cameras and radar located around the windshield, especially near the top. Mounting your E-ZPass in the center, but slightly below these sensors, reduces the chance of signal conflict.
Think of it like this: the E-ZPass needs a clear “window” to talk to the toll reader. The center-top of the windshield is that window. Any other spot increases the risk of signal blockage or interference.
What to Avoid When Mounting
While the center-top spot is ideal, there are a few things you should definitely avoid when mounting your E-ZPass in a Tesla Model Y.
First, don’t mount it over the Autopilot cameras. The main forward-facing camera is located just behind the rearview mirror. If you place your E-ZPass directly over it, you could block the camera’s view or interfere with its operation. This not only affects Autopilot but could also lead to safety issues.
Second, avoid areas with metallic window tint. Many Tesla owners opt for aftermarket tint to reduce heat and glare. But if that tint contains metal particles (common in high-performance films), it can block RFID signals. Even a small section of metallic tint over the transponder can cause detection problems.
If you have tinted windows, check the manufacturer’s specs. Look for “non-metallic” or “ceramic” tint, which doesn’t interfere with signals. Or, make sure your E-ZPass is mounted outside the tinted area—usually below the top 6 inches of the windshield.
Third, don’t use tape, magnets, or temporary holders that aren’t designed for E-ZPass. While it might seem convenient to stick it to the dash with double-sided tape, this can lead to poor signal reception and even damage your transponder or interior surfaces. Always use the official mount that came with your device.
Finally, avoid placing it near other electronic devices, like phone mounts or radar detectors. These can emit signals that interfere with the E-ZPass. Keep at least 6–8 inches of clearance from other gadgets.
Alternative Mounting Options for Tesla Model Y

Visual guide about Where to Put Ez Pass on Tesla Model Y
Image source: rxmechanic.com
What if you don’t want to mount your E-ZPass on the windshield? Maybe you’re concerned about aesthetics, or you’ve already got a phone mount or dash cam taking up space. The good news is, there are alternative options—but they come with some trade-offs.
Dashboard or Vent Mounts
One popular alternative is a dashboard or air vent mount. These are small holders that attach to your dash or clip onto the air vent. They keep the transponder visible and accessible without sticking anything to the windshield.
However, there are a few things to keep in mind. First, the dashboard is lower than the windshield, which can reduce signal strength. Toll readers are optimized for transponders at windshield height, so a dash-mounted E-ZPass might not be detected in all lanes—especially high-speed or express lanes.
Second, make sure the mount is made of non-metallic materials. Plastic or silicone holders are fine, but avoid anything with metal brackets or clips. Metal can block or reflect the RFID signal.
Third, position the mount as high as possible on the dash—ideally near the base of the windshield. This gives it the best chance of reaching the reader. And avoid placing it near the center console or any electronic components.
Some drivers use a small suction cup mount that attaches to the side of the windshield instead of the center. This can work if the side area is clear of tint and sensors, but it’s still not as reliable as the center-top position.
Using a Sun Visor Clip
Another creative option is a sun visor clip. Some third-party companies make clips designed to hold E-ZPass transponders on the sun visor. This keeps the device out of sight when not in use and avoids windshield mounting altogether.
But again, this method has limitations. The sun visor is even lower than the dashboard, and it can swing down and block your view. Plus, if the visor is made of metal or has a metallic lining, it could interfere with the signal.
If you go this route, test it thoroughly. Drive through a few toll lanes and make sure the transponder is consistently detected. If you get a missed toll notice, it’s time to reconsider the mounting location.
Rear Window Mounting (Not Recommended)
You might be tempted to mount the E-ZPass on the rear windshield, especially if the front is crowded. But this is generally not a good idea.
Most toll readers are positioned to read transponders from the front. Rear-mounted devices often go undetected, especially in high-speed lanes. Plus, the rear windshield in the Model Y has heating elements (for defrosting), which can interfere with RFID signals.
So while it might seem like a neat solution, rear mounting is unreliable and not worth the risk.
Tips for Ensuring Reliable E-ZPass Performance
Once you’ve mounted your E-ZPass, how can you make sure it’s working properly? Here are some practical tips to keep your tolling experience smooth.
Test It Before You Travel
Don’t wait until you’re on a long road trip to find out your E-ZPass isn’t working. Take a short drive through a local toll road or E-ZPass lane. Watch for the green light or confirmation beep that indicates detection. If you don’t see it, check your mounting location and try again.
Some states offer online tools where you can check your transponder’s status. Log into your E-ZPass account and look for recent activity. If there’s no record of a recent toll, your device might not be transmitting properly.
Keep the Transponder Clean
Dirt, dust, and grime can build up on the transponder’s surface, especially if it’s mounted low on the dash or visor. Over time, this can block the signal.
Wipe the front and back of the transponder with a soft, dry cloth every few weeks. Avoid using harsh chemicals or abrasive materials that could scratch the surface.
Check Battery Life (If Applicable)
Most E-ZPass transponders are passive, meaning they don’t have batteries—they’re powered by the toll reader’s signal. But some newer models, like the E-ZPass Flex or certain state-specific devices, do have batteries.
If your transponder has a battery, check the manufacturer’s guidelines for replacement intervals. A low battery can cause weak or inconsistent signals. Some devices have a small LED that flashes when the battery is low—pay attention to these indicators.
Avoid Overloading the Windshield
The Tesla Model Y’s windshield is already home to cameras, sensors, and sometimes dash cams or phone mounts. Adding too many devices can create clutter and increase the risk of interference.
If you must use multiple mounts, space them out. Keep the E-ZPass at least 6 inches away from other electronic devices. And always prioritize the Autopilot cameras—never block or cover them.
Update Your Account Information
Even with perfect placement, your E-ZPass won’t work if your account is outdated. Make sure your vehicle information, license plate, and payment method are up to date in your E-ZPass account.
Some states require you to register your Tesla’s VIN with your transponder. Check your local E-ZPass website for specific requirements.
Common Mistakes to Avoid
Even with the best intentions, it’s easy to make mistakes when installing your E-ZPass. Here are some common pitfalls and how to avoid them.
Mounting Over the Shaded Band
As mentioned earlier, the top of the Model Y’s windshield has a shaded band. It’s tempting to mount the E-ZPass right in the center of this band for a clean look. But this area often contains materials that block RFID signals.
Always mount below the shaded band, in the clear glass area. This ensures maximum signal transmission.
Using the Wrong Mount
Not all mounts are created equal. Some third-party holders are made of metal or have poor adhesive. Always use the mount that came with your E-ZPass, or a certified replacement from the manufacturer.
Avoid DIY solutions like tape, rubber bands, or suction cups not designed for transponders. These can fall off, damage your car, or block signals.
Ignoring State-Specific Rules
E-ZPass is a multi-state system, but each state has its own rules. For example, New York requires transponders to be mounted in the center of the windshield, while other states may allow side mounting.
Check your home state’s E-ZPass website for placement guidelines. If you travel frequently, consider getting a transponder that’s compatible with all states you visit.
Forgetting to Remove It When Selling the Car
If you sell or trade in your Tesla Model Y, don’t forget to remove your E-ZPass. Leaving it in the car could lead to unauthorized toll charges on your account.
Most transponders are easy to remove—just peel off the adhesive mount. Keep the transponder and mount in a safe place for your next vehicle.
Final Thoughts: Get It Right the First Time
Placing your E-ZPass in a Tesla Model Y might seem like a small detail, but it can make a big difference in your driving experience. A properly mounted transponder ensures reliable toll detection, avoids unexpected fees, and keeps your focus on the road—not on whether you’ll get a violation notice in the mail.
The center-top windshield position, just below the rearview mirror, remains the gold standard. It offers the best signal strength, avoids interference with Tesla’s sensors, and keeps your setup clean and unobtrusive. If you can’t use the windshield, a high-mounted dash or vent holder is the next best option—just test it thoroughly.
Remember, the goal is a seamless, stress-free drive. With the right placement and a little attention to detail, your E-ZPass will work flawlessly, mile after mile. So take a few minutes to install it correctly, test it out, and enjoy the convenience of modern tolling in your Tesla Model Y.
Frequently Asked Questions
Can I mount my E-ZPass on the side of the windshield in a Tesla Model Y?
While possible, side mounting is less reliable than the center-top position. Toll readers are optimized for centered transponders, so side mounting may result in missed detections, especially in high-speed lanes.
Will window tint affect my E-ZPass signal in a Tesla Model Y?
Yes, metallic or metalized window tint can block RFID signals. Use non-metallic tint or ensure your E-ZPass is mounted outside the tinted area, typically below the top 6 inches of the windshield.
Can I use a phone mount and E-ZPass at the same time?
Yes, but keep them at least 6–8 inches apart. Mount the E-ZPass high and center, and place the phone mount lower or to the side to avoid signal interference.
What if my E-ZPass isn’t being detected after installation?
First, check the mounting location—ensure it’s in clear glass, away from sensors and tint. Test it at a known working toll lane. If issues persist, contact your E-ZPass provider to verify the device is active and functioning.
Is it safe to mount the E-ZPass over the Autopilot camera?
No, never mount anything over the Autopilot cameras. This can block the camera’s view and interfere with safety features. Always keep the E-ZPass below or to the side of the camera housing.
Can I use a magnetic mount for my E-ZPass in a Tesla?
Avoid magnetic mounts, as they often contain metal that can block signals. Use the adhesive mount provided with your transponder or a non-metallic third-party holder designed for RFID devices.

At CarLegit, we believe information should be clear, factual, and genuinely helpful. That’s why every guide, review, and update on our website is created with care, research, and a strong focus on user experience.